Advanced panel-like formatting

Hey together,

so I’ve started recently working with LibreOffice and already get a bit into working with sections. However, I would like to achieve the following behavior and I’m not quite sure how to achieve it:

  • Have “Panels” defined in a central
    place - usually a separate document
    or even gallery entries of some sort.
  • Basically, each panel has a general
    structure of a table with 2 columns.
  • The left column is reserved for the
    symbol. This is different for each
    panel type.
  • The symbol should be
    defined in the external section and
    only there. When it’s changed, this
    should be reflected to all the used
    references.
  • However, the right column should
    be freetext.
  • I’m thinking of it more in a
    matter of “instructional text”,
    such as “Insert your content
    here”.

I got the sections working in general, however, it’s always synced completely. Essentially I want only a part of the section to be synced. Is this possible or are there other alternative approaches?

EDIT: To clarify look at the following image coming from an AsciiDoctor-PDF-export.
Panel example with AsciiDoctor

There I can insert different panels with an icon on the left side (no text per default) and free text on the right. Should I want to change the icon for all “Notes” for example, I can do it in one place and the change is distributed to all used references.
My issue now is that even if I define the section and reference it somewhere else, my changes to the right text will get overriden as soon as I’m syncing it. So, essentially I want to prevent LibreOffice from syncing the text in the section Definition.

Your edit shows your need is similar to one of mine. See this question for a complete discussion about the issue.

Accept the answer, this will give you points to upvote and do other funny things on this site.

Well, your linked question almost resolves my question.
I accepted the one from you below for now.
However, I will look into providing some sort of alternative that just needs some fine-tuning (but builds up on your question) as an answer here in a bit.

I added a solution that fits my personal requirements as an answer below.

As stated before, I’m going to state the way I fixed my issue in my personal case. First it should be said, that the comment by @ajlittoz pointed me in the right direction (actually not the answer but that was likely a misunderstanding in the question). However, I still wanted to achieve something slightly different:

  • I don’t want to place the image in the sidebar. It should just be indented relative to the general text body.
  • I want a separation line placed between the image and the description text. This line should automatically adjust to the length of the corresponding paragraph.
  • The image/icon on the left side should be aligned in one line with the top of the paragraph.

How I achieved that

###Basic principle###

We’re starting with two paragraphs where we want to insert a panel for each of them. The starting point:
image description

  1. Apply the paragraph-style “Marginalia” to the first paragraph.
  2. Go to the style gallery, select the Frame category and right-click on the Marginalia-style. Then select New.`
  3. In the opening window check the following settings
    • Organizer
      • Name: Obviously free, but should be something meaningful (I’ve chosen “Note” or “Warning” for example as it will resemble the panel type).
      • Activate AutoUpdate (recommended at least, if you want to see quick results and prevent forgetting to reassign the style).
      • Inherit from: Marginalia
    • Type
      • Size: Both Width and Height should be the same. I’ve chosen 1,00 cm for both. Also remove the AutoSize checkbox.
      • Position: Obviously depends on the individual case. For now, it suffices to check that Left Paragraph border is selected for the horizontal orientation and Paragraph text area for vertical orientation.
    • Area
      1. Click on Bitmap.
      2. In the left area click on Add / Import and browse for the desired image.
      3. After selecting the image, check Options > Style in the window and set it to Stretched.
      4. Confirm the frame style creation and exit the window with Ok.
  4. Place the cursor in the first paragraph, then use Insert > Frame > Frame.
  5. In the opening window change the following options (and not more for now).
    • Anchor: Must be set to To paragraph.
  6. After checking (cursor still in the same paragraph) go the Style menu and choose our recently created frame style.
  7. Check your current status. It should look similar to this:

image description

###Improve formatting###

Of course, the formatting above doesn’t look good, so we’re going to fix that now.

  1. Go to the style gallery, Paragraph styles, right click on Marginalia and then New.
  2. In the opening window check the following settings
    • Organizer
      • Name: Again, doesn’t really matter much, but should be meaningful. Likely this paragraph style can or will be the same for all used panel types.
      • Activate AutoUpdate (again, recommended)
      • Next style: Also not really important, but usually it’s assumed this should be set to your general text body style.
      • Inherit from: Marginalia
    • Indents & Spacing
      • Indent: Of course depends on your personal preference but for my case Before text is far too high. Changed it to 1,50 cm.
  3. Confirm your changes and close the window.
  4. Check your current status again. It should look similar to this:

image description

###Fine-tune formatting###

Although it get’s better, I’m not quite finished yet.

  1. Edit the customized paragraph style (that’s inheriting from Marginalia) and change the following settings
    • Borders
      • Line Arrangement: User defined, I’m using only the left border.
      • Line: Depending on your own preference. I’ve chosen a solid line with a more subtle gray (Gray 3 for example).
      • Spacing to Contents: Again, depends on your preference. However, you should remove the Synchronize-checkbox and then define the spacing. I’ve chosen 0,20 cm for left only (as that’s my only border).
      • Deactivate the Merge with next paragraph-checkbox as consecutive panels will have a joined border line otherwise (although excessive use of such panels is questionable aside from operating instructions, but that’s a different point).
  2. Apply your changes and close the window. You should now see a border line appearing left to your description.
  3. Now edit the customized frame style (that’s inheriting again from the Marginalia frame style) and change the following settings
    • Type
      • Position: Horizontal alignment with Right and Left paragraph border.
    • Wrap
      • Settings: Should be set to Parallel.
      • Spacing: Depending on the paragraph style. Ideally, should follow the formula “2 times the content spacing to the border on the opposing side”. In my case this means “2*0,2cm=0,4cm”.
  4. Confirm your changes and close the window.
  5. Again, check your status now. You should see both the image and the description are aligned properly with a border line between them.

image description

###Check maintainability###

As a last step we should get sure that we can make good use of our new style definitions and an image change is reflected to all occurrences.

Reapply the panel

  1. Apply the custom paragraph style for our panel to the second paragraph.
  2. Copy the frame from the first paragraph.
  3. Paste the frame from the first paragraph while the cursor is in the second paragraph.
    • Alternatively, insert a new frame and apply the custom frame style for the desired panel type.
  4. You should find that with either way, the second paragraph is styled in the same way as the first one.

image description

Exchange the icon

  1. Open your custom frame style for editing.
  2. Choose another image as desired.
  3. Before applying your changes, check that the image style is still set to Stretched.
  4. You should now find out (if AutoUpdate is applied to your style at least), that the icons for all occurrences of the corresponding panel are exchanged accordingly.

image description


Of course, there might still be something to improve upon, but for the moment I’m satisfied with the given solution.

1 Like

Excellent! And it gives me lead for one of my pending problems.

Your icons are much nicer than mine. Where did you find them? Are they copyright-free?

Sections, in LibO parlance, are parts of text flow for which you can define properties different from the default flow. They are usually set up for differing number of columns, margins, background colour, … They can be inserted in pages, tables, frames or even sections and make up an independent independent flow area. “Independent” here means that text cannot cross the frontier between the outside area and the internal section area.

Within a section, text flows smoothly from one column to the next. There is an option to request that text is spread evenly between columns instead of filling up the first up to the “natural” frontier (end of page, table or frame) before spilling over to the next one.

This said, your request does not fit well in columns philosophy. If your goal is to study sections, you have two options:

  • Use column breaks

Type your “instruction” or title in the first column, then insert a column break to be able to write text in the second column. When at end of this text, insert a column break to revert to first column.

This is not very convenient because you must manually insert the breaks at the right location. If your textual column contains several paragraph, the break is inserted only after the last one (could be replaced by an automatic column break insertion in paragraph styles: one for the “title” with break after, one for standard text without, one for last text paragraph with break after). However, if you change your mind and add a third column, the schema fails.

  • Use one section per item

Start a new section for every item. Each section is independent from the others. You only need now a column break between the first and the second columns. You can add columns (but every section on its own) without messing distribution of contents between columns.

This is not very convenient either, because you have a lot of manual work without real added-value and you can’t control globally your document aspect: any change to column width must be repeated in each section.

Your main problem is synchronising the “title” and “text” columns. Once again, you have two options depending on the amount of text in “title” and your skill.

  • The easiest way: a table

Insert a table with 2 columns. The first one will be dedicated to “title” and the second to text. Tables may extend past a page, so there is no problem with text flow. When you want to open a new item, just insert a new row.

There are a few advantages to using a table. You can format borders in a variety of ways. If you need a title above your columns, this title may be repeated at the beginning of every page. The inconvenient is to use a table which may impose a performance penalty under some circumstances and make the file less compatible with other document processors (such as M$ Word) when exported to non-ODF formats

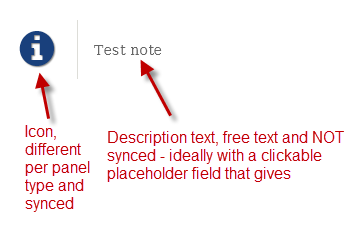
  • The “complex” way: side note

This solution is better suited to “short” contents in “title” (= you don’t need dozens of lines). Prepare your page to have a wide left margin (or right if you prefer it there; you may alternatively choose the outer margin). Your text is typed as usual. When you need to have a “title” aside some paragraph of your text, insert a frame linked *To Paragraph" and set its properties so that it fits inside the wide margin (there are options to wrap text around, but the result will not be pleasant). The “title” is typed inside this frame. I recommend using paragraph style Marginalia you can customise to highlight the “title” independently from the text.

The frame always follows the paragraph to which it is linked, whatever the changes above in the document. You have a lot of versatility in the frame position (but this requires some skills because there are many traps). For instance, the “title” may be located in the outer margins alternating between left and right and even and odd pages.

However, I am not sure to have fully understood the question. There something about “central place” or “gallery of some sort” I don’t grasp. This may hint to the notion of template. Don’t hesitate to edit your question (do not answer if you add elements or comments and are not giving an answer.

If this answer helped you, please accept it by clicking the check mark :heavy_check_mark: to the left and, karma permitting, upvote it. If this resolves your problem, close the question, that will help other people with the same question.

1 Like

That’s quite a nice answer and I would upvote it if I code.
Your last alternative sounds nice and generally something I will look into.
However, I also edited my answer and posted an example, so maybe it gets a bit more clear.

Note: Your mention of templates does somehow fit it, but I’m looking for some sort of “block template” then. In Markdown languages they’re referred to as “Macros”, but obviously that’s not the case here.