Calc: Vertical split of page for better printing of a tall table

I have a table in LibreOffice Calc which consists of only 3 columns, but hundreds of rows.
Standard printing results in many pages, where only the left half of a page is filled.
I would like to split the page vertically into two “logical pages” such that also the right half gets filled and therefore only half the number of pages is needed for printing.

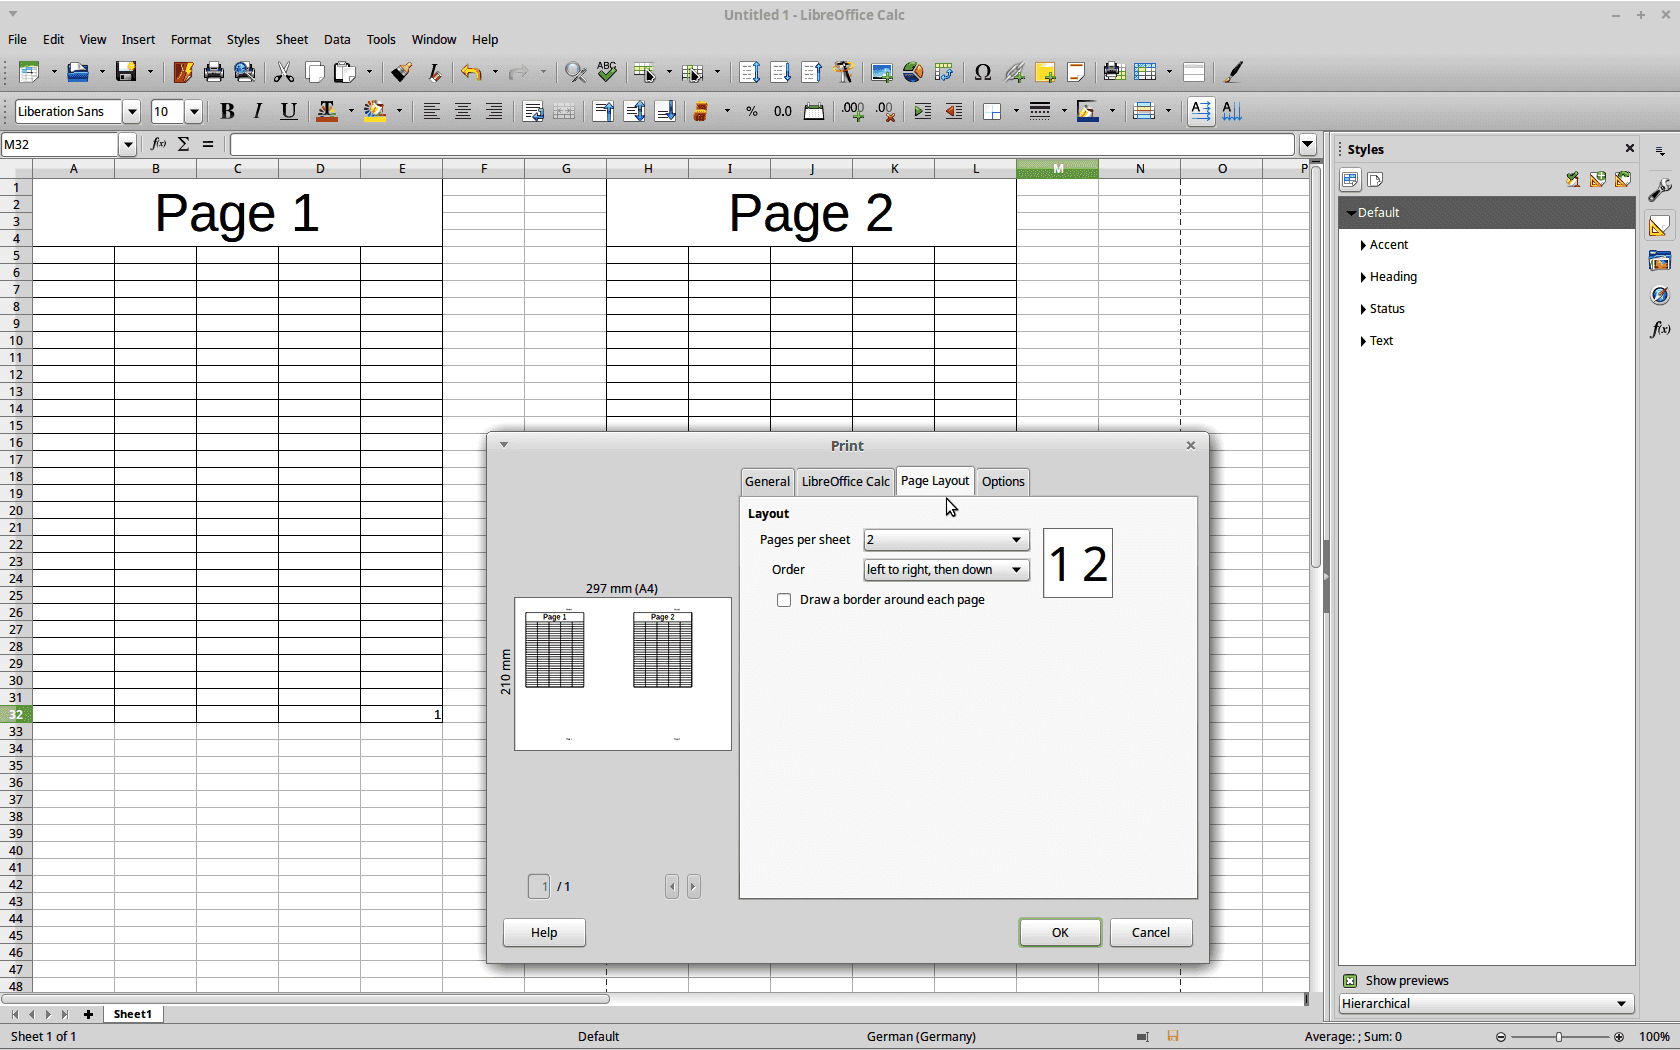
In Libreoffice Calc, the split of the page can be done at Format → Page → Columns. However, in LibreOffice Calc, there is no such option at Format → Page. Is there still a way to do it in LibreOffice Calc? How?


EDIT: Maybe the following helps to show what I want.

Currently the table is printed like this:

----------- page 1 -----------
A1   B1   C1
A2   B2   C2
A3   B3   C3
...  ...  ...
A30  B30  C30
------------------------------

----------- page 2 -----------
A31  B31  C31
A32  B32  C32
A33  B33  C33
...  ...  ...
A60  B60  C60
------------------------------

...

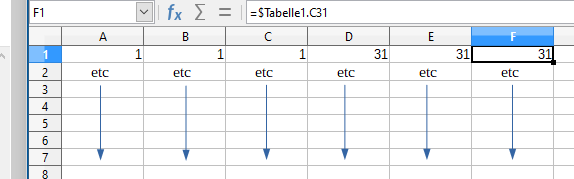
The right half of the pages is blank and therefore wasted. I want it to be printed like this:

----------- page 1 -----------
A1   B1   C1     A31  B31  C31
A2   B2   C2     A32  B32  C32
A3   B3   C3     A33  B33  C33
...  ...  ...    ...  ...  ...
A30  B30  C30    A60  B60  C60
------------------------------

...

Note that this goes on for many many pages, so applying something manually to every single page is not an option.

EDIT 2: Another try to make clear what I want. The following (old school) way would provide a solution, though a bit tedious and crude:

Take scissors, cut page 2 vertically in two equal parts (the right one will be blank), and glue the left parte over the blank right side of page 1. Similarly, glue the left half of page 4 over the right half of part 3. Glue the left half of page 6 over the right half of part 5…

Look at this description to see if it will help you.

EDIT_1_20190227-08:30 MEZ

Yes, but these are the basics. Set the print range $A$1:$C$30 and then add $A$31:$C$ 60,

($A$1:$C$30; $A$31: $C$60).

As @Grantler writes, select 2 pages per sheet in the print menu. In the “Options” tab, check “Use only the paper size of the printer settings”.

===========

Another possibility is to collect the data in a new sheet. For example,

“= $ Sheet1.A1”, “= $ Sheet1.B1”, “= $ Sheet1.C1”, “= $ Sheet1.A31”, “= $ Sheet1.B31”, “= $ Sheet1.C31” (etc. )

image description

Thank you. I read that description several times now, but I don’t see how it answers my question. Could you please give a pointer which part you are refering to?

Thank you for the update. 1. The suggestion of Grantler does not solve my problem, see the comment I left there. 2. I don’t think that print ranges can solve my problem. As I understand, print ranges select the cells whose entries should be printed. However there is nothing special abou this: I want all the non-empty cells to be printed (the default). However not in the normal way, but in a 2-column page style to better fill the pages. 3. You suggested to collect the data into a new sheet. Yes, that would solve the problem. But it is not very practical, as I have many pages, and the rearrangement would require me to organize this for every single page.

Yes, but I also wrote you how it works. What don’t you like about it?

Why du you think: “I don’t think that print ranges can solve my problem.”

If you suggest a solution that works, I tested it, you could expect the questioner to try it.

And goodbye.

Guess what, I actually had tried your suggestion with the print ranges. But either I didn’t understand what you mean, or it doesn’t produce the output I wanted. This is what I did: Select page range A1:C30. Add page range A31:C60. Open print dialog. I’m only presented the first range on page 1 and the second range on page 2. Then set “page layout → Pages per sheet” to 2 and tick “options → Use only paper size from printer preferences”. Print.

Why don’t I like the result:
(1) I got all the data on a single page (so far so good), but with tiny font and a lot of white area. However, I want the letters in full size, not scaled down. I’ve added an “EDIT 2” to my question in the hope that it makes clear what I expect the printed pages to look like (quite a natural thing in my opinion).
(2) Moreover, my real table does not have 60 lines, but more like 60.000. Manually capturing blocks of 30 lines block by block is not an option.

Is Hide Columns an option for you?

You start on A1-A3 and continue from A31-A33, that means that some space in between could be blinded out…

Use the print out dialog and set 2 pages into 1 (screenshot).

Also check menu View > Page Break

Thank you, but this is not what I want. The result would be that the font size is scaled down and still, a good part of the printed pages is blank. What I want is that the second page is printed full-size in the blank right half of the first page.

Just define proper print areas, page size (e.g., A4) and sheet scaling (“print to 1 page wide”), and you won’t have those scaling and whitespace issues. You’d also need to choose “Use only page sizes from printer settings”, and choose proper actual page size (I tested with A4 Landscape).