Some borders in Libre Writer table are grey instead of black and don't show up at all when printed

Any ideas? This has happened several times before when splitting cells. The new lines are light grey and don’t print. Can’t use it as is and don’t want to start all over.


edited with more detail-

I added the lines not Writer. I have a table that has black borders. But at some point when editing it and splitting cells, sometimes those new lines created from splitting a cell aren’t black (grey/“invisible” instead) even though I haven’t changed or removed any thickness or anything.

For example in the image is part of the table. You see it has a black outline, but some of the lines are in a grey color. If printed that grey color is not seen so there’s no line at all there. When splitting cells that only happens rarely, but once it does I can’t figure out any way to make the line seen, thus the project is unusable.

image description

In what file format do you save your file?

Writer shows the limits and structure of tables with “shadow lines”. These light gray lines are only reminders for a “non-paragraph” objects. Since the lines do not result from a user action, they don’t print (Writer don’t add contents on its own).

If you want borders around cells and table, you must explicitly set them. Select the set of cells to decorate (*) and Table>Table Properties, Borders tab.

(*) If the cursor is simply positioned inside the table, borders will be set for the whole table. If some cells are fully selected (highlighted), borders will be set only for this set.

If you don’t like the “shadow lines”, uncheck View>Table Boundaries (Table>Table Boundaries in older versions), but this is not a good idea.

To show the community your question has been answered, click the ✓ next to the correct answer, and “upvote” by clicking on the ^ arrow of any helpful answers. These are the mechanisms for communicating the quality of the Q&A on this site. Thanks!

Note: you should have tagged your question Writer, not common because it doesn’t apply to Calc, Impress or Draw.

EDIT

You’re facing the “partial formatting” problem.

With the cursor simply in a single cell, the Borders tab will affect the whole table.

If you want to consider only the split cells (with their gray separating border), select the cells (cell background will to highlighting colour, i.e. full cell area, not just lines of text). Then Borders tab in Table>Table Properties will be effective only on this area. Note that the lines in the border template are tri-state: none (nothing drawn), black (all lines set as per parameters) and gray (corresponding lines have different settings - if you click more, you’ll force them to a common definition).

I added the lines not Writer. I have a table that has black borders. But at some point when editing it and splitting cells, sometimes those new lines created from splitting a cell aren’t black (grey/“invisible” instead) even though I haven’t changed or removed any thickness or anything.

For example in the image is part of the table. You see it has a black outline, but some of the lines are in a grey color. If printed that grey color is not seen so there’s no line at all there. When splitting cells that only happens rarely, but once it does I can’t figure out any way to make the line seen, thus the project is unusable.

link text

Regarding the tag, it was the only one I tried that would work. It took me half an hour to get registered and for it then to allow me to log in and that was then the only tag that wouldn’t give me an error.

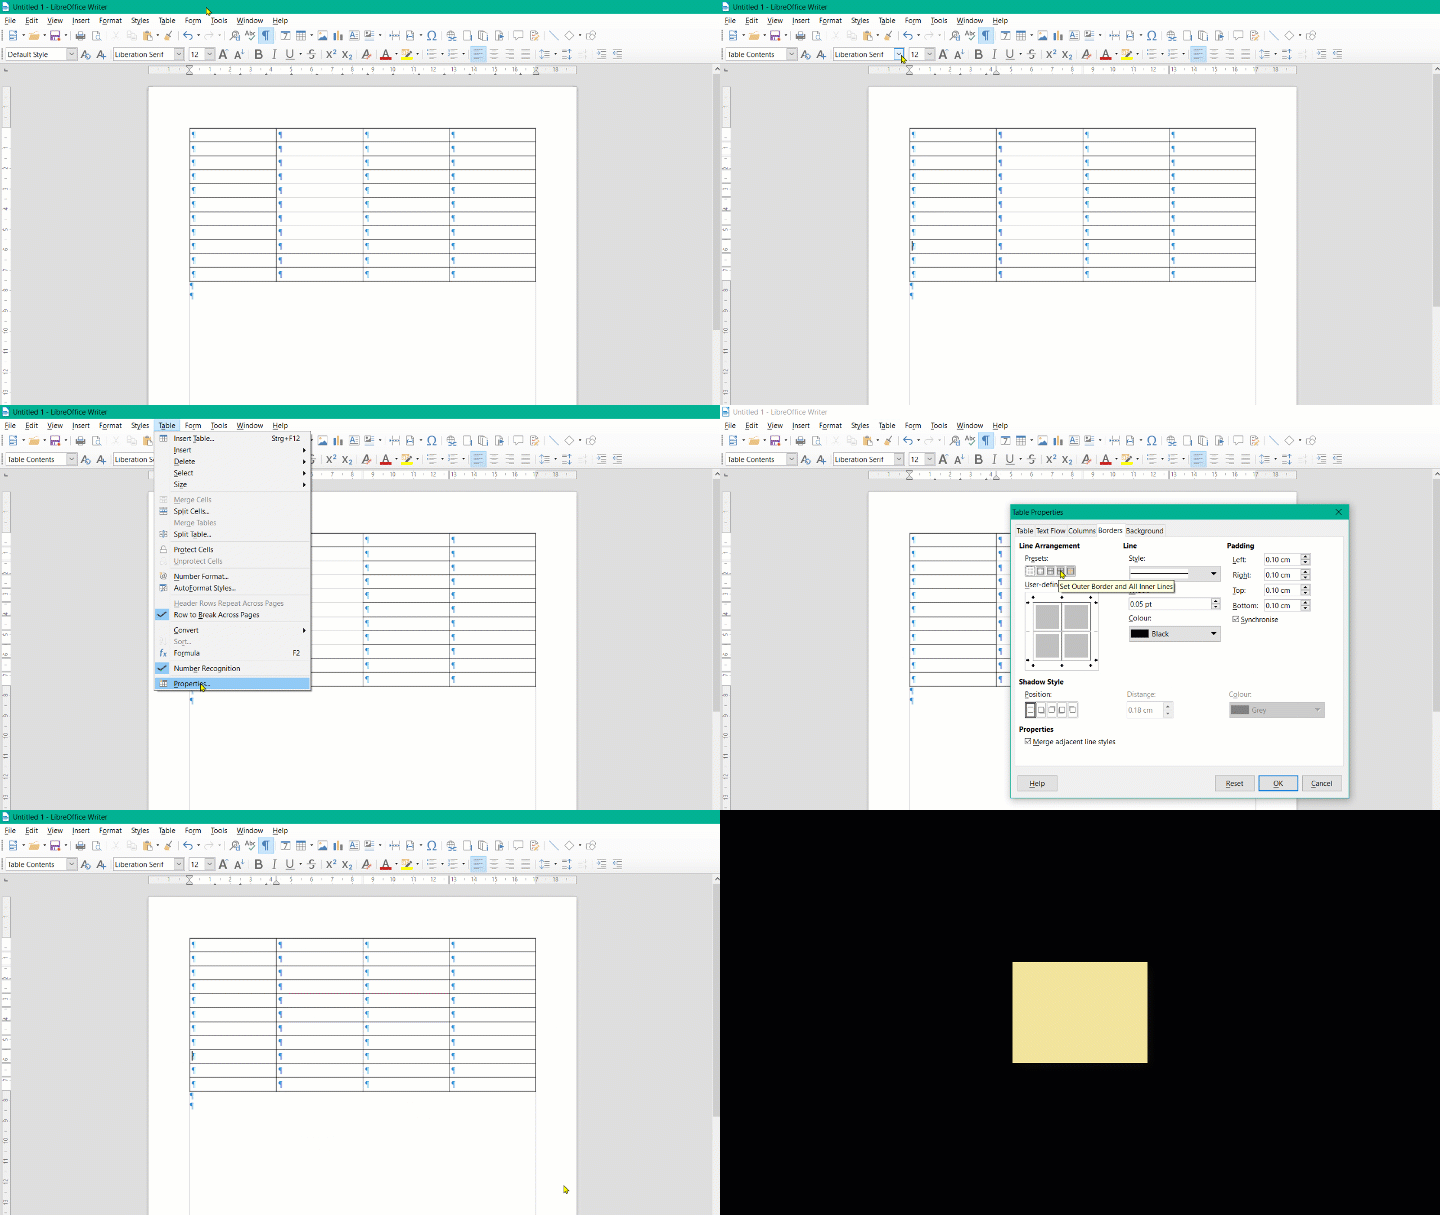
In addition to @ajlittoz here is a visuell representation. It is actually quite simple. @ajlittoz has already written you everything:

  1. Click in the table
  2. Select Table>Properties from the menu
  3. In the “Table Properties” dialog box, click the “Set Outer Border and all Inner Lines” icon.
  4. Click OK.

Now your entire spreadsheet should have visible lines. Finished!

image description

You just have to do it. I wish you success!

Thanks, I did manage to find that little little button and it took care of it.

Then click on the gray checkmark left of the relevant answer (it will tuen green – not immediately) to show the question answered.