
How are outlines created in Writer, and how are they edited? (They don’t appear under Styles like numbering does.)
1 Like
If I am reading you right …
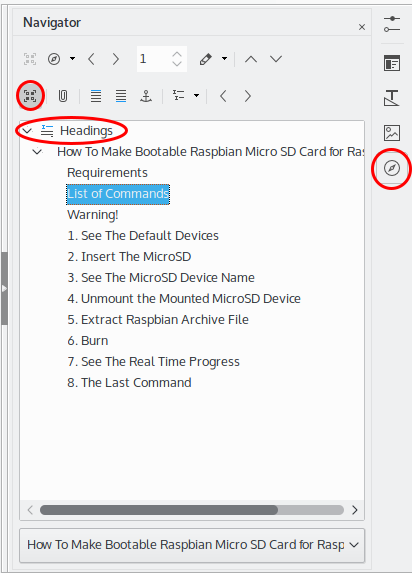
Writer does not have the outline view “inline”, with chapters/subchapters collapsible within the text edit pane, like what you have in some other wordprocessing apps. Instead you have the navigator on the side for this. Press function key F5 to toggle the floating navigator, or click the compass icon on the sidebar.
The outline you see in the navigator is based on the use of Heading x paragraph styles(*). Every Heading 1 paragraph inserted will create a new main branch in the Headings category of the navigator. Higher numbered Heading ... styles will spawn sublevels of branching.
All editing is done in the main, document editing pane.
If you want to use a lead paragraph (ingress), you can have that inserted into the navigator structure too. It may look a little messy, but it works. Just use Heading 10 (or any heading style with a level above the highest you are going to use), and edit that style to give an apearance like the text body (or slightly emphasized - like italic, shadow, indent - if you want the leads to stand out).
(*) - What really governs the creation of this outline is the “outline level” selected for the paragraph in Format - Paragraph, tab Outline/numbering. This is automatically set when you use the Heading styles. It is possible to set outline level for a paragraph independently of styles, but this is rarely a good idea. Instead, adjust the format by modifying heading styles so they suit your preferences.
1 Like
That makes no sense to me. Your response has to do with chapters, and I am interested in paragraphs. Further, as I understand it, one must use Bullets and Numbering to get an outline.
1 Like
My response was based on the assumption that you were looking for an “outline view” for an entire document.
A different kind of outline can be achieved by using a multilevel list which you have already mentioned, at least by context. Is that what you are looking for?
The simple way to start that is by the numbered list or bulleted list tools. To adjust outline level of each paragraph, press tab or shift+tab when the cursor is at the beginning of the paragraph.
The appearance of the entire outline can be adjusted by that Bullets/numbering dialog you mentioned.
Thanks for the clarification. I think I understand now. I guess I need to use a windows app to get that fundamental feature as a basic component of a word processor rather than an adaptation of a numbered list. Thanks again.
I agree. One of the truly great things about MS Word is that you can draft a document outline first using its outline view, then write the paragraphs. This is even more useful when multiple people are drafting different parts of the same document.
WordPerfect is even better. It is awesome. It is the word processing and desktop publishing standard still.
I will try to explain hat the OP was asking for (I came for the same):
A widely used way to create a structured document is to create an outline first: First the parent nodes, then adding the child nodes and eventual child-of-child nodes… and once you have the outline populate the necessary entries.
This is also known as "Workflow" or "Tree Diagram". Examples are WorkFlowy (online) or TreeLine (open source Python based).
A way of ding that would of course be to work with the headers starting with H1 first , adding the H2 later, but in the Outline mode of MS Word or tools such as TreeView this is done for you so that you can concentrate on the work and you would first craete alist of entries that are already formatted as H1, clicking on these , if you and an entry it will automatically be formatted as H2... and so on.
My approach for working with Libreoffice is to use an external tool, export it to ODF and edit the text there as a last step.
This approach, of course, has it's drawbacks in case you need to change the structure. But it is for now the only way to do it.
Note: This approach is also used in university scriptures were an outline of the text will be asked first. And it is a very important tool for technical writers. I think it would be a very valuable addition to Libreoffice, specially now that MS does not include the Outline Mode feature in Office 365 online (you need the desktop version).
Summary
This text will be hidden
Please implement an outline editing view in Writer, with similar functionality to MS Word’s Outline view, but make it more user-friendly.
Most important is being able to use tab and back-tab to change the outline level as one types, and automatic assignment of heading styles to corresponding outline levels.
Tab and Shift+Tab already allow level change when outline items as styled Heading n.
Note also that feature requests should be channelled through https://bugs.documentfoundation.org/.
Recent changes have improved the situation. LibreOffice Impress has an outline view. When utilizing LibreOffice Writer, you can use the Navigator to go to the section that you want:
In order to make the outline of a document:
-
You can start by typing your first outline paragraph, style it as a “Heading 1” (or press ctrl+1 if you don’t want to leave the keyboard).
-
When you hit Enter, the next paragraph reverts to Text Body, which is not what you expect when creating your outline. Pres ctrl+1 to style this new paragraph at level 1.
-
You can use ctrl+N (N can be 1, 2, 3, 4, 5…) to set the outline level of your paragraph. Technically, that assigns a style “Heading N” to the item.
-
Pressing Tab and Shift+Tab allow level changes when outline items are styled as “Heading N”.
-
Note: The previous list was adapted from what ajlittoz wrote.
To quickly scroll to an outline item for further edit: double-click on its entry in the Navigator.
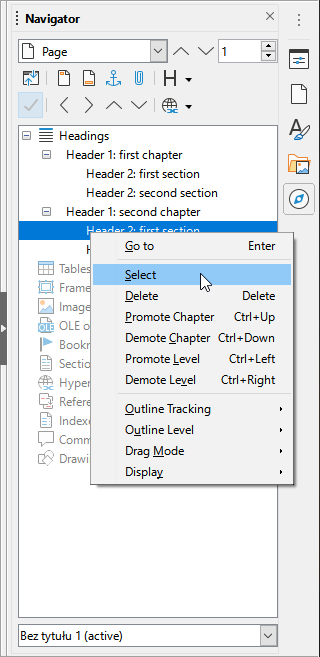
Related features were added to Navigator in Writer 7.0:
- Heading objects in Navigator have own context menu items like Go To or Delete.
- Headings in Navigator have Promote/Demote level and Promote/Demote chapter context menu items.
- An Outline tracking for Headings was added for Navigator. It can be in three states: Default, Focus, Off. “Try clicking with your mouse in several places in your big text document with many headings. You’ll see that Headings in Navigator will be selected automatically according to text cursor position.”
- This is a Screenshot of Navigator showing some new features:
In Writer 7.1, a new outline folding mode was added:
-
[…] “you’ll see a button with an arrow near any selected heading in your document. Click on it to fold all text from the current heading to next heading. Right click on it to fold all text from current heading to next the same level heading with all its subheadings”.
-
There’s a video about it.
-
The official help can be seen.

Since @enricm refreshed this question, I’ll provide a procedure. It is almost as easy as in M$ Word. It only takes one extra keystroke for each outline paragraph.
As already mentioned by @keme, the outline is shown in the Navigator pane, Headings category. The editing window cannot be collapsed; it shows the complete document. Therefore you must have both views to play with your outline.
-
Start by typing your first outline paragraph styled as a Heading 1 or
Ctrl+1if you don’t want to leave the keyboard. -
When you hit
Enter, the next paragraph reverts to Text Body, which is not what you expect when creating your outline. PresCtrl+1to style this new paragraph at level 1.
You can use Ctrl + n (n = 1 to 5) to set the outline level of your paragraph. Technically this assigns style Heading n to the item.
To quickly scroll to an outline item for further edit, double-click on its entry in the Navigator. Add new entries as described above.
1 Like
The most convenient way to create and edit titles (called “headings”) is to have your navigation pane docked to the left of your document, and the sidebar settings docked to your right of your document, with your sidebar set on “Styles-paragraph style”. So you can either jump from one title to another (with the navigator to the left) or select a style with the navigation pane (to the right).
If you wish to type directly all your titles, first select on the sidebar settings on your right “heading 1”, type your title. Then, put the cursor right after the number of your title, type “Enter”, that will create a second “heading 1”. You can go on like this, type 2nd title, go right after the number of your title, for example right after " 2) " , and type “Enter”, and so on.
Another option is to set your paragraph style “Heading 1”, tab “Organizer”, and then select “Heading 1” as the “Next style”. As you can imagine, each time you type a title 1 and press the “Enter” key, you will have as a next style your heading 1. So basically it acts like Word’s outline mode. You can change as often as you wish the settings in “Heading 1”, it is quick as you simply need to select it on your settings pane, right-click on your “Heading 1” and select “Edit”, and you can change your settings in a couple of clicks.
Libre Office and Word each have their pros and cons, Word seems more user friendly, but at the end of the day, because it lacks logic and became so messy those last few years, Writer wins the game IMHO.
Have a nice editing with your titles !
There is an even easier way which avoids all the stance about the assignment of a heading level.
- Type your heading in any paragraph style which happens to be current (in other word: don’t care for the current paragraph style).
- Before hitting Enter, press Ctrl+1 (or Ctrl+2, Ctrl+3, Ctrl+4) to apply Heading 1 to 4
It works because these keyboard shortcuts are associated by default to the first 4 heading levels.
Higher levels are not assigned default shortcuts, but needing them is quite rare in common documents. You can anyway create these shortcuts if in dire need.
And WordPerfect is the standard.