[UPDATED] Yes, this is possible, but the approach used depends on the origins of the RTF file, since difference software will leave you with different markup (so it seems). Sunny’s document is best treated with #2, below, “CTRL-H and Regex”. Obviously, all testing should be done in a copy of the file, so you have your original, coloured version still available!
1. Using AltSearch extension
You need to download and install the very useful Alternative dialog Find & Replace (AltSearch) extension for Writer and install it. You’ll get this garish green icon on your toolbar, but it’s worth it: 
Then follow these steps:
(1) Position your cursor within the colour block you want to modify.
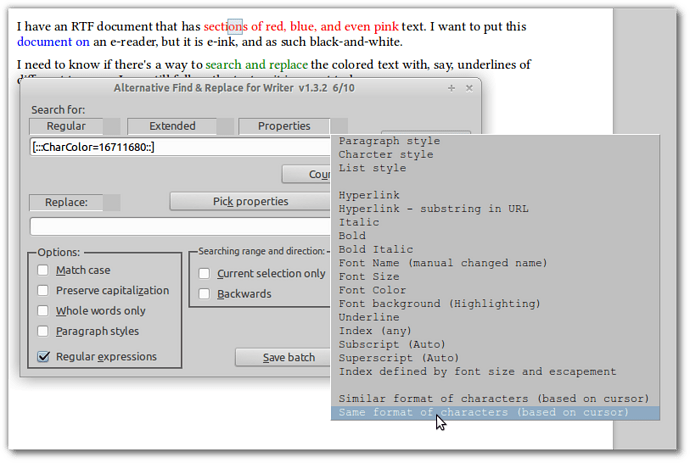
(2) Click the “AltSearch” icon, and select the “Properties” drop down, then the last option listed: “Same format of characters (based on cursor)”. It should look like this:
(3) When you click on that option, you’ll see the “search” field populated as shown in the screen shot: that’s the color of your text at cursor. Now click the Find All button (hidden in the screen shot), then Close the AltSearch dialog. All text in that colour is now “selected”.
(4) Now use the Format > Character... > Font Effects > [Underlining] to choose your underlining of choice for this colour. Click OK.
(5) Repeat process for each colour.
When you’re finished, use CTRL-A to select ALL, and set the Font Colour to “Automatic” from the drop-down on the toolbar.
That’s you done. You should end up with all your text in black, but with the various bits of text that were originally colours now in various styles of underlining.
2. CTRL-H and Regex
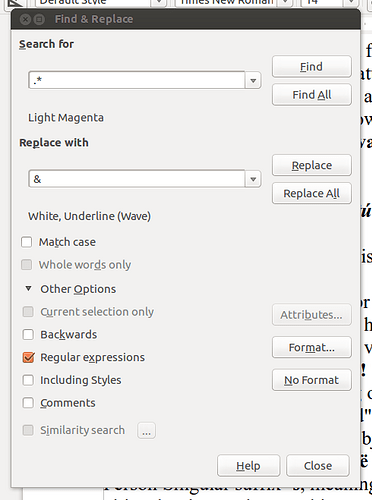
You can also use the “native” search-replace function. First, use CTRL-H to bring up the “Find & Replace” dialog. Click the “Other Options” drop-down, if it isn’t already open, and check the “Regular expressions” box:
(1) In the “Search for” field, put .* (that is, “dot” followed immediately by “asterisk”). Then click on the Format... button, and choose the “Font Effects” tab. Select the colour desired (Sunny’s document uses “Light red”, “Light blue”, and “Light magenta”).
(2) In the “Replace with” field, put & (ampersand) which means = “the text found in my search”. Again choose the Format... button, but now choose “Automatic” for the font colour, and choose the “Underlining” style of choice for this colour.
(3) Hit Replace All, and you should have the coloured text chosen replaced with black text and its distinctive underlining.
(4) Repeat for each colour needing to be changed.
~ ~ ~ ~ ~ ~ ~ ~ ~ ~
It’s not as tricky as it might sound, and once you’ve done it a couple times, will go very quickly, I think. This works for me with LibO Writer 4.1.4.2, and I’m on Linux Mint 13 LTS (Xfce) at the moment. Hope that helps!


