It would be easier if you split your problems into 3 separate questions because the answer is quite voluminous.
##Problem #1
I hope you’re familiar with styles.
Your part is styled Heading 1 and chapter Heading 2. I created a specific Appendix1 style for level 1 in the appendices so that I could change from Roman to alphabetical numbering.
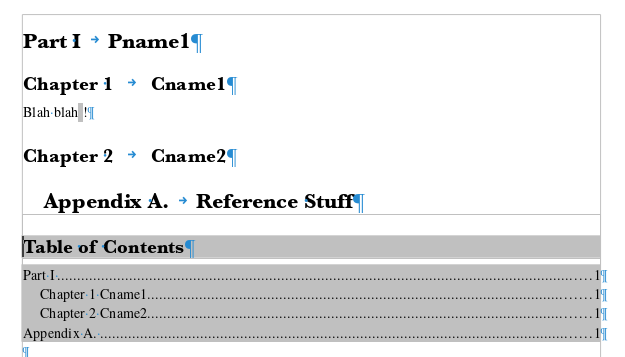
Your specification is a bit self contradicting. Taking all your constraints, here is the result (I intentionally used a Serif font for the heading instead of my usual Sans font to clearly show the differences between Roman and traditional numbering):

As this is a proof-of-concept, I didn’t take time to tune the styles.
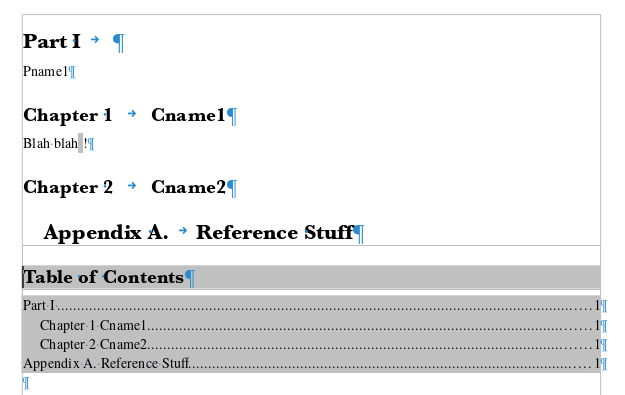
As you can see, your requirement for not showing part name causes the appendix name to not be reported in the TOC. This can be settled if you accept to write your part name in an independent line as in:

Create a paragraph style for the partname which will look the same has Heading 1 but not attached to outline level 1 (see Outline & Numbering tab of paragraph style configuration). Tune the spacings and alignment so that visually you can’t tell the part and its name are different things albeit on different lines.
Important! In order to fool the TOC engine, you must not have an empty part name, i.e. you can’t have a Heading 1 paragraph reduced to its number. Enter at least a space for the name. This is not visible on the screen shot, but Part I is followed by a space (after the automatically added tab).
What are the tricks?
Appendix1 is a paragraph style you’ll tune to have the same properties as Heading 1 except in Outline & Numbering. There you’ll attach it to Outline level Level 1 (the same as Heading 1) and you’ll assign a Numbering style to get auto numbering. I chose built-in Numbering ABC assuming it is not used anywhere else in the document. If you use it, just create a custom list style to define your numbering.
To avoid manually entering words “Part”, Chapter", I customised Tools>Chapter Numbering to add these words as Separator Before in the appropriate levels. I did the same for “Appendix” in the Numbering ABC list style.
##Problem #2
The “bottom of the page” is an area called the footer. By default, there is no footer in page styles. They must be enabled in the Footer tab of the configuration dialog. This creates a variable height area for static text on all pages controlled by this style. By “static”, I mean its definition will not change across pages, though its content may be dynamic.
The difficulty with your specification is Part I | CName1 targets two heading levels while Appendix A | Reference Stuff targets a single level. The footer then contains different items. You can’t do with the same page style. You must define one page style for your parts (e.g. Default Style) and another one for the appendices (e.g. Appendix). This Appendix will have the same properties as Default Style as far as the style configuration is concerned.
-
Appendix
-
click in the footer area
-
Insert>Field>More Fields, Document tab
-
Type Chapter, Format Chapter number and name, Level 1
Note that the level is the same as the one assigned to my Appendix1 paragraph style.
-
Parts
-
click in the footer area
-
Insert>Field>More Fields, Document tab
-
Type Chapter, Format Chapter number, Level 1
-
type a space or other text to separate the next field
-
Insert>Field>More Fields, Document tab
-
Type Chapter, Format Chapter number, Level 2`
This second level corresponds to Heading 2 chosen for the chapter headings
CAUTION! In case there is not yet a Heading 2 when the footer is met (this could be the case if the part heading is on a page of its own), instead of returning an empty result, Writer retrieves level 1 data. This means you get twice level 1 information. If you have your part headings alone on a page, lay them out with a dedicated page style with no footer or a footer without the fields.
Also the fact you chose non consecutive levels in your approach may cause problems or inconsistencies.
Format your footer as you like. Built-in Footer paragraph style is rather handy: it has predefined tab stops allowing for three bits of information. The first one flushed at left (tab), the second one is centered (tab), the last one is flushed at right.
To show the community your question has been answered, click the ✓ next to the correct answer, and “upvote” by clicking on the ^ arrow of any helpful answers. These are the mechanisms for communicating the quality of the Q&A on this site. Thanks!
In case you need clarification, edit your question (not an answer which is reserved for solutions) or comment the relevant answer.


