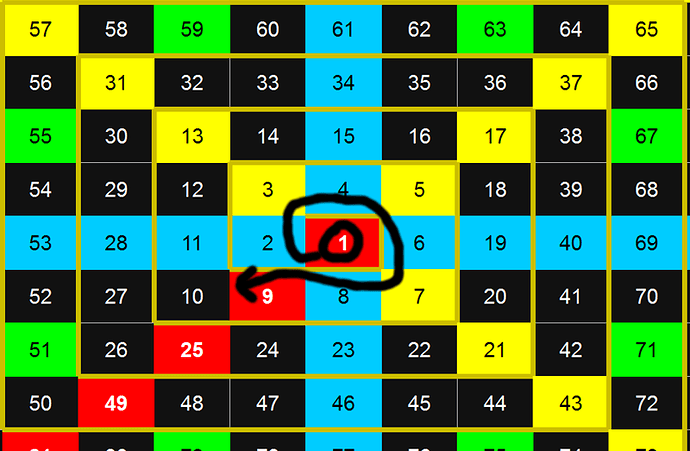
How to program / draw a square spiral?

Hi and hello to all, God’s beings!

In Calc, I would like to “draw” a spiral from ‘squares’ (cells), and populate them with numbers;
Populate:

  • from a starting number (x), by step (y), until final number of cells (z) is reached; e.x. - start with number 1 (x=1), increase each step by number 5 (y=5), continue until 100 cells are populated (z=100)
    Draw
  • starting from a ‘center’ cell, draw rectangle (= cell border), and continue drawing in spiral, on left (or right side), then go up (or down), and right, then down etc.

I want to insert an image, but this web page is blackmailing me, saying (with pirate accent, drunken, of course): “Hoy, ya, gimme 3 beers, if ya want to take a picture of me, or I’ll punch you in ya face!” Rude web page, must admit. One of the rudest I have seen in last 30 years. No, definitely the rudest web page of all times.
Please, dear God Almighty, I just want to insert an image of what I am trying to program with Calc, I am not here to fight. And please forgive those authors of this blackmail. Please, dear God. I love you so much.

Simon
S love nia

When it comes to rudeness, you ain’t seen nothin’ yet. Upload you graphic at for instance www.mediafire.com and post the link here. Any other file sharing file will do, as long as it doesn’t require you to register or watch an advert before you can download anything.

In these parts, it’s the website itself that’s rude. The people that use it are generally friendly and willing to help. Everyone complains about it, but the website seems unlikely to change.

Hello @Chistabo,

+1 for nice idea:)

The following method shows how you could draw such a spiral in Calc:

NB. Modified version 29 dec 2017

Sub Calc_Spiral( strStartingCell$, iStartingNumber%, iMaxCount%, iStep%, iStartingDirection%, bClockwise As Boolean, bSecond As Boolean )
REM	https://ask.libreoffice.org/t/how-to-program-draw-a-square-spiral/29883
REM <strStartingCell> :	A single cell address, e.g. "H12" representing the center of the spiral.
REM <iStartingNumber> :	Integer to be displayed inside the starting cell; Incremented by 1 for each following cell.
REM <iMaxCount>		  :	The total amount of cells to be drawn in the spiral;
REM						NB. Cells that fall outside of the Sheet''s edges are not counted in the total amount.
REM <iStep>			  :	Integer increase of the armlength after each turn in the spiral.
REM <iStartingDirection> : Determines the direction of the second cell to be drawn, relative to the starting cell.
REM						   0=RIGHT ; 1=UP ; 2=LEFT ; 3=DOWN.
REM <bClockwise>	  : Boolean indicating whether the spiral goes clockwise ( <True> ) or counter-clockwise ( <False> ).
REM <bSecond>		  : If <True> , the armlength increases only every second turn instead of every turn.
REM Example call :  Calc_Spiral( "H12", 1, 100, 1, 2, True, True )
	On Local Error Resume Next
	Dim oSheet As Object : oSheet = ThisComponent.CurrentController.ActiveSheet
	Dim oCell As Object  : oCell  = oSheet.getCellRangeByName( strStartingCell )
	Dim iColumn As Integer : iColumn = oCell.getRangeAddress().StartColumn
	Dim iRow As Integer	 : iRow = oCell.getRangeAddress().StartRow
	Dim m As Integer	 : m = 1 : If bClockwise Then m = 3
	Dim iCount As Integer: iCount = 0
	Dim iDirection%		 : iDirection = iStartingDirection
	Dim iCurrentStep%	 : iCurrentStep = iStep
	Dim iCurrentPos%	 : iCurrentPos = 0
	Dim iArmCount%
'	If iCurrentStep = 0 Then iCurrentStep = 1 '
	Dim rBorder
	
	Do While iCount < iMaxCount
		oCell.setValue( iStartingNumber + iCount )		REM Display the index number inside the cell.
		oCell.CellBackColor = RGB( 230, 220, 210 )		REM Set the background color for the cell.
	'	oCell.CellBackColor = RGB( 255-iCount, 255-iCount, 255-iCount )	REM This only works for iMaxCount<=256.
		
	REM Setting individual cell borders; Takes much more time...
		rBorder = oCell.BottomBorder : rBorder.LineWidth = 1
		oCell.BottomBorder = rBorder : oCell.TopBorder = rBorder
		oCell.RightBorder = rBorder  : oCell.LeftBorder = rBorder
		
		If iCurrentPos   = iCurrentStep Then		 REM End of Arm reached:
			iArmCount	 = iArmCount + 1
			iDirection   = ( iDirection + m ) Mod 4	 REM Compute the Next direction.
			iCurrentPos  = 0
			If Not bSecond Or ( iCount > 0 And iArmCount Mod 2 = 0 ) Then iCurrentStep = iCurrentStep + iStep
		End If
		
		Select Case iDirection
		Case 0	REM Right
			iColumn = iColumn + 1
		Case 1	REM Up
			iRow = iRow - 1
		Case 2	REM Left
			iColumn = iColumn - 1
		Case 3	REM Down
			iRow = iRow + 1
		End Select
		oCell	 = oSheet.getCellByPosition( iColumn, iRow )	REM Go towards the Next Cell.
		iCurrentPos = iCurrentPos + 1
		iCount		= iCount + 1
		
	Loop
End Sub

Hope you can use it,

With Regards, lib

To be clear, the code must be called from another subroutine or function.

Sub Draw_Calc_Spiral
    Calc_Spiral( "H12", 1, 100, 1, 1, True )
End Sub

Then Tools → Macros → Run Macro, and find Draw_Calc_Spiral.

Thanks @jimk for the added instruction on how to call the Calc_Spiral() method.

I usually omit that part, assuming that the OQ already knows how to call a method with arguments …
except if they indicate that they don’t.

Mea culpa - though I am wanna-be-coder, I am new to LO programming, and have never programmed VB neither. I suppose that LO and mS Office have similar programming interface. Will try this solution, but must get familiar with programming interface of LO.

Thank you for your answers,

Have fun,

Happy New Year 2018,

Long Live the Libre Office,

Godspeed,

Simon
S love nia

Go to Tools → Macros → Organize Macros → LibreOffice Basic. Expand to My Macros → Standard → Module1 and press Edit. Copy and paste Calc_Spiral and Draw_Calc_Spiral into Module1.

“I suppose that LO and MS Office have similar programming interface.” There are some similarities, but mostly, programming in the two suites is different.

Ole!

I managed to put together the macro, and run it also. Bravo me!
While this code (by librebel, bow, basic it is) does go around in spiral, it is not exactly what I was looking for. (I am trying to automate (google::image Gann Square of Nine trading tool).
Allow me to upgrade my description:
The spiral (order of populating the cells) is always drawn the same way, i.e.:

  • from starting cell (H12), go next i.e. 1 left cell (G12)
  • then go 1 cell i.e. up (G11)
  • then 2 cells right (H11, I11); the earth opens up here, and cells ‘fall’ down
  • then down (I12, I13);
  • then left, following the spiral (clock-wise in our example)…

Then, the spiral is populated (with decimals, as an option) with ‘iStartNumber’ + ‘iStep’. iStep could also be a function (like square numbers, Fibo sequence, natural numbers etc.). But this is heavy upgrade.

This is how it looks like.

Ole! Image uploaded!
I have also found Excel version:
SQ9 2018.xlsx

In Excel version, there are cells acting as input fields, for StartingNo, Step, sOmethingElse.

The iterate code to find next cell to pppopppulate was also found:

(x - 1)
(y - 1)

(x + 1) (x + 1)
(y + 1) (y + 1)

(x - 1) (x - 1) (x - 1)
(y - 1) (y - 1) (y - 1)

But Basic is not my thing, and I already have more than enough learning with python. Progress feels veeery slow.

Happy Happy 2018.

Godspeed,

Simon
S love nia

Would you mind to explain what you mean by “the iterate code to find next cell …”?
What is to take for x, y, and in what way shall (e.g.) (x-1)^3, (y-1)^3 be used?

Hello Simon,

Based on your upgraded description plus image i have slightly modified the above macro Calc_Spiral(), so that it can now also produce the desired spiral type where the armlength increases only every second turn, instead of every turn.

To produce the spiral as depicted ( minus the colors… ), you could now call:

Calc_Spiral( "H12", 1, 100, 1, 2, True, True )

Happy 2018!
lib

A few years ago I was inspired by an old friend starting an email exchange about the so called Ulam-spiral to do some experiments on it in Calc.
For that purpose I designed and used an explicit formula to assign the correct serial number to any cell described by its (x|y) [x to the right, y downwards] coordinates with respect to the centre being (0|0).
You may have a look into the reduced example here. Since I oiriginally had populated a square of 121x121 the original file was to large for uploading to this site. I reduced it. The primes you find there I did not reduce. They were created using the sieve of Eratosthenes.