Positioning images of different sizes and shapes side by side and setting default text padding to 0.2cm

In my 400 page word document that I am still converting I am having a nightmare of a time positioning images where I want them.

Often I will have images of different sizes and shapes side by side with space between where text is placed.

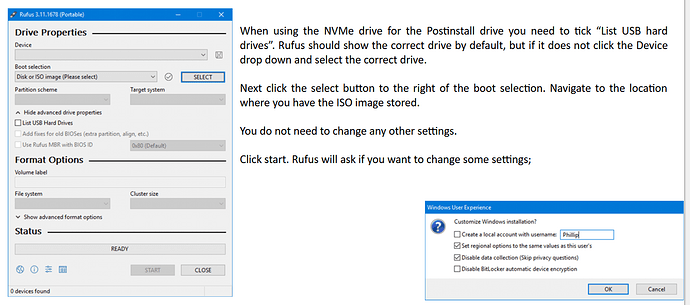
I can’t get this to work. Every time I add the second image to the right of another image it snaps to the right edge of the page.I’ve messed with Align, Wrap and Properties but cannot get the image to stay where I drop it, and any attempt to move it doesn’t work - it just snaps right back the right edge of the page.

When I place text beside the image it butts directly up against the image (as long as I use before or after wrap). So I have to edit every image to set the text to a 0.2cm padding. Is there a way to set this globally so the text padding is always 0.2cm?

Lubreoffice 24.3.2 x64 Windows 10 x64

I can only add one image to the post due to forum limitations.
An example of what I get

thanks

In the example, I would arrange both images either on the left or right and let the text flow around them. Alternatively, you can also use a table. Or set the Wrap to Parallel.


To be able to make further statements, upload a sample file (2-3 pages) here.


Inserting images in Writer Part 3

English documentation

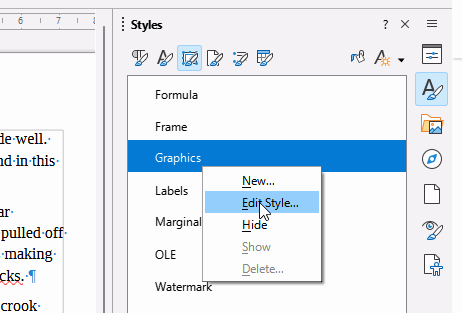
Images are inserted in frames with frame style Graphics. In the Sidebar styles pane, select Frame styles (third icon from left), then right click Graphics and select Edit style. In the Wrap tab, set the spacing to 0.2 cm left and right and click Apply. You might want to also set the Wrap to Parallel; it might help when you have two images and some text across the page.
EditGraphicsFrameStyle

Thanks for that. Fixed the issue with the default padding.

I will never have an image surrounded by text. Is that what Parallel does?
Many, many times I mix images of different sizes and shapes and in word I put the image where I want it and it just stays there.

In all likelihood I’ll only ever use before and after.

Using a table? Hadn’t thought of that. Probably because in HTML coding that’s considered bad etiquette :slight_smile:

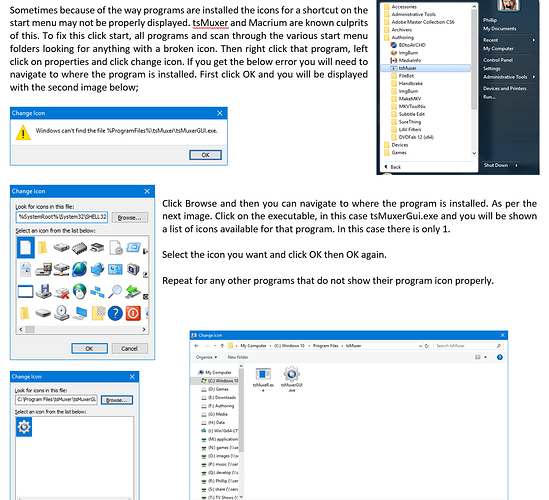
Hopefully this image comes through…

By sample file (2-3 pages) was meant an extract of the original document (ODT).
A screenshot is not helpful for a precise examination.


Another personal note:
I don’t know where users get the compulsion to utilise all the space on a page.
Sorry for what I said, but the picture looks like a patchwork quilt.
You can design it more generously so that the context of the image and the text can be better experienced.

1 Like

So many small images that need to be placed in correct order to give a good, quick, understanding. The best way is to have them vertically in order but the width of the page prevents that so make 2 columns.

In the attached .odt, I have two pages; in the first I have crammed the images and text together and have had to use captions to assist comprehension, even so it is a struggle to read.

In the second page I have turned off wrap for the images and now the captions are unneeded as the reader flows from text to image to text. The white space isn’t wasted in page two, it helps with comprehension.
PositioningImagesOfDifferentSizesEA.odt (69.6 KB)

My experience is inconsistent. I found that sometimes if I position an image to the right first I can then add an image to the left and it will stay where I put it, as long as I don’t move it or any text. Other times it just doesn’t cooperate.

Anyway, after a week of converting the document, that is 17.9mb in Word (small enough to be emailed), the Writer version is almost double the size and too big to send via email. Given that attaching a document (even compressed with zip or rar), adds about 50% to the attachment size.

Sorry, I missed the comment about uploading a sample.
Patchwork quilt :frowning:
I’ve had no complaints about the readability of the document

Anyway, with the resulting document being too big, this project is a bust.
I’m not going to break it into smaller documents and try to link them for the sake of TOCs and Indexes.
I’ll have to stick with Word. Shame. I really wanted to stop using M$ products.

thank you all for your assistance.

I rather thought it had started life in Word, the font looked like Calibri. I had no problem with images when I recreated your layout from the screenshot in Writer.

When I recreated your document in my ancient Word 2010 and opened it in Writer some of the image anchors were off the page and one of images had to be set in position using the Properties dialogue window as it kept jumping to the margin. I think it might be an issue with the importation of Word documents.

I submitted this bug report:
Bug 161055 - Editing Docx Image shifts to and sticks to righthand margin when moved

1 Like

I originally imported it “as is”, but was advised to import it and paste as unformatted text, then recreate all tables, TOC, Index, images, lists, etc etc… which is why it took a week at many hours a day to get even close to finishing.

But the images were copied and pasted from the word doc.

However, as part of my trying to fix the sticking to the right side of the page, I copied the image from its source folder (thinking maybe that would not have suffered any “word modifications” (if such occur). But that didn’t work either.

Yes, Calibri is my preferred font.

Thanks for reporting the bug.