Add styles to my existing template

I’ve read the help and the manual many times.

I do not understand how to add styles to my existing template.

I need to add a Superscript character style.

Modifying the styles that are offered by default for my template from the Set Paragraph Style drop down works well.

However, moving styles/modifying styles from the panel on the right that appears from the Styles/Manage Styles drop down menu is not intuitive for me.

I can see that the Main Styles menu offers the Emphasis style which I can modify.

Yet when I modified that style, it does not appear in the Set Paragraph Style drop down.

Yes, I understand that the Emphasis style is a Character style, and so perhaps it’s not intuitive that it should appear in the Set Paragraph Style drop down menu.

But it seems that if I can create Character styles, they should become accessible in some menu.

Again, I need to add a Superscript character style.

Perhaps with that understanding I will be able to reason out the rest.

If you have ready-made text-examples formatted with the styles you want to add to the template, you can edit the template and paste in little textportions. The styles get imported this way (if not already styles with the same name exist). If you don’t want the pasted text-pieces in the template, you can delete them again without losing the styles.
You shoulöd consciously check the hierarchy of styles for compatibility with the different contexts.
Save the template again.

I have read “parts” of the manual many times. Now I can begin to see that what I need to understand is not explained early on, and if I keep reading Ch.8 and 9, again and again, I have some hope that I may learn what I need to learn.

Every package of software is truly a distinct culture, and how instructions – the keywords and language terminology – are organized will not always conform to how each person most naturally approaches their learning experiences.

Beginning with my Windows Delphi experiences of many years ago, after beginning to work with Turbo Pascal in the late 1990s, I found that many of the most fundamental things which “I” need to learn in order to understand, were apparently self-evident – or close to it – for many of the documentation people, leaving me too often wondering for too long …

One thing that has confounded me with learning how to “apply” styles is the “Fill Formatting” option in the Styles Sidebar deck. That terminology – with the paint can icon – could not connect anything that I have intuitively acquired in these many decades, including building my own font with Fontlab (which, today, makes for – unfortunately – a whole 'nother story).

So, I will soon begin to re-read and re-read and I will give myself license to interpret “Fill Formatting” to mean to me to “Apply Style.”

I may return with some updates, if I survive this :wink:

Character styles are attributes that you want to apply to only part of a paragraph so alter only those attributes that you absolutely need to. Character styles supersede paragraph styles and in turn are superseded by direct formatting. A paragraph style cannot change a character style although it can change those attributes not defined in the character style.

To add a character style to an existing template

  1. Click File > Templates > Manage Templates.
  2. Find the template you want to add the style to, right-click it and select Edit
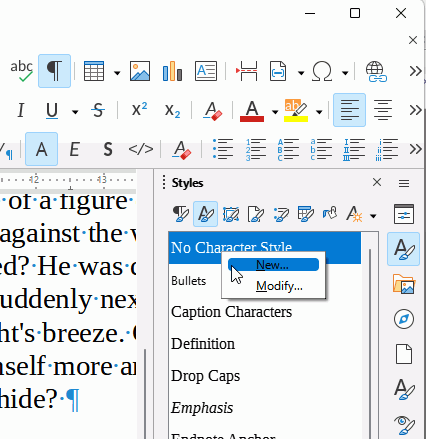
  3. Open the Sidebar and select the Character style icon at the top (second from left) to display existing character styles.
  4. Right click the No Character Style and select New.
    NewCharacterStyle
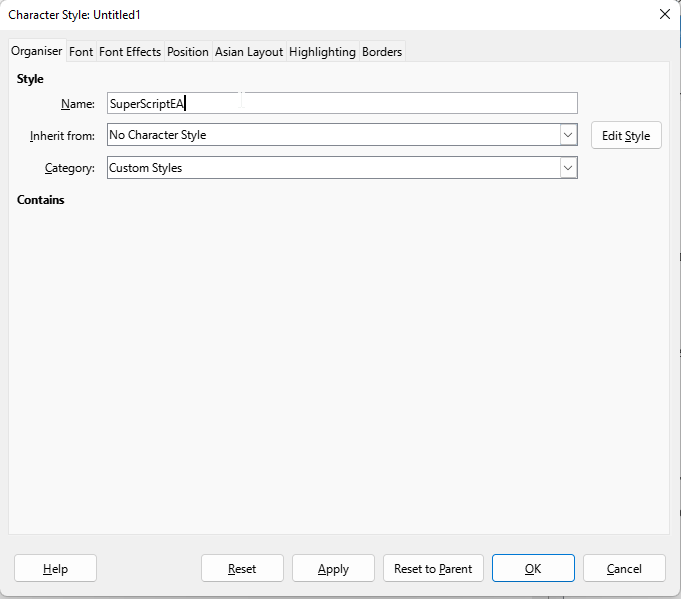
  5. In the dialogue box that opens select the tab labelled Organiser give your proposed style a name.
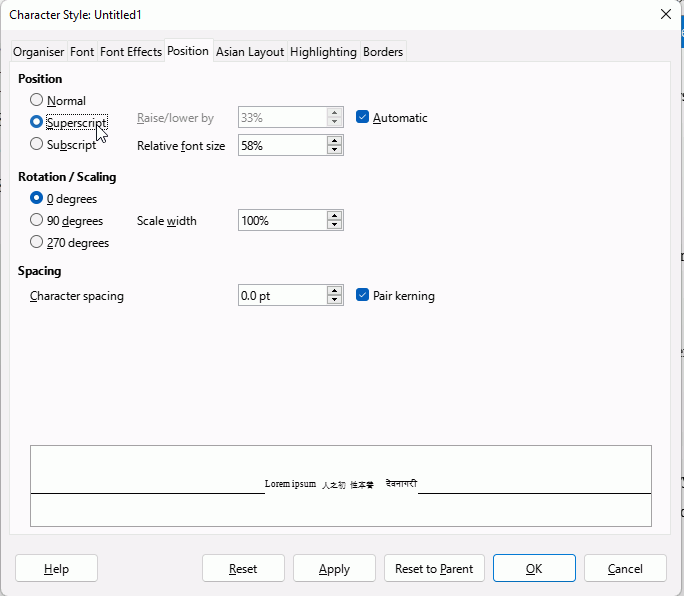
  6. As you want superscript, select the Position tab and click the Superscript option button. If you want, make any other alterations to the size and position of the superscript. and click OK.
  7. Save your template and close it.

To use the character style

  1. Select the characters you want to apply a style to.
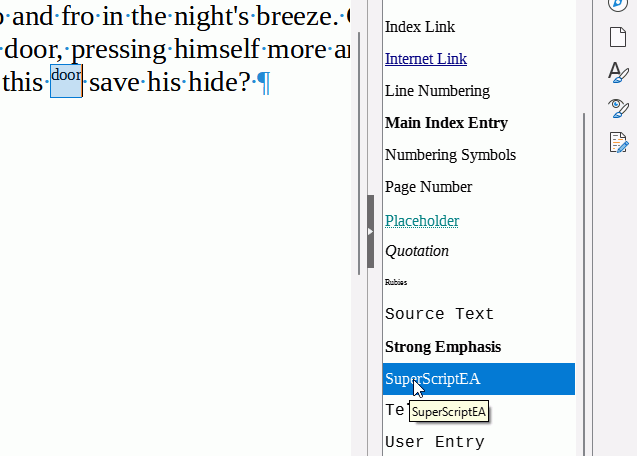
  2. Double-click the appropriate character style in the Sidebar

CharacterStyleApply

To remove the character style

  1. Select the characters from which you want to remove the character style.
  2. Double-click the No Character Style in the Sidebar

Optional

If you wanted to, you could add another toolbar, *View > Toolbars > Formatting (styles)*. This is another way to access styles.

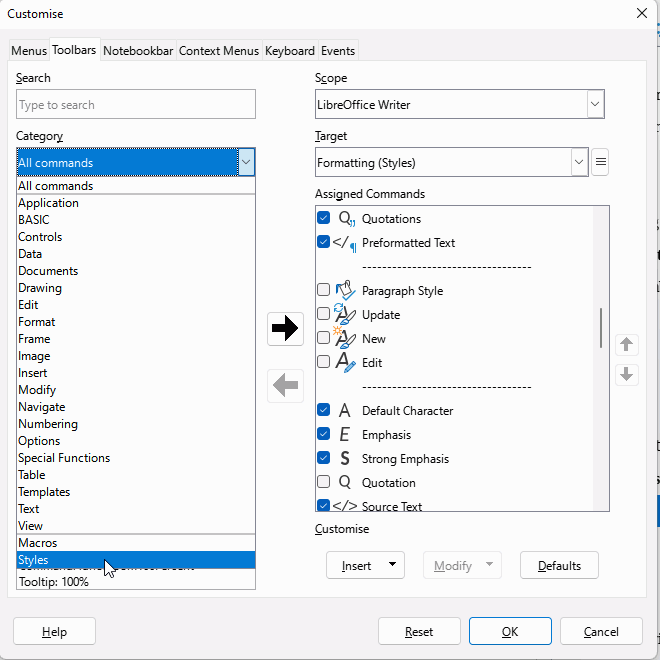
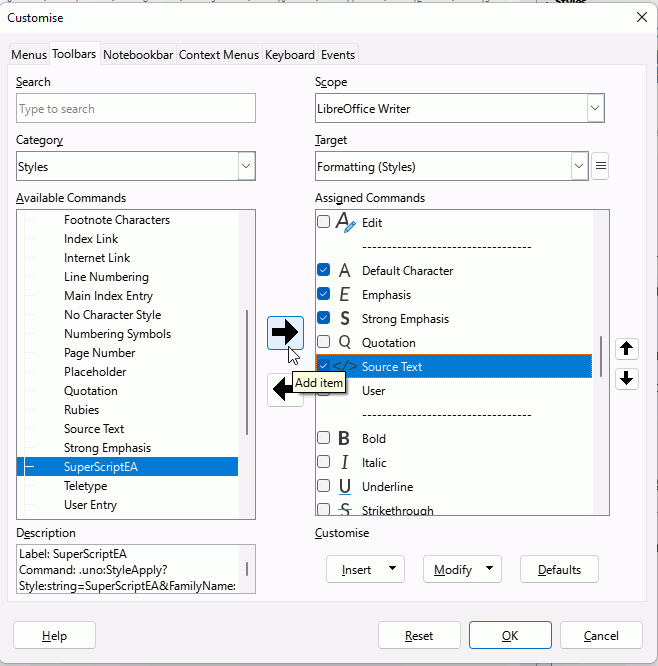
You can add your new character style to the the toolbar by right-clicking it and selecting Customise toolbar. Select Styles from the Category field.

Click your new style and then click the Add arrow to add it to the toolbar.

3 Likes

EarnestAl,

Thank you so much for all of that work. I cannot explore anymore style adventures this evening but I wanted to express my appreciation.

EarnestAl,

I’m using Win10/LO 6.4, and I’m attempting to follow your instructions precisely:

  1. Click File > Templates > Manage Templates.
  2. Find the template you want to add the style to, right-click it and select Edit
  3. Open the Sidebar and select the Character style icon at the top (second from left) to display existing character styles.
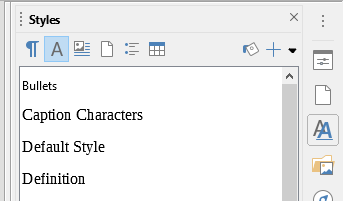
    Following those actions precisely, with “All Styles” appearing by default in the very bottom of the Sidebar Styles Deck’s drop down edit box, there are no other choices appearing above the top sorted “Bullets” offering under the Character styles offerings.
    The icons that appear at the top of your Sidebar Styles Deck appear to be somewhat different from mine.
    Here is what mine looks like, without a No Character Style option at the top or within the sorted list below:
    image
    If there is supposed to be a similar “No Paragraph Style” for the first icon’s default Paragraph option, there is none there, also.
    Please advise.

At the bottom of the character styles page change the filter to Hierarchical so you can see all the available styles

EarnestAl,

My system: Win10, LO6.4.

What I finally discovered is that even though there is not a No Character Style option, there is a Default Style option.

The secret is this: Selecting any of the other Character styles, and then right-clicking, brings up the small menu with the following options: “New” “Modify” “Hide” available for selection, but with “Show” and “Delete” grayed out.

On my install – if this is supposed to differ by OS or whatever, I don’t know – but on my install, with Character Styles selected in the Styles Sidebar deck, there is a “Default” style.

Selecting “Default Style” only has “New” available for selection; all of the other four options are grayed out.

Using the “Default Style” brought up the dialog to name a new Character style – which I named “SuperscriptTR11” – inherited from “Default” allowing me to select the Superscript and the other necessary options for that Character style. As soon as the new name is entered and I switch tabs in the Character Style dialog, the new name is already entered in the Styles Sidebar deck Character Style page.
The template must, naturally, be saved either by saving, or attempting to close where the command to either “Save” or “Don’t Save” or “Cancel” is offered. “Save” allows the new character style to remain.

Finally, changing the filter at the bottom to Hierarchical moves the “Default” style to the very top, where your “No Character Style” option is placed. Voila.

So, this has concluded this chapter of my Character Styles lesson. Thanks for your help.

Remember, LO users, if your install does not offer a “No Character Style” option, then the solution is likely to be found using the “Default Style”.

Sorry, I answered from my phone during lunch. A bit more reflection and I would have remembered the character style name changed, probably for version 7.x., so around two years ago. Good luck with styles.

You could consider upgrading LibreOffice; LibreOffice 7.3.6 is quite stable. Release notes for that and for intervening releases linked at LibreOffice 7.3 Community: Release Notes - The Document Foundation Wiki