Calc setting borders via a macro

I have been trying to format borders via a macro. I have managed to get most of it to work but have one problem I cannot resolve.

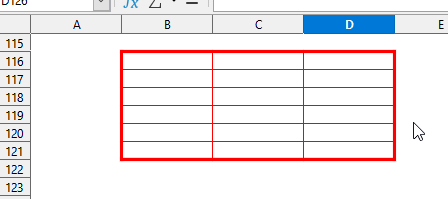
I want to set the borders on a range of cells. I want to have Left/Top and Right borders to be bold. I want the vertical and horizontal borders to be thinner.

However I would like the bottom border to be a double line. If I have read the documentation correctly I need to set an InnerLineWidth and LineDistance properties. When I set either of these to any value it stops the bottom border being displayed at all.

I have distilled the code into the following (adapted from another post)

Sub Main
Dim BasicBorder as New com.sun.star.table.BorderLine
Dim oBorder As Object
Dim rng
rng  = ThisComponent.Sheets.getByName( "Sheet" ).getCellRangeByPosition(1,1,2,2)
oBorder = rng.TableBorder

BasicBorder.Color = RGB(255, 0,0)
BasicBorder.OuterLineWidth = 20
oborder.VerticalLine = BasicBorder
oborder.HorizontalLine = BasicBorder

BasicBorder.OuterLineWidth = 60
oBorder.LeftLine = BasicBorder
oBorder.TopLine = BasicBorder
oBorder.RightLine = BasicBorder

' enabling either or both of these lines prevents the border being displayed  	
'   BasicBorder.LineDistance =30
'	BasicBorder.InnerLineWidth = 40
oBorder.BottomLine = BasicBorder

rng.TableBorder = oBorder
End Sub

It all works apart from my bottom border. To make this a double line I think that the two lines commented out (linedistance and innerlinewidth) should make this a double line. Adding either of these lines however stops any bottom line being displayed.

How do I create a double line as my bottom border? The screen shot shows what I am trying to achieve

image description

LibreOffice Calc version 6.4.4.2 (x64) running on Windows 10 Home version 1909

See also bug tdf#126058.

The clever code by @jcs94782 encouraged me to study what I coulkd get from the API doumentation, and to research some facts by testing, and to rtemember a few things I was annoyed about years ago.
The result was a slightly reworked versio of the mentioned solution by the questioner himself, and the followig code also based on it, but differeing in more places, and aso containing some explanatory remarks. The code in both variants is also contained in the attached document where you may play with it.

Sub applyOuterInnerDistanceDoubleLineToCurrentSelection(Optional pVertW, Optional pHoriW, _
          Optional pOuterW, Optional pInnerW, Optional pLiDist, Optional pRgb)
If IsMissing(pVertW)  Then pVertW  = 20
If IsMissing(pHoriW)  Then pHoriW  = 20
If IsMissing(pOuterW) Then pOuterW = 40
If IsMissing(pInnerW) Then pInnerW = 20
If IsMissing(pLiDist) Then pLiDist = 40
If IsMissing(pRgb)    Then pRgb    = RGB(100, 80, 255)

Dim borderLine As New com.sun.star.table.BorderLine2
Dim tb2        As New com.sun.star.table.TableBorder2
Dim doc As Object
Dim rng As Object
doc = ThisComponent
rng = doc.CurrentSelection
If NOT rng.supportsService("com.sun.star.sheet.SheetCellRange") Then Exit Sub
REM SheetCellRanges selectiopns make no sense, object (Shape e.g.) selections even less.
borderLine.Color = RGB(95, 77, 255)
borderLine.LineStyle = 0
borderLine.LineWidth = pVertW
tb2.VerticalLine = borderLine
tb2.IsVerticalLineValid = True
borderLine.LineWidth = pHoriW
tb2.HorizontalLine = borderLine
tb2.IsHorizontalLineValid = True

borderLine.LineStyle = 3 REM double: FixCoded here. (See name of Sub!)
borderLine.LineDistance = pLiDist

REM With double borderlines having set different outer an inner widths.
REM there is a bug for many years now. It was never resolved, and will most likely neverba.
REM Too much code meanwhile relying on the bug - like this Sub!
REM 'Outer' is wrongly interptreted as 'Top or Right', 'Inner' as 'Left or Bottom. 
REM The problem is basically the same with LineStyles 4 through 9 which create predefined double lines.
borderLine.OuterLineWidth = pOuterW
borderLine.InnerLineWidth = pInnerW
tb2.TopLine = borderLine
tb2.IsTopLineValid = True
tb2.RightLine = borderLine
tb2.IsRightLineValid = True

borderLine.OuterLineWidth = pInnerW  REM A little bit counterintuitive.
borderLine.InnerLineWidth = pOuterW  REM A little bit counterintuitive.
tb2.LeftLine = borderLine
tb2.IsLeftLineValid = True
tb2.BottomLine = borderLine
tb2.IsBottomLineValid = True

rng.TableBorder2 = tb2
End Sub

ask253532borderLinesAndTableLikeCalcRanges_1.ods

2 Likes

__

borderLine.Color = RGB(95, 77, 255)  

should, of course, read:

borderLine.Color = pRgb  

Sorry!

Also sorry for the silly typos.

Thanks for all of your comments and suggestions. I followed the hints contained mainly in Lupp’s suggestion above and did some experimentation and I have a solution using a Line Style = 3 and more possible alternatives.

The clue I had been missing was the use of the Table2 and Border2 objects rather than the more obvious Table and Border objects. Where does one find information on properties for these important items? I would rather not have to read the code!

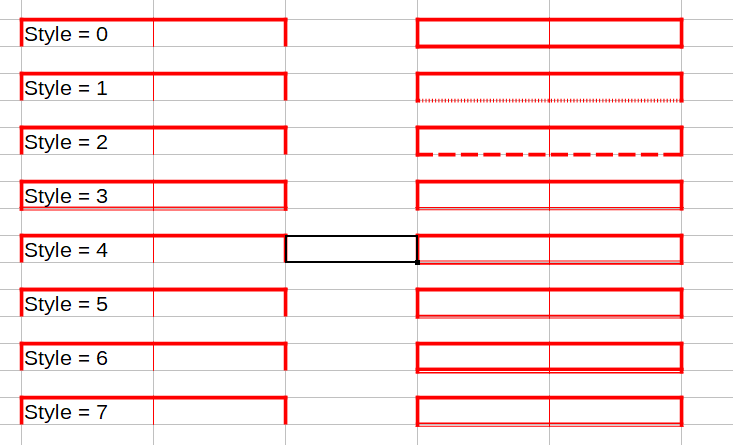
That revealed how to access the border styles and I found that Style 3 (with appropriate parameters) gave me exactly what I wanted. I made a loop that cycled through all the line styles up to 20! The spreadsheet attached includes the macro and shows the result. It also showed (with different parameters - see file attached) how to get the dotted and dashed styles which I have not seen mentioned anywhere. It actually also shows that Styles 3, or 7 might also be acceptable for my purposes without fiddling around with the inner, outer and separation parameters,.

For some reason pasting the code did not seem to work - it only pastes one line at a time and that was rather tedious. I have included the working sub and a test loop in the attached file that runs through 20 line styles for the bottom border. The picture shows the first 7. The left hand version allows the bottom border inner and outer line weights and separation to be modified but suppresses the styles. The right hand set just applies the line styles.

BordersSolution.ods

poor mans tool: record a macro …

would that snippet help?

sub double_line_border

rem ----------------------------------------------------------------------
rem define variables
dim document   as object
dim dispatcher as object

rem ----------------------------------------------------------------------
rem get access to the document
document   = ThisComponent.CurrentController.Frame
dispatcher = createUnoService("com.sun.star.frame.DispatchHelper")

rem ----------------------------------------------------------------------
dim args1(0) as new com.sun.star.beans.PropertyValue
args1(0).Name = "ToPoint"
args1(0).Value = "$B$3"

dispatcher.executeDispatch(document, ".uno:GoToCell", "", 0, args1())

rem ----------------------------------------------------------------------
dim args2(0) as new com.sun.star.beans.PropertyValue
args2(0).Name = "By"
args2(0).Value = 1

dispatcher.executeDispatch(document, ".uno:GoRightSel", "", 0, args2())

rem ----------------------------------------------------------------------
dim args3(0) as new com.sun.star.beans.PropertyValue
args3(0).Name = "By"
args3(0).Value = 1

dispatcher.executeDispatch(document, ".uno:GoDownSel", "", 0, args3())

rem ----------------------------------------------------------------------
dim args4(0) as new com.sun.star.beans.PropertyValue
args4(0).Name = "By"
args4(0).Value = 1

dispatcher.executeDispatch(document, ".uno:GoDownSel", "", 0, args4())

rem ----------------------------------------------------------------------
dispatcher.executeDispatch(document, ".uno:BorderTLBR", "", 0, Array())

rem ----------------------------------------------------------------------
dispatcher.executeDispatch(document, ".uno:BorderBLTR", "", 0, Array())

rem ----------------------------------------------------------------------
dim args7(7) as new com.sun.star.beans.PropertyValue
args7(0).Name = "BorderOuter.LeftBorder"
args7(0).Value = Array(0,0,0,0,0,0)
args7(1).Name = "BorderOuter.LeftDistance"
args7(1).Value = 0
args7(2).Name = "BorderOuter.RightBorder"
args7(2).Value = Array(0,0,0,0,0,0)
args7(3).Name = "BorderOuter.RightDistance"
args7(3).Value = 0
args7(4).Name = "BorderOuter.TopBorder"
args7(4).Value = Array(0,0,0,0,0,0)
args7(5).Name = "BorderOuter.TopDistance"
args7(5).Value = 0
args7(6).Name = "BorderOuter.BottomBorder"
args7(6).Value = Array(16711680,18,18,53,15,88)
args7(7).Name = "BorderOuter.BottomDistance"
args7(7).Value = 0

dispatcher.executeDispatch(document, ".uno:BorderOuter", "", 0, args7())

end sub 'double_line_border

[edit] edited acc. @Lupp’s hint, (sorry, still not learned how to insert code,) [/edit],

sorry, it’s not exact your solution, but something you can start with,

sorry, would have posted it as comment, but too long,

sorry, macro recorder produces cruel cote with ‘uno’ and ‘dispatcher’ …

@Lupp: thanks, good tip, totally intuitive once you know it,

i’m quite sure it’s somewhere in the FAQ, i’m absolutely sure nobody reads it …

[edit]] @Lupp (written here because too long for a comment) ‘never say never’,

OP said he could do that in Excel, tried, works, recorded macro - cave! ex$el, not! calc:

Sub Macro1()
'
' Macro1 Macro
' format borders
'
- cave! ex$el, not! calc
'
    Range("B3:D6").Select
    Selection.Borders(xlDiagonalDown).LineStyle = xlNone
    Selection.Borders(xlDiagonalUp).LineStyle = xlNone
    With Selection.Borders(xlEdgeLeft)
        .LineStyle = xlContinuous
        .Color = -16776961
        .TintAndShade = 0
        .Weight = xlMedium
    End With
    With Selection.Borders(xlEdgeTop)
        .LineStyle = xlContinuous
        .Color = -16776961
        .TintAndShade = 0
        .Weight = xlMedium
    End With
    With Selection.Borders(xlEdgeBottom)
        .LineStyle = xlDouble
        .Color = -16776961
        .TintAndShade = 0
        .Weight = xlThick
    End With
    With Selection.Borders(xlEdgeRight)
        .LineStyle = xlContinuous
        .Color = -16776961
        .TintAndShade = 0
        .Weight = xlMedium
    End With
    With Selection.Borders(xlInsideVertical)
        .LineStyle = xlContinuous
        .Color = -16776961
        .TintAndShade = 0
        .Weight = xlThin
    End With
    With Selection.Borders(xlInsideHorizontal)
        .LineStyle = xlContinuous
        .Color = -16776961
        .TintAndShade = 0
        .Weight = xlThin
    End With
    Range("E15").Select
End Sub

[/edit]

If you have a forced new line (space, space, Enter), then the (mostly) pasted lines of code, and a forced linebreak then again, you only need to select the inserted part, and click the icon for preformatted text or hit Ctrl+K, each one of the selected lines gets prefixed 4 spaces, and the complete selection thus goes to a CodeBox. The four-spaces-trick also works without Ctrl+K.
Used for a part of the text in a line, Ctrl+K works differently.

Thanks but this just draws a double line at the bottom of the selection. I need the left, right, top and inner borders as well as shown in my picture.

I will have to stick with a single line as the bottom border.

that: ‘when making the border it erases the internal lines and when making the internal lines it erases the borders.’ from @schiavinatto is unpleasant, but i already wrote ‘something to start with’. you need to learn the language, strutures and options, and it might be ‘not possible’ as @schiavinatto wrote. as long as our pro’s don’t come up with better solutions:

‘manual’ has three states for each line, insert - shown coloured, delete - shown white/blank, and don’t touch - shown grey. if you don’t find similar in the macro options file it as an enhancement request in ‘bugs’.

if it’s that way a cheap workaround might help, e.g. construct in one step the inner lines related to your area, and in further steps the outer lines as borders of the surrounding cells …

‘macro comfort’ is not the strongest point of calc … :frowning:

@newbie-02: You also need do treat the corner cells differently.
And all that isn’t just poor support for macros. There are serious logical implications, and no macro support can contain the additional concept needed if cells should be made fit for being treated as bordered ranges with inner borders even if their numbers (down/right) are zero, but applicable as soon as the cell format is applied to a range with more tan one row/column.
But even if development tried to implement such a feature, it would never cover all the fancy table formats “complex users” may dream of.
There recently was a similar effort for Writer where the so-called TableStyle feature was implemented. I played with it. Did you? I was not satisfied.

@Lupp, regarding ‘it would never cover all the fancy table …’: ‘never say never’,

tried something in ex$el, report too long for a comment, see edited answer …

tried similar in calc, record setting different styles for different lines, fails … (recording works, but execute fails) …

Well, I wouldn’t deny that there is a problem with the dispatcher. In fact there is a calc-oriented command .uno:Border obviously meant for the case, but the recorder doesn’ even try to use it, and records two steps based on one dialog instead. That’s a bad sign, and it’s a bit annoying that the developer covering the case didn’t notice the inaptness of this approach.
Hmmm. You surely also found my recent comment on the question itself: There’s a known bug.

Thanks for all of the comments. For my purposes I will just choose a different colour for the bottom border rather than a double line. I have just proved that it works.

The data displayed on the spreadsheet is being parsed from structured data in a text file (actually from a Writer form, saved as PDF form, completed in Acrobat Reader, and the completed form is then processed by PDFtk to a text file) which is why I want to automate the layout formatting.and separate header from the form data

When it is done manually it is possible, but when the recorder is used to generate the macro, it generates with error, when making the border it erases the internal lines and when making the internal lines it erases the borders.

macros below: With the selected area

Sub Execute

'Sub ExternalBorders
CreateUnoService("com.sun.star.frame.DispatchHelper") _
.executeDispatch(ThisComponent.CurrentController.Frame, ".uno:BorderTLBR", "", 0, Array())
CreateUnoService("com.sun.star.frame.DispatchHelper") _
.executeDispatch(ThisComponent.CurrentController.Frame, ".uno:BorderBLTR", "", 0, Array())
dim args31(7) as new com.sun.star.beans.PropertyValue
args31(0).Name = "BorderOuter.LeftBorder" : args31(0).Value = Array(0,0,79,0,0,79)
args31(2).Name = "BorderOuter.RightBorder" : args31(2).Value = Array(0,0,79,0,0,79)
args31(4).Name = "BorderOuter.TopBorder" : args31(4).Value = Array(0,0,79,0,0,79)
args31(6).Name = "BorderOuter.BottomBorder" : args31(6).Value = Array(0,18,18,53,15,88)
CreateUnoService("com.sun.star.frame.DispatchHelper") _
.executeDispatch(ThisComponent.CurrentController.Frame, ".uno:BorderOuter", "", 0, args31())
'end sub

'Sub InternalLines
CreateUnoService("com.sun.star.frame.DispatchHelper") _
.executeDispatch(ThisComponent.CurrentController.Frame, ".uno:BorderTLBR", "", 0, Array())
CreateUnoService("com.sun.star.frame.DispatchHelper") _
.executeDispatch(ThisComponent.CurrentController.Frame, ".uno:BorderBLTR", "", 0, Array())
dim args1(12) as new com.sun.star.beans.PropertyValue
args1(8).Name = "InnerBorder.Horizontal" : args1(8).Value = Array(0,0,2,0,0,2)
args1(9).Name = "InnerBorder.Vertical" : args1(9).Value = Array(0,0,2,0,0,2)
CreateUnoService("com.sun.star.frame.DispatchHelper") _
.executeDispatch(ThisComponent.CurrentController.Frame, ".uno:SetBorderStyle", "", 0, args1())
'End Sub  

'Sub RedColor
dim args2(0) as new com.sun.star.beans.PropertyValue
args2(0).Name = "FrameLineColor" : args2(0).Value = 16711680
CreateUnoService("com.sun.star.frame.DispatchHelper") _
.executeDispatch(ThisComponent.CurrentController.Frame, ".uno:FrameLineColor", "", 0, args2())
End Sub

Complement

image description

Improved macro, only the bottom edge is double …

With the selected area

Sub Execute
dim args1(12) as new com.sun.star.beans.PropertyValue
args1(8).Name = "InnerBorder.Horizontal" : args1(8).Value = Array(0,0,2,0,0,2)
args1(9).Name = "InnerBorder.Vertical" : args1(9).Value = Array(0,0,2,0,0,2)
CreateUnoService("com.sun.star.frame.DispatchHelper") _
.executeDispatch(ThisComponent.CurrentController.Frame, ".uno:SetBorderStyle", "", 0, args1())
'End Sub  

'Sub ExternalBorders
Dim oSel As Object
Dim oBordeLinea As New com.sun.star.table.BorderLine
Dim oBordeTabla As New com.sun.star.table.TableBorder

	oSel = ThisComponent.getCurrentSelection()

	With oBordeLinea
		.Color = RGB(255,0,0) 				'Cor
		.OuterLineWidth = 75 					'Espessura
	End With

	With oBordeTabla
		.TopLine = oBordeLinea				'Superior
		.IsTopLineValid = True
		.BottomLine = oBordeLinea			'Inferior
		.IsBottomLineValid = True
		.LeftLine = oBordeLinea				'Esquerda
		.IsLeftLineValid = True
		.RightLine = oBordeLinea			'Direito
		.IsRightLineValid = True
	End With
	
	oSel.TableBorder = oBordeTabla
'End Sub

'Sub RedColor
dim args2(0) as new com.sun.star.beans.PropertyValue
args2(0).Name = "FrameLineColor" : args2(0).Value = 16711680
CreateUnoService("com.sun.star.frame.DispatchHelper") _
.executeDispatch(ThisComponent.CurrentController.Frame, ".uno:FrameLineColor", "", 0, args2())
End Sub

As I think you identified. If I select a single cell it works but if I select a range (as I wanted to do) it just draws the inner lines.

The solution I have works with solid lines to I will just have to live with that. Thanks for the suggestion though. It is my first real attempt to use Calc macros to do formatting this way. I have been using Excel to do things like this since 199 (pre VBA)

(I never tied to set borders by user code, but would judge…)
If you apply border attributes to a SheetCellRange in a macro, every single cell of the range will get set these attributes. Assigning different border attributes in a subsequent step will also afflict each cell of the range as a single object, and by this (likely) spoil the previous settings. You get similar effects when trying to fill (any direction) cell contents inside border-formatted parts of a spreadsheet. And you cannot define a cell style containing settings for “inner borders”.
“Complex” tables are evil. This is very annoying when using complex TextTable in Writer, and we cannot ignore it in Calc when trying to create tables insid a sheet.
I personally asume “toughening” the API to make it capable of handling the issue to your satisfaction wouldn’t pay. It would need lots of changes, and likely give life to lots of wee little bugs.
The alternative: Split your range in (up to) 9 parts: Inner, TopLeft, …

See complement …