Customizing "Graphics" styles for image with a caption?

Hello,

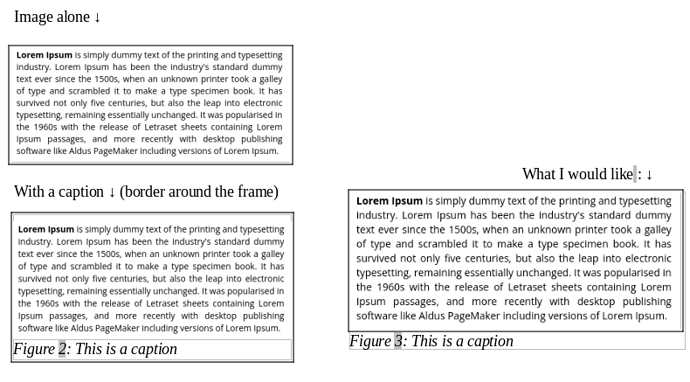
I would like to (automatically) set a border around images which have a caption, but fail to do so:

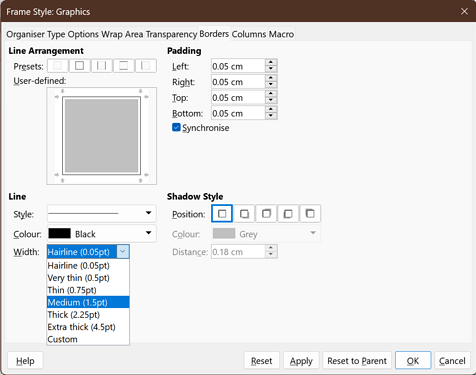
  • If I configure the border “Frame → graphics” style within the “frame style” tab:
    • A border is set around the image when inserting/pasting it
    • The border then goes on the frame if a caption is added to the image

Hopefully this screenshot will help me clarifying what I am facing and what I am after:


:innocent:

Of course, I could manually set the frame&graphics styles, but it is something I really often do, and I think I’m missing something!

Any idea?

Many many many thanks in advance! :wink:

1 Like

When you Insert>Caption, you create nested frames. The macros under the hood (I suppose they are macros or equivalent) take the selected frame and store it into an outer frame into which they also add the generated caption: category taken from the selected one, field to number the category and text taken from some entry box in the dialog.

The frame style of the captioned object is not changed. By default it is Graphics for images but may be something else for objects other than images.

The outer frame style is Frame.

Consequently, customizing Graphics to add a border may look sufficient. However there are many bugs (or misbehaviours) with frame styles. One of them is customising a style does not update immediately the occurrences.

So, tune your frame styles before using them.

To fix existing occurrences, select the inner frame (Graphics), apply any other frame style, reapply Graphics. This is not user-friendly but this is the most efficient trick I found.

Bottom note: Initially I found Insert>`Caption quite handy, but it uselessly multiply frames. Frames contribute to document instability. Consequently, the fewer you have, the better you are. I now prefer to caption manually my “objects”. Thus, I control precisely if I want the caption “in-flow” or “off-flow”, i.e. in a frame which no longer interferes with main text. I don’t think there are definitive rules. It depends on how you want your “illustrations” to flow with text.

Thank you ajlittoz for your answer.

Ok, so this may indeed be a bug (or misbehaviour), how frustrating!

I did tune the styles before using them, but it does not look to be enough yet, but I will try to play with this a bit more!

As for “captionning manually you objects”, could you elaborate a bit on that? or may be point me to some resource explaining what it means? I though righ-clicking on the image then clicking on “insert a caption” was about the only way to go! :sweat_smile:

Thanks again!

A caption is nothing else than a paragraph. So that you can collect all captions in a table, you just give them a specific paragraph style. You have a built-in generic Caption style you should consider as holding your preferred formatting defaults for all your captions. Dedicated paragraph styles are derived from Caption: Drawing, Figure, Illustration, Table and Text so that you can (1) eventually format separately your categories, (2) collect the dedicated captions in separate tables.


You can add as many new styles as you want to have new lists. Derive your new styles from Caption so that modifications to Caption are also forwarded to your custom styles.


As mentioned, a caption is nothing else than a paragraph with a conventional layout:

  • a category with a number
  • an optional separator
  • the caption itself

An object will be attached to the caption in a frame. This means that when text flow moves your caption, the object will move with it.

The choice is whether the caption should be read “in order” with narrative or not. If you consider, the caption is a logical part of the narrative and has an ordering relationship with the text, then type your caption “in line”. Text flow will maintain the ordering throughout your edits.

On the contrary, if the object (and its caption) should be disconnected from the narrative, i.e. inserted wherever there is enough room for it irrespective of the narrative, then use a frame which allows you to send the caption and its object anywhere in the page. The consequence is you need to insert a cross-reference in the narrative when mention of the object/caption is relevant.

Unfortunately, there is presently a limitation in Writer where a frame and its anchor point must be located in the same page. This limitation may lead to situations where a huge blank space is left so that the anchor and the frame are on the same page. Even playing with anchor mode To character and selecting the character in the paragraph can’t solve all situations. What is really needed is a new anchor mode “Floating” not related to any paragraph, but this implies deep modifications in present handling and perhaps changes in the ODF standard (in which case implementation probability falls very low).

So the choice is on the author’s side. Personally, I prefer to avoid frames whenever I can; so, if my captions are logically part of the narrative, they are created as “ordinary” paragraphs.

Now, what about Insert>Caption? From the discussion above, if your captions are disconnected from the narrative, the menu command is an excellent shortcut.

However, I noticed severe limitations.

  • you can’t change the category name from the dialog
    Say you labelled “Drawing”, but “Illustration” would have been better. All you can do is to use Edit>Find & Replace because the category is static text
  • similarly, you want to change the counter from “Text” to “Figure”
    You have the same problem of course with the label, but the number is a filed of type number range. There is absolutely no way to replace a field with another one. You must delete it and replace it with the new number range field. In OTW, you must edit manually all your existing captions one by one


When I am in the “in line” caption context, I find it is no more difficult to write manually the caption and insert the proper field. In addition, I have more formatting liberty than with Insert>Caption. But my skill level is “advanced” or even “guru expert” and I know precisely what I want to achieve. And all mys styles are already in place.


For a newbie, Insert>Caption is a good compromise if you don’t mind frames and have already some experience with frames.

Hello again!

Many thanks ajlittoz for your answer.

I’ve started playing a bit around and it looks promising!

Usually, the illustrations I want to add are supposed to follow the text flow! And without knowing why, My illustrations, which were encapsulated within a frame, often moved away from their intended place! Now i understand this is the expedted behaviour for frames! Thanks for that.

With the approach you’ve described, there’s one thing I’m not sure how to do yet: every now and then I put two images side by side. But as there is no longer a frame, the caption does not seem to be attached to the image. I supposed this is expected, but is there a way to have both images side by side while also having a different caption below each image?

Then you are no longer in the flow (frameless) approach. You have several possibilities:

  • frames, i.e. what Insert>Caption does but you have to manually adjust the positioning the outer frames to set them side by side, which means they are probably both anchored to the same paragraph. This is not immediately accessible to a newbie.
  • table
    You create a 1-row×2-column table. In each cell, you insert your image and its no-frame caption. I think this is easier because you are not confronted to all the frame subtleties. The table will implicitly create equal-sized columns. In each cell, your paragraph styles may have Center attribute so that contents is centered in the cell.
  • 2-column section (or n-column for n images
    You enter your images and their captions as in the case of frameless context. Between the captioned images, you Insert>More Breaks>Column Break to flush the second image into the second section break.
    I don’ recommend this possibility if you have many images to layout. The table approach is easier. Sometimes sections behave unexpectedly. In addition if the section is too close to page break, layout may be constrained by the page bottom and cause “surprising” results unless you configure the paragraph styles (for the image and for the caption) so that they keep together (flag to set on the first paragraph style and absolutely not on the second one).

In addition to @ajlittoz ,

Insert images into table

I would like to (automatically) set a border around images which have a caption, but fail to do so:

LibreOffice’s directions are also sometimes a bit convoluted.

To achieve the right result, three things must be met:
A. the frame template for graphics must be adjusted.
B. the Options menu must be adjusted.
C. after adjusting A. and B. the document must be saved as a document template.

A. customize frame style for graphics
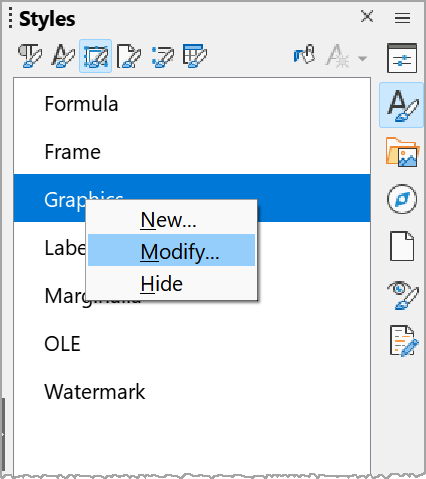
Right-click on the frame style for graphics and click on Modify.

86153 HB Screenshot 2023-01-06 180842

In the “Graphics” dialog, select the desired Border and click OK.


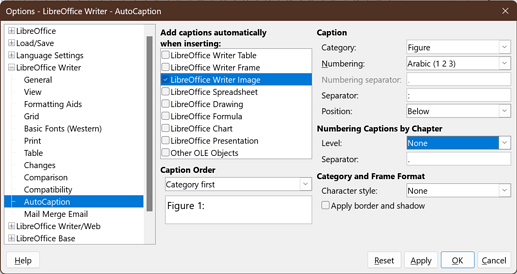
B. choose menu Tools>Options>LibreOfficeWriter>AutoCaption
Place a check mark next to “LibreOfficeWriter Image”.
Select a category and make other desired settings and click OK.


You can now test.


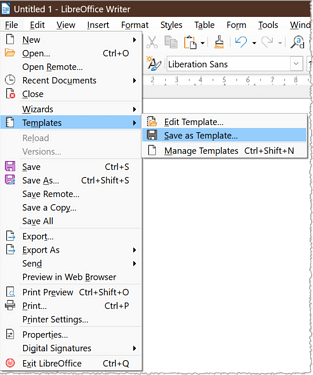
C. Choose File>Templates>Save as Templates from the menu.


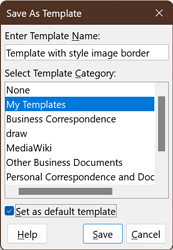
In the dialog that opens, enter a name, select a category and check “Set as default template”.


When you restart Writer, the result should look like in testing.


1 Like

Hello Hrbrgr,

Thank you for your answer. I’ve tested what you suggested and it’s also very promising with one notable exception for my workflow: it does not seem to work with images directly pasted from the clipboard (I usually edit and copy them from gimp (image editor)).

→ Is there a way to make it work with image “inserted from the clipboard” ?

Also, as I now understand the frame added around the image makes it lose its connection to the text flow (I often had to move back its paragraph anchor which kind of move around on its own :sweat_smile:)

→ Is there a way to make those frames keep their position within the text flow? (like freezing the anchor and/or forbidding it to move between paragraphs)

Is there a way to make it work with image “inserted from the clipboard” ?

I don’t know one.

The regular process for inserting images in LibreOffice is via menu or toolbar.
Paste via the clipboard is a quick option but may also be problematic, depending on the source you copy from, there is a risk that unwanted formatting will be included.


I often had to move back its paragraph anchor…

There is a presetting possible for images in the Options menu and the Frame styles “Images” and “Frames” also offer the possibility to set “Anchor to paragraph”.


Insert and edit images in Writer Part 1

Insert and edit images in Writer Part 2

When you paste from the Clipboard, you create a frame and all what has been described for frames is aplicable.

Yes, with frame styles; In the Type tab, you have comprehensive settings in the Position section. To keep position related to the anchor, reference your properties to Paragraph text area or Entire paragraph area (which includes spacing above and below and left and right indents compared to the previous reference).

Note however that frame styles usually don’t behave as expected after a change. You may need to apply another style and reapply the intended frame style for the changes to become active.

Too bad! Pasting a capture is so quick & easy and part of my everyday workflow that I’m not really ready to consider any other way that is not as easy :-/


That being said, after some trying&customizing, that frame does not seem to cause me problems (yet) and I’ll go with that and the custom caption paragraph style as you suggested!


At least this way, I can have the borders I want around the graphics, and that was what I was looking for!


Many thanks to you both ajlittoz and Hrbrgr! :clap: