Hi All
Wondering if someone can direct me to the documentation that shows me how to format this callout messages in my documents.
HI
I am not sure what you mean here. I don’t know what Libreoffice calls this style or section header or whatever. I have looked through the manual and there is quite a few of them there for information, tip, hint, note etc.
I would like to be able to create them for my manuals
Thanks
Ken.
I understood your initial question - you are looking for the documentation.
But you are looking for instructions on how to use it yourself in a document.
OK, I will prepare something, please be patient.
The easy way:
Open a Writer Source Guide and, for example, copy a “Note” completely with a line above and below it.
Paste the copied text into a new document.
This means that you have not only copied the text but also the formatting.
Your new document now also contains the paragraph and list styles.

Look in the sidebar at Paragraph and list styles (with right-click on the style).
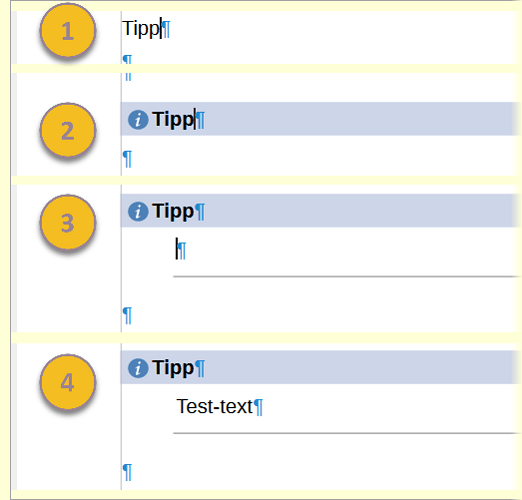
Using the paragraph styles - note, tip, caution
In the document template (Writer Guide) for the documentation, these three paragraph styles have the name
“Heading Note”
“Heading Tipp”
“Heading Caution”
The description here is based on the example of “Heading Note” and is identical for these three templates.
Application sequence:
- In an empty paragraph followed by one (or more) empty paragraphs, write the word “Note” and mark it.
- Double-click on the paragraph style “Heading Note”. Place the cursor after the word “Note” and press the Enter key.
- The cursor is now in the next line with an indent (with the paragraph style: “Text Note”).
- Now write the text for the “Note” directly or insert it with Ctrl + ⇧ Shift + V (unformatted).
“Tipp” and “Note” work in the same way.
Thanks for your reply. I figured out some of that by playing with it. It suddenly dawned on me what you were saying about the source.
Weekday I still have not figured out is the image. Can’t find anything in the properties. From memory you can’t select text and image as one so it can’t be copy and paste.
I assume this is a different topic, right?
If it is a different topic, please ask a new question (not in this topic, please)!
Hi.
No not a new topic, I am referring to the little image in each of the headings.
Ken
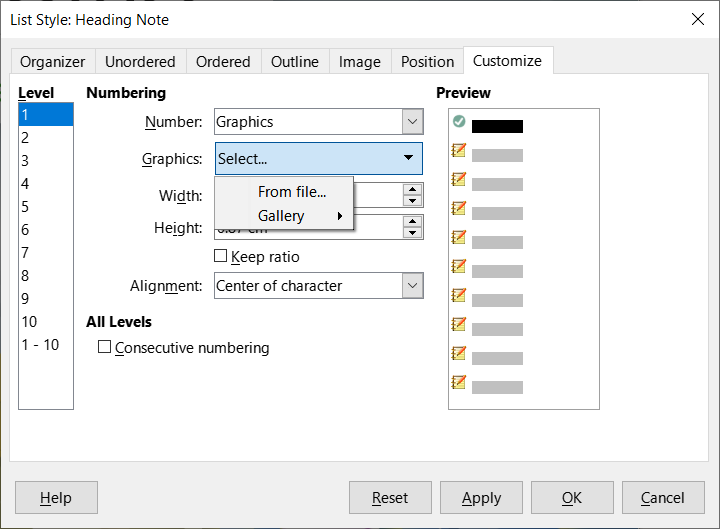
The image is defined in the list style. Look in one of the existing list styles.
You can select a graphic from the Gallery or from a file (including self-made images).
And have a look at:
https://books.libreoffice.org/en/WG76/WG7612-Lists.html#toc28
I see at least 3 ways of achieving your goal. It depends on your skills with styles.
The easiest is the one used in the official LO documentation: a table
- create a 2-col × 1-row table
- make sure table has the Keep with next paragraph attribute set in its
Txt Flowproperties - adjust column widths to narrow the first column which will contain the icon
- paste an icon in the first cell (anchor it preferentially As character)
- type the “title” Note, Tip, Caution, … in the second cell and apply an adequate paragraph style
- type the note, … in a paragraph below the table and apply an adequate paragraph style
Alternatively, to “simplify” alignments, your table can be a 2×2 one.
Personally, I don’t like this solution because it violates one of my semantic rules: only tabular-by-nature data should go into a table. Here, a table is used only for its “geometric” effect.
Second easiest: a list style
- create a custom list style where the “number” is a
Graphicsand attach your icon to level 1
You may configure this style to associate various icons to the different levels for note, caution, tip, … so that the same list style can be use in different contexts. - associate the list style to the dedicated paragraph style for note, caution, … title
For maximum “comfort”, assign the paragraph style for note, caution, … in the Next style setting to automate paragraph style switch when you hit Enter.
When you want to insert your callout, change for the callout paragraph style and type the title. If the list style is used for several kinds of callout, you need to promote the callout to the required list level to show the correct icon:
- put the cursor at the very beginning of the callout
- press Tab to reach the required level (Shift+Tab to back up)
The most complex but versatile: frames
Here is an example of what can be done:

The icon is in a frame which is sent into the margin. The CAUTION! title is also in a frame so that it can overlay the caution paragraph border.
This solution requires mastering frame styles so that no manual operation is needed. It also uses the list style trick to automate icon choice. The list style also has an invaluable advantage: If I decide to change the icon, all callouts are automatically updated, which wouldn’t have been the case if icons were directly inserted into their frames.


