Help needed to create a book

Please, understand me. You lose me once you give me two instructions I don’t understand. So in this case you lost me at ‘the bullet list icon (unhighlight it) to turn off the invisible bullets.’

I have no idea where the bullet list icon is, whether or not someone has highlighted it and how to turn off ‘invisible bullets.’

Forgive me for not being on top of all of this but I’ve only been using computers to write books for twenty five or so years.

The text has been copied and pasted from a .JML file, whatever that might be, by the way.

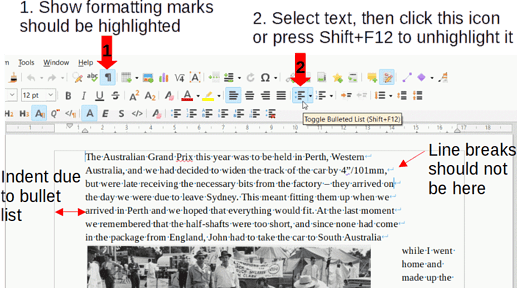
If you haven’t turned on View > Formatting marks as @Hrbrgr suggested, you should do so now. The image below shows the icons you need to click,

  1. to show the light blue formatting marks (should be highlighted)
  2. After you have selected all the text click the Bullet list icon to unhighlight it.
    If the icon is too difficult instead click Format > Bullets and numbering and in the dialogue box that opens click the button at the bottom labelled Remove.

The indent will disappear and you can start the next stage of saving the paragraph breaks but removing the line breaks.

To give you encouragement to try out the steps, here is the result from undertaking the steps in my previous comment:
sampleforbookCleaned.odt (484.9 KB)

BTW I think it is likely that jml is from from Adobe Framemaker according to MML file - The easiest way to open .mml files in 2022 | DataTypes.net it is commonly “misspelt”

I’m very sorry, but I am getting a lot of advice here I just don’t understand. To me it seems to be conflicting and in no way does it take me back to the main question - how do I do it?

I did open the file as Hrbrgr said to do, but it’s still not justified. But that’s not the real problem, I need to be able to do this myself, I need some (lots of, probably) guidance on how to make it work so I can go through this book and do this job chapter by chapter.

So, please, how do I do it, one thing at a time. Let’s please start with the justifying… Just that one thing for now.

And look at this, because I am getting so many things to which I have to reply I have exceeded the posts I can make in the first day!

Just look at EarnestAl’s first comment.

  • First at the top, the part about “invisible bullets”:
  • Temporarily your document is going to look even more jagged. Don’t worry about it!
  • Then go through the three step find/replace procedure given in that same comment.
    • First step is again going to make your document look even more cluttered. Do not worry. This step is required.
    • Second step ensures proper text flow.
    • Last step cleans up the clutter and puts back paragraph breaks where they belong.

There may be places where the procedure failed to detect the presence of a new paragraph. This calls for manual work (proofreading). It will be good in the end.

Now is the time to apply the justification.

It looks like this is your first meeting with a powerful document formatting tool such as LO Writer. Your first task is to get acquainted with vocabulary of typography (for words like indent, justification, wrap, …). So, unless you have a very contingent deadline for your book, I recommend you read first the Writer Guide, which is not perfect, but will give you some ideas about what can be done and how. It will also make you familiar with dedicated words which be understood differently from everyday life.

While reading, as already suggested, make exercises on blank documents to see by yourself the results and where the commands are hidden.

The best advice I can give is: keep your contents separate from appearance. You are an author who wants to communicates an argumentation to his reader. You know which message you want to transmit. Focus on this task. Don’t worry for formatting.

Since you are new to Writer, adopt the good methodology (but this needs to work from the start with styles which is not obvious for beginners). Styles are additional information you attach to your text. They are some kind of annotation which helps to understand how your text is structured and which significance it has.

To take an easy example: your book has chapter headings and text within chapters. You will assign style Heading 1 to chapter heading and Text Body to text. Thus LO will know which paragraphs are headings and which are standard text. By playing with style configuration, you can make your headings bold and bigger size than chapter text. And you do this separately from typing. When you’re in the formatting phase, you only act on the styles without interfering with your text and you immediately see the changes.

Concretely, you need ~10 paragraph styles (you already have the Heading n family, Text Body and Footnote; you add others for comment paragraphs, quotations, remarks, …) You also need ~5 character styles to denote a change against the general significance of the paragraph (you already have Emphasis and Strong Emphasis; you can add others for “irony”, “trivial”, “rude”, foreign word, trademark, person name, …) Since you have also images, define or customise frame styles. This will simplify your life once you have decided how the images should be positioned and text wrap around. For your own sanity, never anchor them To page. But getting frame styles do exactly what you expect is quite difficult; you’ll need many trials and errors before you have a satisfactory reproducible result. And last but not least, don’t forget page styles. You’ll need them to format differently your cover from the chapters. Built-in First Page (for cover) is already there. You also have Left Page and Right Page for specific formatting on left and right (otherwise Default Page Style is good for uniform pages). Perhaps you’ll need one special page style for TOC or index.

This is a lot to learn, but you’ll get a huge benefit if you follow this methodology. You may feel you’re progressing very slow in the beginning (all the more if you have a schedule for your book) but your job will be done faster and faster as you master the various notions.
In order to avoid very bad problems when you come to final formatting, absolutely forbid any direct formatting (or in common words: don’t use Writer like a typewriter; it is made for automated process = styles). Direct formatting is there for quick experimentation to see the effect of such and such command. But don’t mix it in any real work. It interacts adversely with styles, taking precedence over them and it is often very difficult to tell if and how direct formatting was applied, consequently difficult to fix things.

So, once again, read the guide, practice a bit and do your real work without being under stress.

1 Like

Stupid Asus computer … I’ve now lost the page, deleted the thing because the ridiculous mouse pad turns into a number pad at the drop of a hat and if you don’t notice anything that’s highlighted gets deleted.

How can people be so stupid to actually design this feature into a computer?

I’ll set it up again and try to work it out. But I’m sure it’s going to require a lot more questions because nobody is telling me what to do in simple English, rather expecting me to know what it all means.

I do, in fact, know the terms indent, justification, wrap etc. I am not by any means new to Writer, but I have just used it for the past seven years or so for typing out stories.

I have a lot of experience reading ‘guides’ and I know they will be full of jargon and distortions of the English language so I don’t propose to do so. What’s more, I am seeing in some of the replies I am getting here that they are copy and paste of complicated answers to questions others have asked and mislead me. I need one thing at a time, basically, because of the jargon being used and I have to learn to work around that jargon to find out what I must do in real words.

The steps I gave in my first comment are required to turn the individual lines of text into a document. If you will not attempt the steps then I cannot help. Cheers, Al

I am trying item by item, but the instruction you give, “select text and unhighlight this item or press shift_F12 to unhighlight it” simply doesn’t work. What do I do then?

IN FACT:
Pressing Shift+F12 opens a new window promoting the computer brand. I thought this was just a chance occurrence but repeating the process over and over brings it up each time.

So all we’re doing so far is undoing the junk added by the original program in which it’s laid out. Maybe it’s faster for me to simply retype it in Writer and work from there.
If I did that, will the justification work correctly? And then there’s the gap between the side of the picture and the text. I don’t think we’ve got a direct (repeat, direct) answer yet on how to get that right.
As an alternative, is there some other program into which I can copy and paste the text and then save it there, then copy and paste to Writer and it’s lost the JML markings?

I get that impression that you try to, like, enter the Tour de France with very little preparation or experience as a racer. You have a pretty complex file with a lot of import problems, and you can’t fix them on your own. Better ask somebody to sort this out for you, then once the document is in a decent shape, you can continue with that a start learning to work with this software in a more relaxed way.

That is exactly what I am doing - asking somebody for the help I need to understand this and sort it out.
I don’t need somebody to sort it out for me, I need the instructions which will enable me to sort it out. But if the second instruction I follow simply does not work (Shift+F12, remember, brings up a new window on the screen promoting the ASUS computer brand and does not unhighlight anything) where do I go?
Could I please have an instruction on how to get the type off the edge of the pictures?

I have not had problems like this sorting out a computer method or issue in the past twenty years.

Sent you a message offering exactly that. Click the circled R in top right of the screen to see “account elements”, where you click the tab with envelope icon to see messages.

"Pressing Shift+F12 opens a new window promoting the computer brand"

The computer manufacturer has repurposed the F keys. To get the F key function press and hold the Fn key down on the bottom row at the left, then press the relevant F key.
In the above instruction, press and hold Shift and Fn keys, then press and release F12, then release Shift and Fn Keys.

Note, it is possible to restore the F keys to the primary role but that is computer specific and normally requires adjusting settings in BIOS

1 Like

That’s not the only problem with this keyboard…

The @ and " key positions are reversed (above the ’ and the 2 keys instead of the other way around) and making it more difficult to follow your instructions above there is no \ key.

Eventually I got to make the three steps you described and now I’m making progress, so thank you.

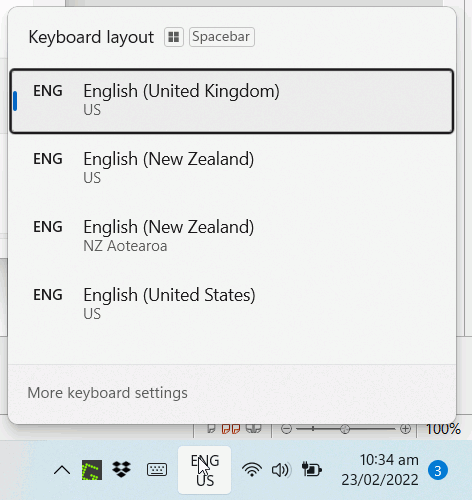
It sounds as if you have inadvertently applied a different keyboard layout than you see on your computer. If you bought your laptop in Australia(?) then you should have a US keyboard. From your description, it probably has a UK keyboard layout applied, see British and American keyboards - Wikipedia
You can have UK spelling and US keyboard selected as screenshot below. Your selections will be different from mine.
EnglishUK_KeyboardUS

Click on the taskbar icon and select the one highlighted in the image above.

Note: if you inadvertently press Windows+Spacebar the layout will change to the next one on your list but you can change it back when you notice it.

Cheers, Al

Well, that fixed everything, thanks for the tip!

I don’t mind losing the £ sign, we went to dollars in 1966.

Ray