Help needed to create a book

I do hope it all works out easier than it is to use this forum…

I have the text of a book and there are some pictures in it, but there will be more. We are looking at putting it together with the text wrapping around some pictures and captions being created for the pictures - also to have the text wrapped around - but I cannot see in the various headings on Libre Office Writer anything which might relate to this function.

Additionally, we will be wanting to save in PDF form, is that possible?

1 Like

I agree with Ray-Bell, I can’t even see how to start a new topic, so I’m replying to this one as it is in the same area. ADMIN - please feel free to move this to a more appropriate location …
I am working on editing a memoir for publication with much additional text, it is already three times as long as the original.
The formatting needs are simple so I am happy to do it in Apple’s Pages as I am familiar with it. An oddity of Pages [and there are many] is that it does not roll footnotes to the next page if needed, but they just stop short. However, if one does a Select all on that fn and pastes into a new document it is all there and, if exported as Word LO handles it correctly. It was my intention just to use LO for a final check before passing it to my publisher.
But another lack in Pages is that you can only have one kind of fn, which is OK while I’m editing as it is convenient to have everything on the current page.
Is it possible in LO to go through a document and redefine the fns so some are on the page and some are endnotes?
Thanks, CC

Putting it together

If you already have the content in some other computerised form, getting it into Writer may be a matter of “open file”, copy/paste or import. The procedure may also be more complex.
Without knowing the nature of what you have, it is difficult to detail the procedure.

Pictures

Picture files are inserted by an entry in the Insert menu. If you have the picture open somewhere, copy/paste may also work.

Right click the picture in your document to adjust…:

  • Anchoring: How the picture behaves when content is moved around.
  • Text flow
    Wrap
    : How text content behaves around the picture
  • Caption

Saving

Always keep your work saved as a Writer document (.odt file type). This maintains structure and allows further editing. Export to PDF for distribution/publishing but keep your odt file in case you need to edit or otherwise use it in the future. PDFs are not easily editable.

Export options are available from the File menu.

In some cases I have seen that PDF “virtual print” (often seen as Print to PDF or Print to file) is better than Writer’s export. E.g.: When you want easy color separation for professional print services. I am not sure whether this is still an issue. At any rate, export maintains bookmarks and ToC linking better than virtual print, which is an advantage if a significant use of the document will be on screen.

2 Likes

Thank you, that is helpful… I tried putting a picture in and it was all straightforward.

But the text creates for itself a large gap between the side of the picture and the text, I guess there is an answer there somewhere for that?

The other thing I’m having a problem with is creating a justified page. When I try that it creates big gaps between words.

For Text flow, read Wrap. As you have found already, it’s all pretty straightforward. You only need to know the names for the tools that you want to use, then it’s plain sailing. Play with all the settings in all tabs of that dialog window in a “sandbox” file to get the hang of it, quite often it’s easier to explain things by showing than by words.

1 Like

Yes, I understand that wrap means that the text goes around the picture, but it stands out a long way from the side of the picture (like the margin) and then that bit of text goes off into the RH margin. I tried several options but none brought the text back to a small distance, one of them had it right up against the picture.

Also, I tried putting a caption on, that worked, but it was prefixed ‘Figure 1’ or something like that prior to my caption.

Use the Borders tab, then Padding (right on the tab) to set your text to a distance from the picture. See my earlier edited comment. A few minutes playing with everything you can change will teach you more than we can tell you in that amount of time. Get back to us when you hit a wall. :nerd_face: :grinning:

You have gone right over my head with shortcuts. You mention a ‘sandbox’ but I don’t see anything like a sandbox in there.

Step by step, first I have to justify the text without creating enormous gaps between words, how do I do that?

A “sandbox” file is just a new document that you use for discovering things about this software, like a kid playing in a, well, sandbox. You try something, erase it when you don’t like it, without having to fear that your work gets destroyed by making a mistake.

Okay, so that’s what I’m doing, but I cannot find the other things you are mentioning. No mention of ‘borders’ anywhere, I found the caption, but it has that ‘figure 1’ problem, and it’s all pointing up the age old problem I have. If it’s an English word I look for the proper English meaning, not the slang meaning or the modified meaning.
So can we please start with the justification?

You can’t avoid wide spaces between words in justified text when the text column is rather narrow in relation to the word length. The longer your words are, the wider your text column has to be, or you have to use hyphenation. You set Hyphenation on the Text flow tab of the Format Paragraph (style) dialog window.

However I am using full page width and the words are not long.

It is always best if the document named as problematic by the questioner can be viewed.
Please upload the document or an excerpt in which the problem is apparent here.
Thank you very much.

1 Like

Please upload a sample document with wide spaces. Seventh icon from the left at the top of the message area, with an arrow.

I’m pretty new here, as you might have understood. How do I upload it?

When you type a message, there’s a bar with icons over the input area. Select the seventh icon from the left, with arrow, follow instructions.

sampleforbook.odt (481.3 KB)

You can see that the justification is downright crazy and the gap between the pic and the text is unacceptable.

Let the text flow. Do not use unnecessary Shift+Enter functions.
Make your text left-aligned to the margin.
HB_01 sampleforbook.odt (520,6 KB)
Turn on the formatting characters.
Standard toolbar icon "Toggle formatting characters, Ctrl+F10".


Right-click on the frame of the image and select “Properties…”.
In the “Frame” dialog in the “Wrap” tab, select the “Spacing” to the text.


Here you will find descriptions that can be further helpful:

Insert and edit images in Writer

Professional text composition with Writer

2 Likes

Just to put you in the picture more fully, I use none (that is zero) ‘shift + enter’ functions.

I am looking for a way to pull the text back closer to the picture, but not right to the edge.

I am also looking for a way to get decent justification. I don’t know how much more clearly I can explain that.

Just to clarify further, the options I get with ‘wrap’ are:

None
Parallel
Optimal
Before
After
Through in background
Contour
Edit contour

Trying each of them seems to do nothing

I guess this has been exported from an older DTP program.

All the text has bullet applied to it, select all (Ctrl+A) and press the bullet list icon (unhighlight it) to turn off the invisible bullets.

There seem to be two sorts of line feed characters, one for end of line, the other for end of paragraph but also randomly in other places. The end of paragraph one I am not familiar with and I cannot identify.
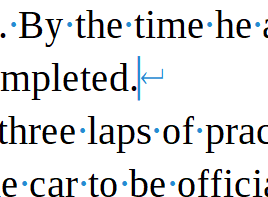
LineBreakModified

In any event, I would use Find and Replace to find the line breaks that end with a fullstop and replace them with a token not used in the text, e.g. ¿.
First step - replace assumed paragraphs with token
Press Ctrl+H to Open the Find and Replace dialogue

  • In the Find field enter \.\n
  • In the Replace field enter .¿
  • Tick the box Regular Expressions
    Click Replace All. There will be some line breaks that end with a fullstop but aren’t a paragraph, you need to identify those manually later.

Second step - replace line breaks with a space

  • In the Find field enter \n
  • In the Replace field enter a Space
  • Tick the box Regular Expressions
    Click Replace All

Third step replace token with paragraph break

  • In the Find field enter ¿
  • In the Replace field enter \n
  • Tick the box Regular Expressions
    Click Replace All

You should have some normal text now.
For the image, open the Sidebar and select the Styles icon, in the Styles pane click the 3rd icon from the left with tooltip Frame styles. Right click Frame and select Modify, in the dialogue box that opens select the Wrap tab and set spacing to 0.20mm for all four sides, untick Allow overlap and OK out.

Click the outer frame (includes the caption) and with it selected, double-click the Frame entry in the Styles Sidebar. The frame will take the spacing you have just set. Subsequent frames just need to be selected and then double click the Frames entry to apply the spacing.

As there will be more challenges as you progress I recommend the Writer Guide. Particular attention should be given to Styles which will make your life easier but might seem a little daunting at the beginning. Download from English documentation | LibreOffice Documentation - LibreOffice User Guides
Cheers, Al

1 Like