How can I universally set the width of 1000+ images embedded in an ODT to fit the page width inside the margins while preserving the aspect ratio?

I’m having difficulty batch scaling all of the embedded images in an ODT document using Styles. There are over 1,000 images so scaling manually would take ages.

I used the Aspose WordPress to DOC Exporter Plugin to extract my WordPress articles to 339 DOCX files on my local PC. I then created a Master Document in LibreOffice with all of the documents organized chronologically.

Next I clicked on Format - Sections - Selected all linked documents, and unchecked the Write Protection box so I would be able to edit them from the Master Document.

Then I made formatting changes to the layout for print publication, and used regex to remove all the publication information tables and other stray data from the documents.

But I found that upon closing and reopening the Master Document, any changes I’d made to the linked documents reverted back to their original form.

So I exported the Master Document as an ODT formatted file, and opened the single 1GB ODT file.

There is still a prompt to update linked content when the ODT is initially opened. If I opt to update the linked content I lose all changes I’ve made and saved and all linked documents revert back to the original linked content before I made the changes. But as long as I don’t click the option to update, the changes are saved the next time I open the ODT.

The formatting is correct now - I just need to use Styles to scale all 1,000+ images to fit width to page area within the margins.

I tried Styles - Frame Styles icon - Graphics - Modify - Wrap tab - Optimal and under the Type tab, checked the Autosize checkbox and the Relative to the entire page or to the paragraph.

That didn’t have any effect on the images, so I reopened the former Master Document .ODM file from before I made my formatting changes, clicked the icon to toggle Master View in the Navigator, clicked the green check mark that appears for the List Box, chose Graphics in Styles. I expanded the Images heading in the Navigator but no changes I made applied to the images.

I also tried manually entering 3.42” in the width field under Style menu - Graphics - Modify - Type. That similarly had no effect, with or without any or all images selected.

And as a last resort, I tried right-clicking Graphics in the Style menu - clicking New - and creating a new Graphics style from scratch. This also had no effect.

I should note that the Keep Aspect Ratio button is permanently grayed out no matter what options I select.

How can I universally set the width of all 1000+ images embedded in the ODT to fit the page width inside the margins while preserving the aspect ratio?

And is there a way to apply the changes I make within the ODT to the linked source documents so that the links can update and preserve my changes the next time I open the document?

I’m afraid you can’t because an image in a document is a “complex” object involving two elements: the image itself and a frame.

  • The frame can be controlled by a style, Graphics by default.
  • The image itself has extra settings outside style controls, e.g. Crop and Image tab.

In addition, frame styles exhibit erratic behaviour compared to other style categories.

AutoSize is supposed to take contents size into consideration. It works quite well with text but suffers severe mishaps as if image dimensions were not correctly notified to the frame. Since the image size can’t be controlled from the frame style (you need to right-click on the image and Properties to access the specific Crop and Image tabs), the image settings are akin to direct formatting. This will cause difficulties as is usual with direct formatting and means you must process images manually one after another, which is not feasible for 1000+ images.

The most annoying point is frame styles don’t apply always immediately modifications you make to the style (depends on the parameters changed). You must apply another style then reapply the desired style. Again this is not feasible with 1000+ images. This can however be avoided with Tools>Update>Update All but it doesn’t seem to always give the expected result.

For more ad hoc diagnostic and advice, attach a sample file (2 pages max.) so that I can see what kind of styling is applied to your images. Remember also that conversion from .docx to ODF is an approximation because Word has no notion of styles beyond paragraph and Writer must guess author intent to generate styles. Usually, a converted document is mess style-wise.

Thank you sincerely for the suggestion! I am using LibreOffice Version 6.4.7.2 and there is no Photo Album option under Insert > Media.

However, even if the option was there, the images in my book are staggered throughout each of the 339 articles so I wouldn’t be able to insert a single 1000+ image album in one shot. Thanks though! I appreciate your lateral thinking!

Test Doc ODF exported to ODT.odt (452.7 KB)
What a splendidly detailed response! I’m so grateful for the time and attention you put into that. Thank you!

It’s a shame that I’ll need to manually scale every individual image, but at least I have a concrete answer.

I must reiterate my other concern, particularly given the laborious time I’ll have to dedicate to resizing these images. I mentioned that, upon opening the ODT, a prompt appears asking whether I wish to update my linked documents. If I say yes, all of the changes I’ve made and saved are lost and all the linked content reverts to the way they appeared before I ran an array of RegEx replacements to remove tables and metadata from the WordPress export DOCX. I’m confused by this, as the master ODM document is only 57.9k whereas the ODT I saved is 1.1GB, which led me to believe that all of the content was embedded in the latter instead of linked. How can I be sure that, after manually scaling thousands of images, that my changes won’t be lost and would revert after I close and reopen the document?

This concern is further compounded by the yet-uncertainty of the final printed page size for my publisher. I’d hate to find, after manually resizing all those images, that the book will actually need to be, say for example, 0.25" narrower in width for publication, forcing me to resize every image all over again. The real trouble is, I won’t know how many pages the book will be until I manually scale all the images, and depending on that figure, the book may not be publishable in a single volume or at those dimensions so I would have to repeat the process ad infinitum until I reach a viable product. There’s just no way to target that in advance. Or is there a way, once I’ve sized them the first time around, to set them to dynamically scale to the page width so that, if the page dimensions are changed thereafter, that the images adjust accordingly?

I tried removing 338 of the 339 articles from the ODT to upload a sample at your kind request, but I must be doing something wrong. LibreOffice documentation said I could select the articles in the Navigator, right click, and delete them but there is no delete option. I instead tried Format > Sections, highlighted all but the last article, and clicked Remove. Then I saved, closed, and reopened it. But the ODT was still 1.1GB, still prompted me to update the linked content at launch, and when I said no to reclaim all of my changes, all 339 articles were back again. They all show in the Navigator but when I go back to Format > Sections there is only the final article listed. And curiously, Write Protection is reenabled in the Edit Sections pane even though I unchecked it and saved with all documents selected.

UPDATE: I started from square one, created a new blank Master Document, formatted the page dimensions, placed only one article, saved it, performed all the RegEx find > replace commands to remove irrelevant and unwanted metadata, chose Format > Sections > and disabled Write Protection, chose File > Export > ODT and saved it as the regular document format I’m presently working with, opened that document, chose NO at launch to not update the file which would revert and lose all my changes, and attached the resulting file for your review.

I must be doing something very, very incorrectly. Please forgive me. Can you please help direct me with these key issues -

  1. No matter what I do, the content is linked and write protected and prompts to update which undoes every change I make every time the document is opened. How can I embed the content so changes are retained, or at least tell LibreOffice to apply the changes to the linked documents? And how can I get the write protection disabling to save when I reopen?

  2. Is there a way to apply dynamically scaling properties to the placed images, albeit one at a time, so that when my publisher inevitably asks me to change the dimensions of the book, that the images scale accordingly after I go through manually scaling them all the first time?

So sorry for all the trouble. I really hope I can get this to work! Hopefully the attached document sheds some light. Thanks again.

@innerspaceboy: warning! insert>Media>Phot Album is a menu item in Impress, not in Writer. @Hrbrgr suggested an alternate way with Impress but feasibility depends on your document structure.

This doesn’t come from the images, though an hyperlink is still in the properties. I think you can delete this image link because there is an embedded version of the image in the document.

The cause is the master+sub-docs paradigm. Writer sees there are linked documents and asks whether you want the latest version of them. Them link is the sample document is 03b All Articles Extracted to One Folder (with Numerical Prefixes)/339 artist-showcase-terminus-void.docx.

This is a .docx file. As such when you save it after edits, it is converted from internal format to DOCX with approximate translation. In particular, everything you can do on frames or frame style will be lost and converted to approximate direct formatting. Next time you open the document with version update, the import gets reconverted from DOCX to internal format with again yet another approximate translation (roundtrip is not idempotent).
You first task is to preprocess this DOCX to make it a clean ODF document (as .odt).

And, as I suspect it, if your master imports this single doc as a whole, it is not worth to split as master + a single sub-doc. The master approach is interesting only if you have 339 sub-documents but this number is a bit terrifying. Writer can easily handle documents up to 500 pages without performance issues.

This is where a rigorous, strict and systematic formatting with styles without any trace of direct formatting is interesting. You must be aware that Writer offers paragraph (known to Word), character, page, frame and list styles (the latter four being totally unknown to Word which resort to some direct formatting to encode their effect).

In your case, you must first work with paragraph styles. In Writer, the primary test style is Text Body while Default Paragraph Style is reserved to set default attribute values shared by all other styles. Your document is faulty because it is essentially based on Default Paragraph Style with systematic direct formatting. This will prevent you from tuning centrally your layout.

Use Heading n styles for what they are intended to: chapter, sub-chapter, sub-sub-chapter, … headings. Don’t use them for text part of the dissertation (like “I am honored …” paragraph).

Use character styles like emphasis to highlight words in your text (italics in case of Emphasis). Don’t do it directly.

Your next friends are page styles. You probably need only one if your document structure is “simple”, but several if you have a cover page, a TOC, … This is where you can define your paper size and its margins. If you’re clever enough (and your publisher is not too strict), you can compensate for a reduced paper size with reduced margins (within certain limits) in order to keep the same paragraph width.

If the image in the sample is representative of all of them, I’d recommend not to enlarge them margin-to-margin. Instead, give them a conventional width, keeping a “buffer” margin space to accommodate possible paper size changes without the need to resize them.

There seems to be captions associated with these images. To avoid separation of picture and caption (because of a page break), use Insert>Caption after selecting the picture. This will create a combined frame containing the image and its caption. Thgis way they always remain together. The combined frame is controlled by default by Frame frame style. This is where you control positioning. In case of page size change, you only need to adjust parameters in this style and all images will be repositioned. But this adjustment is only necessary if you request some “absolute” location. Using a position like “center” needs no extra adjustment.

Using styles, though the learning curve is rather steep in the beginning, is the only way to spare your pain when the final book “shape” is not yet frozen. Also separating format from contents guarantees you don’t need to review page after page when it comes to prepare the final copy. You only play with styles, optionally Tools>Update>Update All to make sure style changes are taken into account.

Try extension PicTool

1 Like

I have absolutely no experience of this extension, but from the description, I’m afraid this works through direct formatting. OP tells the definitive paper format is not known. Frame style tweaking can solve the issue with page size but if direct formatting is superimposed over frames, this will cause update failure because direct formatting has always precedence over styles.

So, I recommend to be extremely careful before embarking on a mass adjustment of pictures.

Thank you SO MUCH for suggesting PicTool! I got it to work in my test document after an entire day of trial and error, but there’s an issue with using it in the 2,800-page actual Master Document.

Here’s what I found - I had to perform four steps to get it to work.

First I launch PicTool and set Anchor to Character

Then I have to select the Size to XY radio button

Then click OK

This will scale the images to the full page width but not to the magins.

Then, without closing PicTool, I leave Anchor to Character selected

Then I change Set Size from the XY radio button to % of Paragraph Area X

Then I click OK again

This doesn’t appear to have any effect, HOWEVER -

I found that if I then undo the last action in LibreOffice, and then perform the exact same steps above a second time, the images magically scale to the paragraph area within the margins. It must be holding onto some formatting changes made by PicTool from the first set of changes.**

So then I tried this out on my Master Document. It took hours of work because it kept running out of memory forcing me to sign out of Ubuntu and then cancel out of the prompt for document recovery.

But when I reached the Undo step with the Master Document, I discovered that LibreOffice considers every individual image resize action as a separate step.

So there are 1,388 Undos I would need to apply one at a time to go through all of the image changes before repeating the steps to hopefully have them work the second time. And that’s if LibreOffice doesn’t stop responding at any point during that process.

If anyone knows of another PicTool setting which would work on the first shot instead of requiring the undo, I’m all ears! I’ll keep experimenting with every permutation I can come up with.

Thanks!

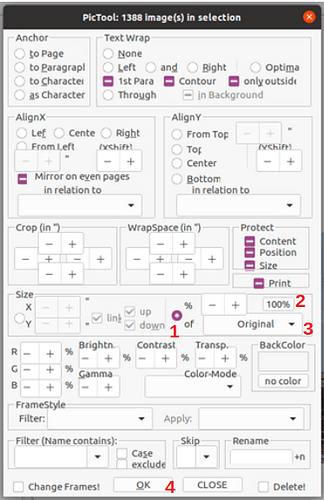
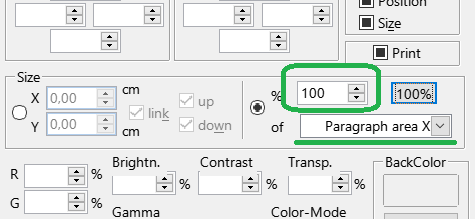
You must set the value to the % box (or click to the 100% Button to fill % box with 100).
pics100

And you can set Undo Steps to 0 to scrimp the RAM in Expert Settings → Tools/ Options → LibreOffice/ Advanced → Open Expert Configuration → org.openoffice.Office.Common → Undo Steps.

Oh! Wonderful! Then I’m nearly there! I was able to recover a backup of the document before I’d applied the first round of 1,388 changes. I want to be exceedingly cautious the next time I perform this task so I don’t lose all my work.

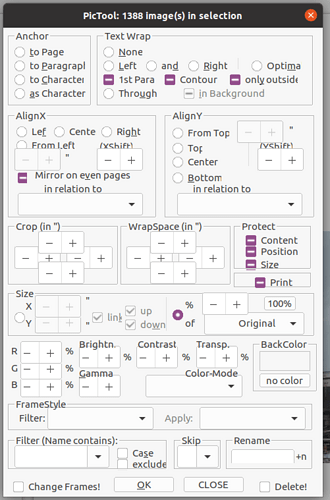
Attached is a snapshot of what my PicTool looks like. I don’t have any numerical windows where I can enter values and the + and - buttons are inactive. But as long as I can follow the steps that worked for the test document I’m hopeful that I can get the scaling to work. I even tried changing the page size after applying the four scaling steps in my test doc and the images did dynamically scale to fit the new margin dimensions which is wonderful! That would mean I might be able to adjust the document as per my publisher with little difficulty once I’ve applied and saved the initial four steps.

Okay - I see the Advanced Setting for Undo history. That’s marvelous. So that I get this absolutely right the first time now - am I to set the value to zero and then perform the initial stages I described in PicTool? From there will I be able to click Edit - Undo to undo the 1,388 separate image scale changes in the history so I can then perform the steps a second time which then appeared to work in my test document?

I feel I’m so close to making this work. I really appreciate everyone’s generous help!

Firstly backup your original document! :slight_smile:

If you will set 0 Undo Steps, then it isn’t possible to use Undo, and every changes will be nonreturnable - of course you can close the document without saving and reopen it for next experiment :-).
If you set Undo Steps to 10, there will be 10 Undo Steps Back, so if the macro will do 1000 changes, you can get back only last 10 changes.
Set the Undo Steps to 0 is good to scrimp the RAM for big and many operations, nothing better.

It seems there is a bug for Ubuntu or for some graphical environment under Linux, because under Windows I have boxes with setable values and not only buttons plus/minus. But maybe the values are setted after click on + or - but it is invisible.

Try next: 1) select radiobox, 2) click to the 100% button [I suppose the click on 100% button will set the value 100 to the %box although the %box isn’t visible], 3) select Paragraph area X, 4) OK

1 Like

I’m so excited! Thank you so much for the linear step-by-step suggestion with illustrated accompaniment. It was exactly what I needed.

I tried your suggestion out on my single-image test document. It scaled the image to within the margins all in one shot, but the page alignment was off. The image was off-center. I experimented and was able to get it to work this way -

  1. Launch PicTool
  2. Choose Anchor to Paragraph
  3. Choose AlignX to Centre
  4. Click Size % radio button
  5. Click on the Size 100% button
  6. Choose Paragraph Area X from the Size drop down
  7. Click OK
  8. Click Close

I then made a test copy of the complete Master Document and tried the steps above. It WORKED in just 2 minutes!

BETTER STILL - Then I tested changing the page size, (as this may very likely be required by my publisher). I changed the Page style width from 5” to 6” and in SECONDS the images all adjusted accordingly to fit the new page style!

This is a major breakthrough for the project! Along with using regex to tidy up all the tables of metadata, I think I should have everything I need now to prepare the copy for publishing.

Thank you everyone so, so much! You’ve made my spring!