I would like to draw a semi-circle with an arrow head. I really read the manual but can’t figure it out. Using Draw 7.4.2. Add arrow head if possible. Thanks for help.
Please improve your question (= modify it without a comment) to describe your goal. Your question may be understood as:
- a stand-alone semi-circle (not related nor attached to anything else)
- a semi-circular arrow connecting two shapes
Do you want an exact semi-circle or an approximate elliptic or polynomial curve is enough?
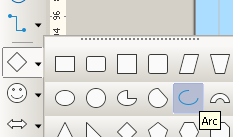
- Choose the Arc tool (in the Drawing toolbar, under Basic Shapes)

- Hold Shift
- Drag to draw a circle
- Click to define the start of the arc
- Release Shift
- Hold Shift and click to define the end of the arc
Tested with version 7.4.7.2 on Windows 6.1.
EDIT: Don’t hold Shift in steps 2.2 and 4 if there is no need to constrain the angles.
Just what I needed!
Thank you very much.
Regards
Bill
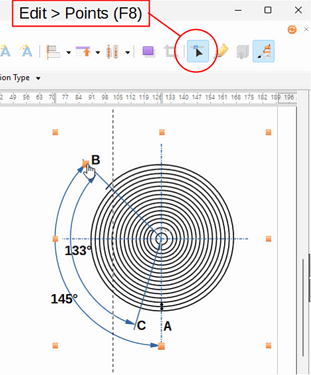
If the drawn arc from the Arc tool is not exactly the angle or distance you want you can modify it.
- Make sure the Edit points icon is highlighted (Edit > Points) and you will see the handles for the generating circle so you can move the entire circle to centre it.
- There is also an extra point on each end of the curve, when you hover over it the cursor changes to a finger
 , click and drag the point to extend or reduce the arc along the circumference.
Thank you. Great Info. This stuff is not in the manual so I’m learning a
lot and collecting some useful instructions.
Regards
Bill
This worked great and easy for a partial circle with an arrow head for
counter clockwise rotation. I would also like to get one with an arrow
head to show the opposite clockwise rotation. Tried but couldn’t get it.
Right-click on the arc and select Line from the context menu.
In the Dialogue that opens, select the tab Line, under Arrow styles you can select your arrow style for each end. Underneath Start style, tick the box synchronise ends and adjust size to suit.
Cheers, Al
Thank you. I got it. Embarrassed should have recognized what “End style”
was for.
Regards
Bill
Use a guide line to help position your objects. Draw a circle with the circle bisected by the guideline. Draw a rectangle with one edge of the rectangle along the guideline. Select both shapes, right click and select Shapes>Subtract.
You should now have a semi-circular Bezier curve. Right click on this curve and select Points. In the Edit Points toolbar, deselect Close Bezier. Delete the extra point (the point that looks darker is actually two points at the same position).
You should now have a semi-circular curve. Right click and deselect Points. Apply a thickness and an arrowhead to the line.
There is a faster procedure:
- select the Curve tool (not filled)
- draw a U-shaped curve (ending with a double-click
Normally, the Points property is enabled. You can check with a right-click on the curve. - the curve is selected with only two green points: position the points at the required diameter positions.
- click on the end points (one after the other of course) and adjust the Bezier control so that it is perpendicular to the diameter and its length is equal to the diameter length
- apply any thickness, colour, arrow head you want
Thank you very much for your response. I will try to follow your
suggestions. I am not very experienced with Draw so it may take me
awhile but will work on it. A half circle would probably be OK but
ideally maybe 1/4, I will experiment.
Since you are so kind, somehow I got the fill option turned on for the
circle and could not get it turned off. The fill color box does not seem
to have an “off”. Would you tell me how to turn it off?
So far I haven’t got it. Using the curve tool I get a straight line with
two squares on the ends. When I click an end box I get an orange circle
in the middle but when I move it nothing happens and all goes away but a
straight line when I click on anything again.
I’ll keep trying.
Regards
Bill
Right-click on the shape and Area. Go to Area tab and None. Note that, since the you used a “filled” tool, the shape is closed. You must remove one line to get an “open” curve.
Using the curve tool is a bit tricky. You begin by left-clicking somewhere with the mouse, move it without releasing the left button at start then releasing it after some length but moving the mouse in a circular movement (otherwise you end up with a straight line).
What for? If you want to connect two shapes (and the connector remain attached to the shapes even when you move them), use the connector tool. Connectors can have various geometries: straight, angle-segmented, curved; with or without arrowheads at ends.
Thank you very much for your response. I will try your instructions. So
far haven’t figured out how to “select both shapes”. Select all option
gets rid of everything.
Regards
Bill

