I cannot work out how to correctly Import my pictures into Writer

Version: 7.1.5.2 (x64) / LibreOffice Community
Build ID: 85f04e9f809797b8199d13c421bd8a2b025d52b5
CPU threads: 8; OS: Windows 10.0 Build 19043; UI render: Skia/Raster; VCL: win
Locale: en-AU (en_AU); UI: en-US
Calc: threaded

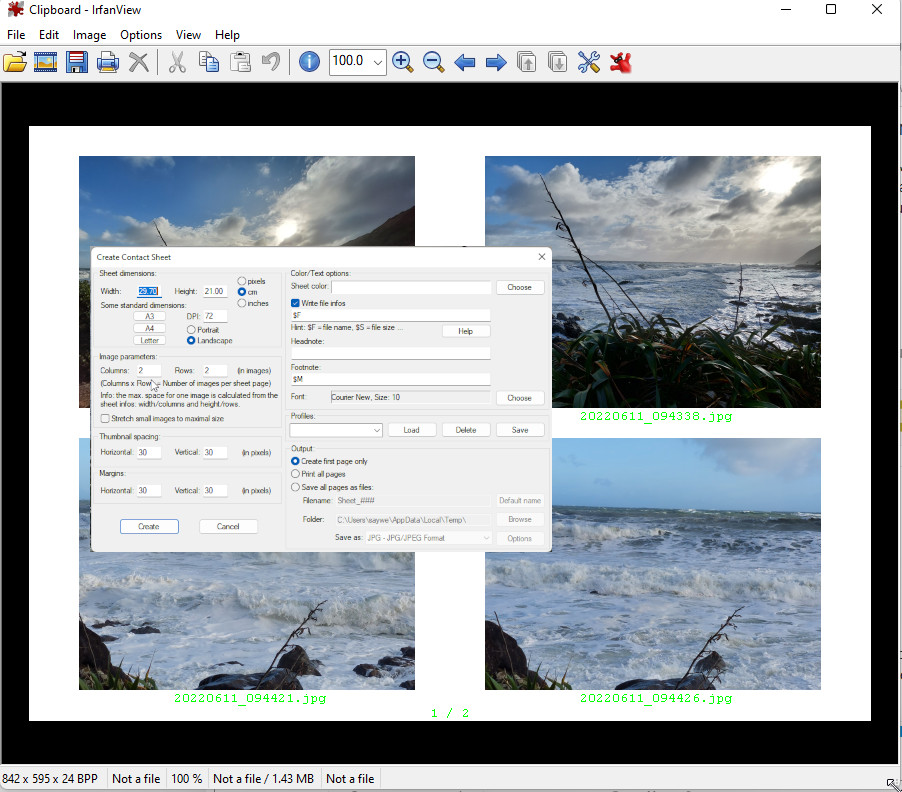
I want to say right from the start that I dont know what I am doing! Ihave created this file “Little Glory.odm” but I can’t upload it at full size, so i have
made this thumbnail
Tiny Little Glory

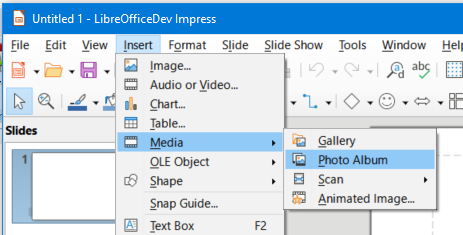
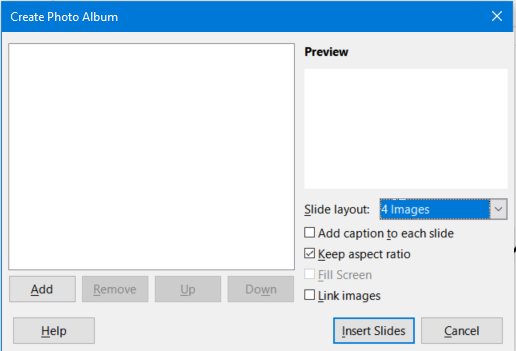
What I am Trying to do is import the four photos into the boxes so that the whole photo is inside the box, but it keeps cutting off the edges, which is cutting off the information I want to show. After two days of tryuing to do this, I am just about tearing my hair out. What I was originally trying to do was create a template? into which I could keep adding different photos.for printing out. The original photo files are 4000 x 3000 pixel JPEGs

Yours Sincerely,
Kaelkitty.

Here are a few basic descriptions.

Insert and edit images in Writer Part 1

Insert and edit images in Writer Part_2

I think you should try a table (see part 2) and adjust the border accordingly.
It is always a good idea to possibly reduce the size of the images before inserting them.
Use an image editor, e.g. IrfanView or Gimp.


English documentation


If you want someone to look at and examine your document with the images, you should upload the document to a cloud and post the link here.

Are you really sure you created an .odm document? The m stands for master. A master document is a kind of binder linking together several ordinary .odt text documents. Managing a master + sub-documents is more complicated than handling a single document.


As suggested by @Hrbrgr, pre-process your photos in a dedicated application like GIMP before inserting them into your Writer document. With colour images, it is not useful to be higher than 300dpi (the printer may dither the colour over its own 600, 1200 or 2400dpi grid making it capable to render more shades). So, scale the image to the target dimensions and reduce definition to 300dpi. Save the thumbnail and insert it into the Writer document.

OK,
I would like to add some more information. What I originally wanted was a blank “picture frame” which I could replicate, and which I could add different sets of 4 photos with the captions. I think I have screwed it up and need to go back to the beginning. I am not sure how to work out the reduced dimensions of the photographs to fit into the frame, if I don’t already have the frame? As for as LO Writer goes, I have never made either a “Frame” or a “Table” and I wouldn’t know where to start. I know the photo’s should be 9cm by 12 cm to fit into the frame, but then I am confronted by 3000x4000 pixels in the original photos. I really dont know how to relate cm to pixels.

I want to point out that I have Asperger’s and I get very overwhelmed if there is too much information at once. Whenever I start trying something new in Libre Office the menus and the choices make me absoloutely nuts. I would like to thank both @Hrbrgr and @ajlittoz for their information. If either of you can help me work this out I would really appreciate it

Yours Sincerely,
Kaelkitty.

Problem 1: reduce size of photos
Applications like GIMP allows you to adapt your photos using common dimensions like cm. You need not compute yourself the correspondence between pixels and cm, GIMP does that for you. An important point is to set the “pixel density”. A figure like 300dpi is correct IMHO because your eyes won’t resolve the pixels at reading distance and the printer needs “macro-pixels” (assuming its native resolution is 1200 or 2400dpi) for dithering to render intensity shadings.
If you store the photo a JPEG, you can also play on the compression level to further reduce the file size.
This will greatly reduce the volume of the photo and decrease stress on Writer.

Problem 2: making a page template with 4 placeholders for photos
Considering your desired disposition, the simplest solution is a 2×2 table with fixed cell size. Put two empty paragraphs in every cell, one for the photo, the other for the caption. Just insert the photo in the paragraph intended for it.

I recommend you read the Writer Guide to learn the various features, notably tables, available in Writer.

Is this just to print images? You might be better to use software for processing pictures. For example, IrfanView has a fairly simple and quick method for printing a number of images to a page. It automatically captions them with the file name. File > Thumbnails select the images, even whole folder, then click File > Create Contact sheet and specify number of rows and columns. You can save the produced sheets to file if you need to add to a Writer document.

1 Like

Perhaps the option in Impress
imagen
imagen
could help.

1 Like