Insert Image not functioning in Calc. Image does not appear

2022-03-28T16:55:00Z

Hi, please could someone help me with this issue in Calc. I’m using:
LibreOffice for Mac v: 7.3.1.3
I have looked for existing answers on this site and through many other Google searches elsewhere, but cannot find a solution. I’d be very grateful if anyone can assist me.

I’m creating a spreadsheet where I need to insert jpg images in a column, but they do not appear.
LIST OF ACTIONS THAT I USE:

  1. Select cell where I want to insert image
  2. Top menu: Insert
  3. Dropdown menu: Image
  4. Dialogue box opens to navigate to folder containing jpg
  5. Options (at bottom of dialogue box)
    (a) Anchor to: Cell
    (b) Link-Unchecked (i.e. set to embed image in spreadsheet)
  6. Select the image
  7. Open (which should insert image in cell)
  8. The image does not appear, however, a tiny red rectangle does appear at the top of Row 1, on the left hand border of the column containing the cell that I selected
  9. When I click on the red rectangle and try to drag it, nothing happens
  10. When I check to see that the image is definitely in the spreadsheet using: Sidebar > Gallery > Images, I can see that Image 1 is listed. I then:
  11. Right mouse button on Image 1 in the list and it reveals:
    (a) Drag Mode > Insert as Copy-Checked
    (b) Display > Active Window-Checked

Try to make the row height a bit higher.

I tried it thanks, but the image still does not appear, just the tiny red rectangle does at the top of the spreadsheet.

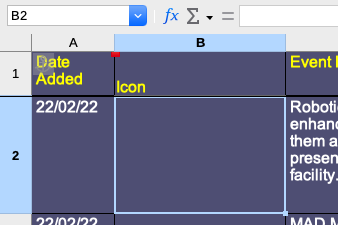
Screenshot 2022-03-28 at 18.53.02

Tiny red rectangle appears at top of spreadsheet after I try to insert image in cell B2

Maybe it has been sent to background, although the anchor should be still in B2.

Double-click on the image in Navigator to select it, then click Format > Arrange > To Foreground

I tried it thanks, but it makes no difference.

I have followed this image insertion method for LO 7.3.1.3 on OS X 10.15.5 using a jpg image and LO provides only the expected, correct behavior for me. Namely, the red rectangular handle appears, but so does the image, spilling over the spreadsheet as far as needed.

What happens if you control+click on the red handle then select Fit to Cell Size?

Please upload an ODF type sample file here.

Unfortunately it didn’t work, thanks anyway.

Thanks, here’s a sample Calc spreadsheet that I reduced to just 5 rows.
It should have 5 images embedded in it, which due to the problem at my end I cannot actually see.
They are however listed when I go to: Sidebar > Gallery > Images.
I look forward to your reply.
LO Calc Test spreadsheet for inserting images.ods (623.6 KB)

Here’s a sample image at exact size of cells, 39mm x 26mm, in Column B titled Icon, to try out if necessary. (BTW: Unlike the Calc doc just uploaded, no download link visible for jpg now that I’ve posted it. RMB > Save Image As, works though).

Showbolt

Let’s try to clarify the advice:
Double-click on the image in Navigator to select it, then click *Format > Arrange > Fit to Cell Size.
Next, you can move the image to the appropriate cell.

Thanks, I tried that method yesterday. However, after selecting the image through Sidebar > Gallery > Images > Cursor on red rectangle > RMB I do not get the correct dropdown menu for a selected image.

I also tried using the top row menu: Format > Image > Fit to Cell Size. It then scales the image to the top row and if I try to move it, it will only move left or right along the top row.

Note that I am not trying to put the image in the top row in the first place, it goes there by default when I try to insert the image into it’s proper cell in Column B.

Now that I can see the image, if I use RMB > Dropdown > Position and Size, I cannot make it move in the Y direction at all. Not that I want to have to position images using this method, but I was interested to see if it would work.

Click on the image with the left mouse button and wait until the cursor takes the form of an arrow with a small rectangle at the bottom, then drag.
In the target cell, “Fit to Cell Size” can be performed again.

Thanks, it allows me to move the image and put it in it’s correct location but it takes a total of 12 steps which is untenable. On my old version of Calc it would take just the first 6 steps (BTW I’d already sized all source images to be exact size of target cells, so didn’t need to use Fit To Cell Size with old version):

  1. Select cell to insert to
  2. Top menu: Insert
  3. Image
  4. Dialogue box opens to navigate to folder containing jpg
  5. Highlight image
  6. Open (which should insert image in cell, but doesn’t. Instead image position defaults to top row and doesn’t actually appear as an image, only a red rectangle, which is not selectable by mouse/cursor). Therefore I go to:
  7. Top menu: Format
  8. Image
  9. Fit to cell size (which makes the image appear, but it’s still in default row at top of spreadsheet and now incorrect size)
  10. Select with mouse/cursor until small square appears
  11. Drag to correct cell
  12. RMB Fit To Cell Size