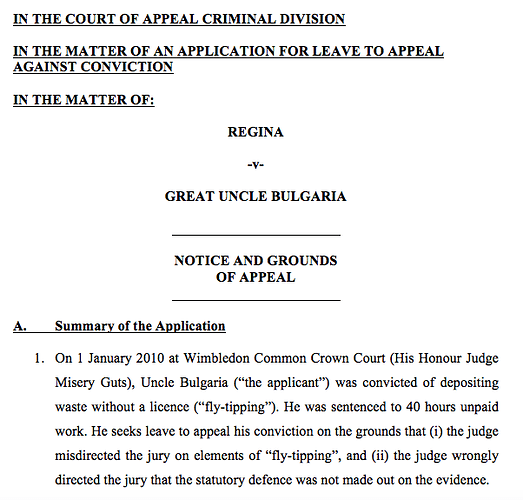
“Tramlines” around text

In English legal practice, it is usual to title documents for use in court by putting the title between “tramlines”. This is an example pulled randomly from the web (the title is “Notice and Grounds of Appeal”):

The usual way that this is achieved is with a row of underscores above the text and then a row of hyphens below it. Something like this:

_______
 Title
-------

This works for many purposes. However, it is not ideal for templates since, if the title changes from something short (e.g. “Order”) to something long (e.g. “Skeleton Argument on behalf of the Claimant”) one has to spend some time messing around adding and removing characters to make the tramlines an appropriate length.

Is there any way of achieving this effect by way of a style so that the tramlines are automatically adjusted to the length of the title? I have tried the following:

  • Using “Overline” and “Underline”: Does not work because the overline and underline are too tight to the text.
  • Using a top and bottom border: Does not work because the border is drawn over the full width of the page.

There may be a way of increasing the leading between the overline / underline and the text or by specifying that a paragraph should only be as wide as its contents but I am afraid I haven’t be able to work one out! Could anyone help?

Thanks!

Use a 1-cell table with top and bottom border set. You can adjust its width and position. If required, you can use 2-cell table with (say) left cell unused and without borders, to make positioning easier.

Using a top and bottom border: Does not work because the border is drawn over the full width of the page.

When there are no indents before and after text for the paragraph. Adjust them. Or simply follow Mike’s advise.

The closest solution I found is based on a custom paragraph style. It can’t adjust automatically to contents width but anyway your example shows a 2-line title while it could have been displayed on a single line.

Here are my experimental settings in the various tabs:

  • Organizer: give it a name and create the dependency to establish default settings if needed (e.g.make it depend on the same title style without “tram lines”)

  • Alignment: Center

  • Borders: select top and bottom borders with appropriate thickness; Spacing to contents allows to move the borders away from text

  • Indents & Spacings: this is the key setting to achieve what you need

    You need to reduce the margins so that the borders will be drawn only around the “effective” paragraph box. Do it symmetrically because your title must be centered in the page (it will then be centered inside the paragraph box with the Center alignment). This is controlled by Indent’s Before Text for left (in LTR languages like English) and After Text for right.

    Separation between the borders and the surrounding paragraphs is controlled by Spacing parameters which set the distance between the border and the other paragraph boxes.

The critical parameter in your case is the margin indent which is fixed/static. This means either you choose an average indent as a trade-off between all your usages (remembering you can put a newline Shift+Enter to force a line break where you deem more appropriate) or adapt the style to the specific usages.

The latter option can be solved either as a limited set of styles linked to a “master” one (so that you benefit from automatic update from your master) differing only in the indent value or making direct formatting on the paragraph instance. I warn you that direct formatting is usually not to be recommended because it overrides the style definition and it is easy to forget that direct formatting was applied, thus leading to weird behaviour until you remove it.

If this answer helped you, please accept it by clicking the check mark :heavy_check_mark: to the left and, karma permitting, upvote it. If this resolves your problem, close the question, that will help other people with the same question.

The solution prior is the right solution. The principle is the same in any text editing program and many lay-out (DTP) programs. Details may vary though.
You can also use the Tab-function to strike out empty part after a sentence to prevent manipulation in the print-out.

In fact, all lay-out should be content driven, as content with the same value should have the same visual characteristics. Also if you want to change these characteristics, you only have to edit the used Style or Format in order to change these throughout the whole document consequently.

I don’t think lay-out should always be content-driven. IMHO, this is not true for “title” pages where correct positioning of elements is critical and paragraph “boxes” must be accurately controlled. On the contrary, in “text” pages (“topic” pages), text flow (graphically and semantically) is the main concern and I agree with your remark.

Thanks for the answers. On further playing around with it, I also found a solution with insert → frame → frame using the following settings:

  • TypeWidth set to Autosize with a small minimum (say 12pt).
  • TypePosition / Horizontal set to centre for page area
  • Wrap → set to None
  • Borders → set to top and bottom as appropriate.

Although this is not done with a style, it is the most automated solution I can find (and also lets you produce a double-line title like in the example).

How do you anchor this frame so that it does not play nasty tricks when surrounding lay-out change due to text addition/deletion? The safest options are 1) To Paragraph (a dedicated paragraph), 2) As Character (in a dedicated paragraph again)