Draw dimensioning line measurements

7.3.7.2 Ubuntu
Dimensioning lines with dimensions showing within the arrows work fine and the measurements in the right hand editing box match those on the drawing and can be edited by entering figures or using + and -.
When the object width is too small and the dimensions are outside the arrows, the measurements in the editing box do not match those on the drawing, and I can see no way of entering figures.
As can be seen on the example - the 15 and 5.01 do not show up in the editing box.

fence_dims_front.odg (19.1 KB)

Perhaps changing the scale would be a workaround.
Instead of 1:10, use a scale of 1:1.
You can set the worksheet (the page) to a maximum of 600x600cm.

Thank you. Playing about with scaling for that purpose is too messy.
Ctrl+Tab and arrow works OK, but I can’t figure out how to get smaller steps but still too coarse. In my drawing alt arrow gives .24cm steps.
Is there a setting somewhere that I can adjust the step?

Set a large zoom level and then try Alt+arrow.
The increment depends on the zoom level.

1 Like

Ah, I didn’t know that! It works.
Hopefully the bug with dimensioning by entering in the width and height boxes will be addressed at some point.

The easiest workaround is the one proposed in the bug report linked by Regina.

  1. Make sure you know the desired measurement beforehand
  2. Start the Dimension line accurately at one end but make it big enough that the dimension number (incorrect) and unit fits between the arrows
  3. With the dimension line selected, click Format > Position and size > Position and Size (F4)
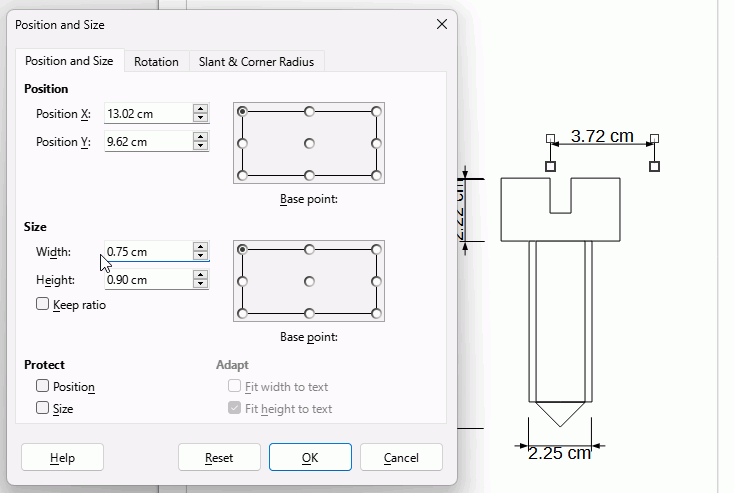
  4. Under Size select for Base point the accurately placed end then enter the measurement in Width or Height field. OK

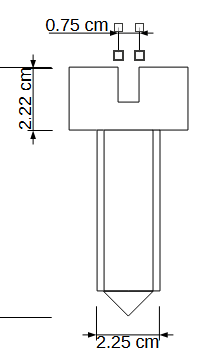
In image below I set the slot width to 0.75 mm

To get the resultant line
DimensionLineResulting

Can you please tell us which LO version and OS you are working with. Thank you.

From at least 6.4.7.2 (the current oldest I have installed) to 24.2.2.2
SizeDimLinesForSmallMeasurements

In the drawing sample from the question, extend the dimension line so that the text is inside the dimension lines. With the dimension line selected, press F4 , enter the accurate dimension and click OK.

Version: 6.4.7.2 (x64)
Build ID: 639b8ac485750d5696d7590a72ef1b496725cfb5
CPU threads: 8; OS: Windows 10.0 Build 22631; UI render: default; VCL: win;
Locale: en-NZ (en_NZ); UI-Language: en-GB
Calc: CL

2 Likes

@EarnestAl ,
Thank you very much for your detailed description, it now works for me too. :+1:t2:


Version: 24.2.2.2 (X86_64) / LibreOffice Community
Build ID: d56cc158d8a96260b836f100ef4b4ef25d6f1a01
CPU threads: 8; OS: Windows 10.0 Build 19045; UI render: Skia/Raster; VCL: win
Locale: de-DE (de_DE); UI: de-DE
Calc: CL threaded

I’m on 7.3.7.2

Thanks ErnestA1, your method works great!

Yes, that is a know limitation of the dialog. The dialog shows the size of the bounding box of the dimension line.

There is the bug report 97161 – Size of Dimension line objects in small scales are buggy and the feature request 145969 – Divide common settings from object-specific settings in 'Position And Size' dialog to improve the situation.

The position of the dimension line is determined by the points, which are normally hidden by the handles of the guides. You can set the position of these points with a macro. Another way is to traverse the points with Strg+Tab and use the arrow keys to move the points to the desired place.

1 Like

Thanks. What is strng?

Sorry, that was from my German keyboard. For English keyboard it is Ctrl+Tab.