How to type glosses

I have LO 6.3.4.2 on Ubuntu 18.04, installed from the PPA.

I write academic papers for linguistics where I frequently need to use a gloss, and I can’t find any way to do it in LO. A gloss is a (usually) three line explanatory example of an utterance in some language that is being discussed. I will try to write an example here, but the spacing will be off because of the nature of web pages. For my example I will use Spanish as the language under discussion.

Temo … que … esto … parece … mal.

Fear.1.s.pres.ind that.cp this.dem. seem.3.s.pres.ind badly.adv

‘I fear that this appears bad.’

Technically, the ‘gloss’ is just the second line, i.e., the linguistic explanation of the text. The idea is that each word in line 1 must align with the word where it appears in the gloss (line 2). The third line is just a free translation of the utterance. (The … do not really appear in a gloss; I had to add them to make spacing because this web page strips actual spaces.)

The problem is how to get the words in line 1 to line up with the words in the gloss. The only way I can think of to do this is to use tabs, but that means that you have to change the tab settings all over again for the next gloss. And setting the tabs is not trivial - you have to get the spacing just right to make the lines appear correct.

The only way I can think of to write glosses is to abandon LO and write the document in TeX using the linguex package. I hope someone can save me from that fate.

(The … do not really appear in a gloss; I had to add them to make spacing because this web page strips actual spaces.)

Hint:

Using             preformatted         text    won't remove          spaces

Looks like Ruby for Eastern text … interesting if Ruby could be applied to Western text?

I would use tabs, then converting each two lines (text + its gloss) to a text table. Yes, quite tedious. Thus I would consider changing the tool and working in a Calc spreadsheet.

Following @mikekaganski’s suggestion, I used rubies:

gloss

Note that the gray background does not print. It is only a visiual clue that you cannot edit directly that text.

It is only a workaround and setting up glosses becomes quickly tedious when you have many of them.

  • Enable “rubies” (done only once)

    • Go to Tools>Options, Language Settings>Languages
    • In Default Languages for Documents, check the Asian box (default language does not matter because you won’t use any)
    • optionally, check For the current document only if you’ll use the workaround only in this document, so that the feature is not enabled which could slow down Writer operation (noticeable only on low-end computers)
  • Annotate your text

    To create a new gloss, put the cursor where you want the group (word + gloss) to appear and Format>Asian Phonetic Guide.

    To add a gloss to an existing word, select the word and Format>Asian Phonetic Guide.

    In the dialog, Base text is the text which will be decorated and Ruby text is the gloss. You can choose the position and alignment of the gloss. In the example above, I used Center and Bottom.

    I kept the default character style Rubies. Since the gloss seemed too small, I modified the style to increase font size. You can make any variation you like. However, rubies are a single sequence of characters, therefore you can’t format part of it separately from the rest. E.g., you can’t highlight the translated word (like “fear”) in red and have grammatical information in black.

Note this is an abuse of the rubies feature. Consequently, don’t put too much pressure on it.

To show the community your question has been answered, click the ✓ next to the correct answer, and “upvote” by clicking on the ^ arrow of any helpful answers. These are the mechanisms for communicating the quality of the Q&A on this site. Thanks!

In case you need clarification, edit your question (not an answer) or comment the relevant answer.

Rubies is a much better solution than a borderless table. I tried to record a macro to open the rubies dialog box and select ‘bottom’ for the position so I don’t have to take my hands off the keyboard to add a gloss. Unfortunately, you cannot record a macro to open a window, but I did successfully use Tools > Customize to assign Ctrl-Alt-R to open the dialog box. I still need to use the mouse to select ‘bottom’ for the position, though. Wish I could make ‘bottom’ the default.

Try this macro:

DefObj o : DefStr s
Sub setRuby
	' Sets ruby to word at current cursor '
	Dim oContr, sText, oList(0), oData(3) As New com.sun.star.beans.PropertyValue
	oContr = ThisComponent.CurrentController
	sText = InputBox ("Enter Ruby text", "Ruby", Chr(1))
	If sText = "" Then Exit Sub ' cancel '
	If sText = Chr(1) Then sText = "" ' empty + OK = delete ruby '
	' https://wiki.openoffice.org/wiki/Documentation/DevGuide/Text/Ruby '
	oData(0).Name = "RubyText"
	oData(0).Value = sText
	oData(1).Name = "RubyAdjust"
	oData(1).Value = 1 ' RubyAdjust_CENTER '
	oData(2).Name = "RubyIsAbove"
	oData(2).Value = False
	' https://opengrok.libreoffice.org/xref/core/offapi/com/sun/star/text/RubyPosition.idl '
	oData(3).Name = "RubyPosition"
	oData(3).Value = 1 ' below '
	oList(0) = oData
	oContr.setRubyList(oList, True)
End Sub

Mike,
Thanks for the macro. Unfortunately I don’t know what to do with the code. I want it to be available to any document in Writer, but I can’t figure out where to put it in order to achieve that. And I can’t figure out how to save it either. There are a bewildering list of places in the macros tree. (And it doesn’t help that I’m on a UHD display so the icons are all about 2mm high.)

  1. In Writer, go to ToolsMacrosEdit Macros
  2. Make sure to open My Macros & DialogsStandardModule 1
  3. Paste the macro there as is; press Ctrl+S to save the module
  4. Return to Writer; go to ToolsCustomizeKeyboard, and assign a key combination to this macro

I don’t have Edit Macros. In Tools > Macros >. But never mind, I finally got it saved, and assigned Ctrl-Alt-R to it. However, it centers the text instead of setting it left aligned. To fix this I edited:
oData(1).Value = 1 ’ RubyAdjust_CENTER ’
to 'LEFT and re-saved it, but it still centered the ruby text until I figured out that I needed to change the number on that line as well - to ‘3’ for left aligned.
But now that I have the ruby text left aligned, it is changing the text on line 1 so that it expands to the width of the ruby text on line 2, i.e., I get:

T … e … m … o (ignore the …)

Fear.1.s.pres.ind

Instead of:

Temo

Fear.1.s.pres.ind

I don’t know how to fix that. :frowning:

RubyAdjust_LEFT is 0, not 3: 3 is RubyAdjust_BLOCK, which gives that alignment. You may replace all that 2 ' RubyAdjust_LEFT ' with com.sun.star.text.RubyAdjust.LEFT for convenience. See https://opengrok.libreoffice.org/xref/core/offapi/com/sun/star/text/RubyAdjust.idl.

You could figure that by opening normal Ruby dialog after using that “3” and checking the resulting alignment there :wink:

Ah! Now it’s working correctly. Thanks a lot for your help!

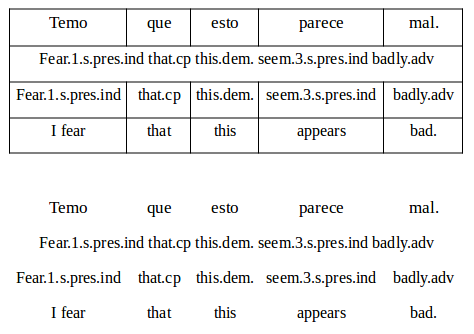
It’s fairly straightforward to use a table for this in Writer:
image description

After creating the table, select it and choose Table --> Properties, then in the Table-tab, choose some other alignment than Automatic (this makes column width editable individually). Also in the Borders-tab you can choose whether to display cell borders.

One question back: Rows 2 and 3 in the image above are two versions of the same; which one would you use?

If you’re going to use a table to do this then the cells of the third row must be combined. The third line is just a free translation, so it is all one sentence. The spacing requirements apply only to the first line the second line. You could also just make it a two-row table and stick the free translation underneath the table, but then you might run into line spacing issues. And having said that, rubies is better. :slight_smile: