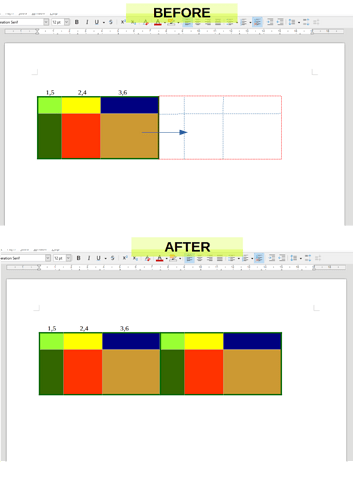
I would like to copy a table and insert it right beside the existing table
Can I do that and how? 
No. Tables extend from margin to margin.
EDIT below (extended to four solutions instead of 3)
You have then three solutions to work around this.
-
use a 2-column section with no gutter between columns. Put the first table in the first column,
Insert>More Breaks>Insert Column Break, put the second table in the second column.
You’ll however experience problems if you’re too close the bottom of the page and your tables will be split and spill over the next column. -
NEW: create a 1-row, 2-column table and paste your tables in each cell
You may meet problems if you’re too close to the bottom of the page unless you allow cells to split across pages.
This may be the easiest of all solutions. -
use frames to host your tables and position the frames next to each other
But using frames is rather difficult and not user-friendly. You’ll also experience problems with page limits if you don’t configure correctly the frames. -
change the "geometry of the first table, adding the required number of columns for the second table. Paste the data and adjust formatting (eventually merging cells).
Your job wll be easier if you extensively styled your cell contents (both with paragraph and character style). Unfortunately, there is no style for cell background or border.
PS: it would have helped if you had mentioned OS name, LO version and save format. The latter is the most important as solution reliability and stability is guaranteed only in .odt format.
Thanks I like the first solutions
(How can you see the breaks)
…
- I don’t understand why you cannot add table columns right after the last columns of a table. eg. “Select last Column” → Table → insert → “Columns after”
- This does not give you a column after last column, which is intuitively what one expect. Instead you get a row after the last row??
OS win 10, Version: 7.4.2.3 (x64), PDF (going to print it out on work)
Enable View>Formatting Marks (and the various Boundaries). It really helps a lot.
Works as expected for me. Are you really sure you selected Table>Insert>Columns After and not Row After?
No, this is not the format into which you save your document. It is an export format (whether you File>Export As or you print it).
Yes I did - But because of the image that I inserted into the table, it seemed to make a row below (this is not shown on my attached image example) - so sorry, the problem description was incorrect. The correct one would be:
It’s a bit annoying that the table thinks it has to be “smart” and adjust its size according to the image - Let me know if you know how to just insert the image into the table without the table starting to expand
Attach a sample document so that I can experiment.
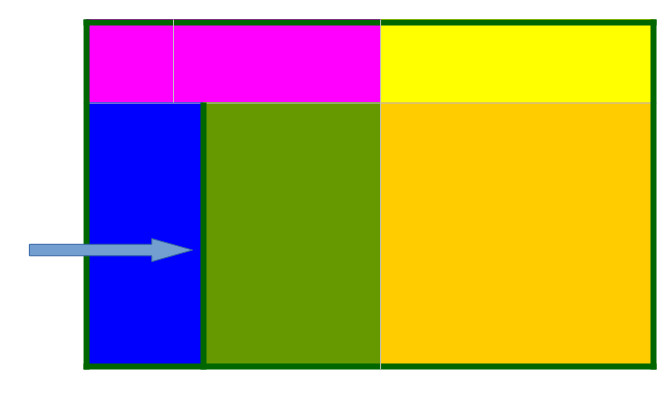
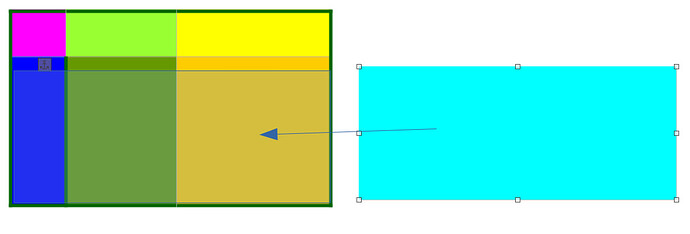
I want to put the blue “picture” into the table without any of the borders (inside - outside) will moves
bonus question also can I move the single Blue cells right border (fat green) witout moving the borders of the rest of the column?
Sample.odt (11.5 KB)
The problem here is the mixture of two kind of objects which ignore each other: table and frame (picture).
- A table cell contains text and the cell width constrains text, i.e. text is restricted to extend only within the width of the column, eventually extending cell height to accommodate its size.
- A frame “borrows” its space from text area, pushing text away from it. The specific text area is determined from the anchor point.
- Table and frame have no relation to each other: table is not text and consequently is not concerned by the wrapping properties of a frame; a frame lives in some text flow and will not influence a table because it is not part of a text flow.
In your case, the frame (picture is anchored in the dark blue cell of the first column. The wrap properties have an effect on text in this cell only because each cell is an independent text flow. The other cells have no idea about the existence of the frame because the anchor is not in any of them. As a consequence, text is laid out as if the picture didn’t exist, resulting in text behind the image.
There is no solution global to the table (as I mentioned, everything is fine in the cell of the image anchor). Your picture must be manually resized or cropped so that it is not larger than the cell. Otherwise, position it outside the table (in margins for thumbnail images or aside as in your drawing).
can I move the single Blue cells right border (fat green) witout moving the borders of the rest of the column?
Since the sentence is not very clear (according to your alias, you’re likely German and I can read German; so perhaps reword your question if my answer is not the expected one), I understand as a request to draw borders around a cell or a column separately from the others.
Select the cell or group of cells, row or column you want to decorate. Table>Properties, Borders tab. What you set now will be applied only to the selection.
can I move the single Blue cells right border (fat green) witout moving the borders of the rest of the column?
Can I move the right border of the blue cell without moving some of the other cell’s column’s border
Like this:

The way I do it - is to split one cell - move the border - and merge two cells again
But there must… should - be a smarter way. I have tried to select a cell and then go into the properties of the table - but without success - and that method cannot be said to be smart either
Don’t want to “decorate” anything (this time)  - And Sorry we are not Countrymen…and my German is worse than my English
I have read your great review. Good to learn. I like tables in my notes and documents. Preferably with writing in different colours, fonts, styles and backgrounds etc. And preferably " spiced up" with picturer, figurs, arrows and illustrations. I don’t really think I’ve come across any program yet that does this quite well. Tell me if you know a good free program, a layout program
Tables are based on a regular grid. In the simplest case, one cell = one grid box. The first effect of split/merge commands is to modify the grid topology, i.e. add new grid lines (deleting grid lines happens only when cells no longer use the candidate line). The modified cells always occupy an integral number of grid boxes.
The consequence of this is: dragging a cell boundary moves the underlying grid line and this has a global effect on the table (also moves the boundary of any other cell aligned on this boundary). So, to change a single row in your table, you must first split some cell in this row in order to create a new grid line not shared with other cells. Your procedure is the only I know of. Not very user-friendly but there is no alternative.
Regarding your question about an application for your work with pictures, I’d need more information about it. There are two classes of apps:
- flow driven: contents is a unique text intended to be read from start to end (ex.: a novel); pages are allocated on demand depending on text size
FOSS suite: LibreOffice - page oriented: user creates pages which contain “blocks” independent of each other (some may be linked so that contents overflows in the next in the sequence); each block may contain text, pictures or both; each block or group of blocks behaves like a different document (ex.: a catalog or a newspaper)
FOSS app: Scribus
These two classes imply a huge difference in workflow.


