@ajlittoz was extremely helpful in answering my question about not being able to copy and paste. Next question: I print a monthly newsletter for the senior citizens in my area. In WP I used to be able to create the 8 half pages in numerical order and they would print in the way they needed to print in order to fold the two pages together. I don’t know how to set that up in Libre. Could you help me? In Libre I have to create in the order they print: 8 and 1, 2 and 7, 6 and 3, 4 and 5. I use 2 sheets of paper with 2 half pages on each side. Also, I like to number my pages at the bottom like -1-, but when I pit the one in, Libre puts a line through it. It didn’t used to do that.
Newsletter page ordering
Just keep the pages in normal order and use booklet printing.
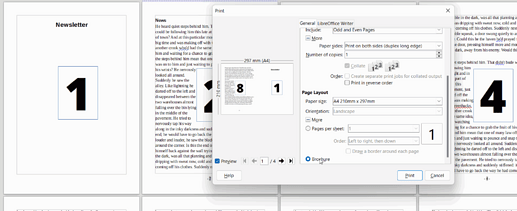
- In the print dialog (General tab) there is a tiny square near the bottom with a + or - in it. This expands extra options. (May be a More button in some versions). Click that.
- In the extras (sometimes you need to scroll down to see them) you will find the Brochure option. Select that. The preview pane will change to display first and last page (1 and 8) for the first sheet printed.
Line through the page number
This is an autocorrect feature. To disable it,
- Select menu item Tools - Autocorrect - Autocorrect options …
- Select tab Options
- Untick the two boxes at the fourth item, for Automatic bold, italic etc.
- Personally, I like to correct my own errors rather than have the software second guessing me. If you are like me, untick all the entries while you are there.
Page numbering
I suggest you use automatic page numbering instead of manually inserting the number at the bottom of each page.
How to enable page footer and insert a page# field there:
- Menu item Insert - Header and footer - Footer - <your page style>
Normally there will only be one entry at the last step, showing Default page style or a similar item - At the bottom of each page you will now have a footer section. Content here repeats on every page. Click inside that.
- Push tab once to move insertion to the middle.
- Select menu item Insert - Field - Page number. Type the hyphen on either side as you like.
I must not have made myself clear enough. I need to create two pages on each side of each sheet. Making two columns doesn’t work, so I need to set up the sheets to look at each sheet as two pages in landscape side by side before I start to create. There is an option for multiple pages per side in the properties on the print page, but you can’t check it and booklet also, and I don’t understand what N-up means. In the file menu, there is a brochure option under printer settings, but I would need to set my page up to use it. I seem to remember years ago when I was using WP there was a brochure option there also.
Also, I did what you said to do on the lines through my page numbers and it didn’t work. And I see that there is more information here than in my email, so I will try the advice for the auto page numbering as I couldn’t find that.
@keme1 did an excellent precis of brochure printing, you might have been put off by the apparent “columns” in the preview but look closely at the preview and check through the pages, they will be as you want them.
To reiterate his points:
- Write your pages in single page portrait (as if for a letter) and let the printing put the pages together in order as a brochure.
- When you come to print, in the dialogue select
- Print both sides (duplex long edge) or similar
- Brochure
Here is the demonstration file I made that lets you see the preview pages easily, just click the Brochure radio button and then use the arrows under the preview to check.
BrochurePrinting.odt (12.2 KB)
Note: Printing as a brochure will reduce everything by 70% so if you want the printed font size to be 12 point then multiply by 1.4 (inverse of 0.7) which gives 17 point. In the sample, I set the Default Paragraph style to 18 point and the Heading style to 20 points which should cover most styles. I set the footer to be different for the first page so there isn’t a page number on the front page
To fix the existing page numbers with a line through, select one of them and press Ctrl+M to revert to default character style which should remove the strikethrough.
I suggest that you refer to the Writer Guide 7.2, Brochure printing starts at page 148 but you can easily find explanations on other issues as they arise. Download from English documentation | LibreOffice Documentation - LibreOffice User Guides
Cheers, Al
Yes you did. On the other hand I didn’t. @EarnestAl helped. Hopefully you find out by his elaboration.
It usually takes a bit of fiddling before you get it right the first time. In particular the duplex setting may be tricky. Page turning is over the long edge of the page, but sheets should turn over the short edge. Get it wrong and half your pages are upside down.
Basically you set Writer to duplex long edge (as EarnestAl explained) and on the printer settings you may need to set “duplex short edge”. How this translates to your system I do not know. Writer, computer, print software and print device interact in ways which are not always logical. That is why fiddling may be required.
While it requires some initial effort, it will pay back in the long run. I promise!
Disabling the option will not fix previously “corrected” numbers, but should stop Writer from doing that in the future. The overline is a formatting feature which may stick to the space where the number was, so you may need to delete more than just the struck out number before you type it back.
Yes, I also miss the old WP at times.
I remember now that I did have problems with my Brother printer trying to over-ride my settings and had to write out how to print a brochure (using A4 pages on A3 sheets however) with exact steps. I don’t know if the steps I took can be applied to your printer but possibly changing names.
BookletPrintingBrotherMFC.odt (267.2 KB)
I do not see any images of the Lexmark CX310n laser printer driver screen, even the user guide is quite sparing of information, so I cannot give detailed steps.
BTW you can attach an image to your question or comment by clicking the Upload icon


