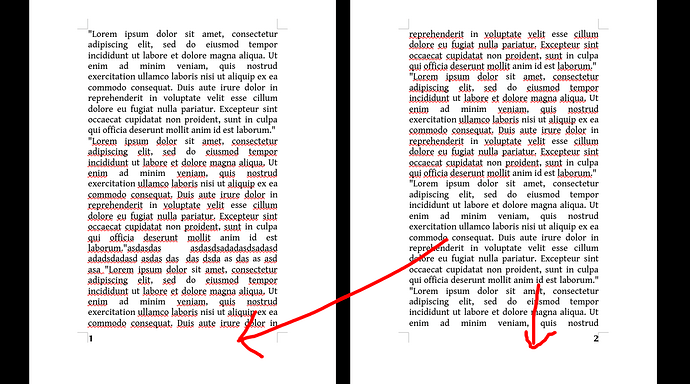
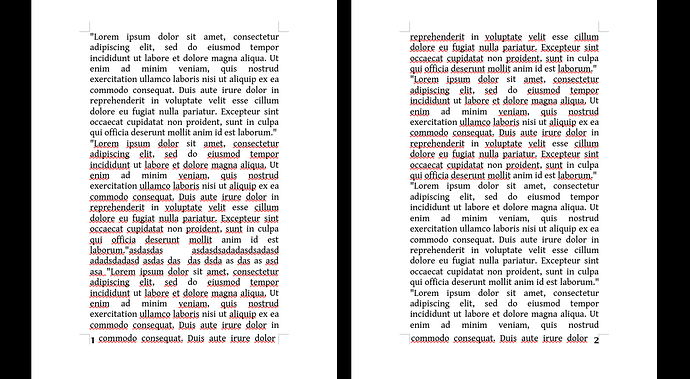
Wrap text around "page numbers"

Hi,

Is there a way to wrap text around page numbing? I would like to find a way to use more of a page area efficiently.

I have been trying various different ways to do this using footers and automatic pager numbering. I have made 2 image examples of a Before (red arrows showing wasted space) and After (pulling text down to level of page numbers) of what I am trying to archive. Would anyone know how this could be done specifically with automate page numbering? Thanks


Instead of concealing the page number in a forest of words, why don’t you just reduce the outer side margins by 5mm?
.
White space is more important to the reader than getting more words per page

Though I disagree with the idea, here is a solution. Remember that white space in books is the base for a nice layout.

You did not mention OS name, LO version and save format. The solution is only valid for .odt and will fail for DOC(X).

I assume you are familiar with page styles. The suggestion also uses frame styles.

Your screenshots show a different layout for left and right pages. I suppose you already have applied built-in Left Pages and Right Page page styles to your document. These styles automatically alternate.

Let’s start by configuring the page styles.

  • tick Footer on in Footer tab
  • since there will be nothing in the footer, set Spacing to 0cm
  • for the same reason, set Height to 0.1 cm (the absolute minimum
  • and untick AutoFit height

Create a frame style Left Page Number Frame (right-click on Frame and New):

  • give it Name Left Page Number Frame in General
  • in Type:
    • make sure Ancho is To paragraph
    • untick AutoSize boxes and set Width and Height to 0.7cm
    • Position Horizontal is Left to Page text area; Vertical Bottom to Page text area
  • in Wrap, make sure Settings is Parallel, *Spacing is 0cm except Right 0.2cm, Allow overlap is unticked
  • for the demo, I set a background colour in Area and enabled Borders; adjust to your liking

Create a second frame style by right-clicking on Left Page Number Frame and New. The new frame style inherits all properties from its “model”. Only modify a few settings:

  • in General, give it Name Right Page Number Frame
  • in Type, change Horizontal Position to Right
  • in Wrap, set all Spacing to 0cm except Left to 0.2cm

Create a dedicated paragraph style for the page numbers.

  • in General, Name it Page Number
  • in Indents & Spacing, set all distances to 0cm
  • select Alignment Center
  • in Font adjust to your liking: I simply set Size to 10 pt and Style to Bold; since I didn’t touch (very important!) Family, I inherit from my default font face

Now all tools are ready.

  1. Click in the footer of a right page (which should be Right Page style; if this is not the case, apply it). A very tiny footer appears.
  2. Insert>Frame>Frame
    A standard default frame is created, styled Frame and position roughly in the center of the bottom margin. While it is large, it is easily accessible. Put your text cursor inside it. Make sure your are in the contents and the frame itself is not selected.
  3. Insert>Field>Page Number
  4. Apply paragraph style Page Number
  5. Click now on the frame border to select it
  6. Apply frame style Right Page Number Frame
    The frame is resized and repositioned in the text area.

Do the same in a Left Page footer to apply Left Page Number Frame.

If you are not satisfied with position or other parameters, refrain from adjusting with the mouse. Frames are extremely sensitive to direct formatting and this creates an unmanageable mess which can’t be easily cleared.

Any adjustment must be made in frame style configuration. In case the changes are not immediately visible, Tools>Update>Update All. If they are still not visible, you have nasty lurking direct formatting. Apply another style on the frame, e.g. Formula (don’t worry for the effects) and reapply xx Page Number Frame style. This should fix it.

Demo file: AskLO_PageNbrInText.odt (32.9 KB)

Hi ajlittoz

Thank you for such a quick and detailed reply!

⬝ My OS: Archlinux
⬝ File format to be used: Only .ODT
⬝ My document is not meant to be read by other people, nor to be pretty or be nice as suggest by EarnestAl, it is solely for my use only as reference book and this layout works perfectly for my needs
⬝ Currently my document weighs in at around a 1,500 pages. have to carry these notes around at times, like a small science book which I want to try and reduce the physical dimensions as much as I can
⬝ The notes are to printed out and used as a book, as such I have usually gone for a mirrored layout to get page numbers to correctly sit on the left/right corners.
⬝ The example image is not how my document looks, it was just to explain in simple terms what I want to archive with the bottom of the page numbers only. My document is actually A5 and I print 2 images per side on A4 so each page can be folded like a book. All my margins are actually set to 1 cm which works well for me

I walked through the explanation you gave, its lengthy, but worked exactly! There is no way I would of figured this out. The example file you uploaded really helped. I really feel this should just be a setting in the footer options… after all you change the width of the footer, so way not its length? That would of have the archived what I was after without having to wade through and setting up styles. But thanks for your time/effort, it has solved my problem :slight_smile:

Cheers

If you don’t practice styles in a document this size, expect performance issues, unless you never embolden, italicise, change font or size, use headings, … In which case, a simple text editor would be more efficient anyway (except for page breaks because there is no page break in a text editor).

If you have typographical variations, applying a handful of styles (paragraph, character mainly) dramatically improves performance and reduces file size in tremendous proportion (because you have only a single definition of the “variation” which is repeatedly applied while it is systematically duplicated when you direct format).

From personal experience, styling is mandatory above 5 pages (yes, mandatory for performance, peace of mind and versatility in formatting).

Certainly no. What I implemented is a violation of typographical and logical rules. A page is split into logical disjoint areas:

  • margins (no-print in Writer)
  • header (common contents shared by a group of pages)
  • contents (all contents areas in successive parts are connected in a virtual continuous huge text flow area)
  • footer (common contents shared by a group of pages)

These areas are logically independent. Any data in an area is visually identified as belonging in one these logical units. Implementing your specification, I sent a footer element into contents area. This is against logic. However it is possible with the frame feature: frames are intended to host illustrative “out-of-text” data like a margin note or an image (optionally with a caption for easy reference from text). A frame is not supposed to be “read” in any order relative to text because it is external to it. Therefore, frame parameters allow to position it anywhere in the page. But here I sent a footer element which should logically remain in the footer area into text area. I had to pay special attention to wrap mode so that there is no adverse interaction/conflict with text.

I don’t understand the procedure. Have you 4 pages per sheet (2 pages per side)? In which case you can’t fold the sheet, unless you follow a contorted print procedure so that you get the A5 pages in correct order (either as individually folded or folded in groups).

I do indeed print to A4 with 4 pages per sheet which can be folded. I just do a final export to a PDF and run that through a linux cmd line program called qpdf which arranges pages so they come out of the printer in the correct order to be folded.