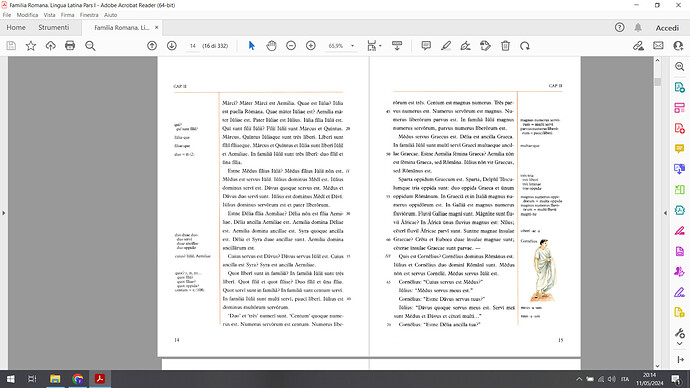
Re-open your question (don’t use a comment) to add OS name, LO version and save format.
The vertical line issue is easy to solve with partial border in page style. However I don’t guarantee exact layout with horizontal border under heading.
Margins are no-print zones in Writer. The only way to add data into them goes through frames. The main problem here is to design appropriately a frame style which will take care automatically of possible overlap between different frames (if you try to position manually these frames, considering their number, this will turn into a nightmare; consequently the process must be handled automatically by Writer). The base question is how text inside these various frames relate to text. You can consider these are kind of margin notes (as opposed to footnotes). They have an anchor point (where you’d find an anchor or number identifying the note). To make the anchor invisible, the number can be replaced by a space character. In addition, a character style applied to the anchor can force font size to 2pt (the absolute minimum in Writer) so that the anchor occupies a hardly noticeable width.
Margin text or illustrations are technically the same: they can use the same frame style. But for finer grained control, it is probably preferable to design two styles with the same general properties.
Line numbering as implemented in Writer is not the same as in your screenshot. Writer line numbering restarts at one at top of every page. Also there is a single line numbering. You cannot override this numbering to replace it with another one (the Roman numbers which seem rather to indicate sub-part or “outline” progression). This Roman numbering marking the parts of the lesson can be done more or less with list numbering (or heading numbering) and will display in a dirrent area than line numbering.
Add a more formal specification of your goal. As soon as I get my hands on my main computer I’ll attach a sample of a similar document. Be aware this layout is advanced usage and you better be used to style manipulation and configuration, notably frames styles which is rather unstable and most difficult to tame. Over all, any direct formatting will completely ruin your chances of success.
EDIT 1
ComplexLayoutExample.odt (43.7 KB)
is an example of margin notes. It is more complex than your request because notes need also to be numbered by the verse number.
EDIT 2
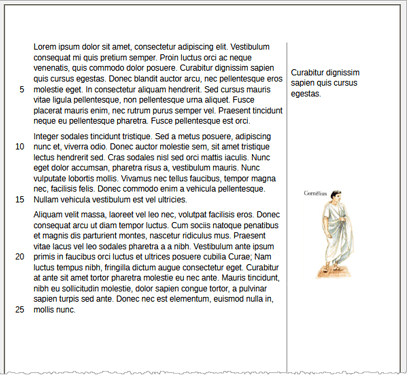
I found fun in the question and it reminded me of my classes (when I was young … quite a long time ago). So, I tried to design something as close as possible to the screenshot.
Here are the challenges:
- Line numbering and “lesson sub-part” conflict
In the example, “lesson sub-part” (Roman number) take precedence over line numbering and replaces it. This is not possible in Writer. Line numbers are “external” to text and quite independent. If “lesson sub-part” is added (with a list style), it will mix with line number. Both are displayed in the same location.
- Fix: line number position is offset towards the center of the inner margin to leave room near text for “lesson sub-part”.
- Suggestion: as you can’t reset line numbers at will, I recommend line numbers to restart at 1 on every page to avoid large numbers which may overflow available space in the margin.
- “Lesson sub-part” can’t automatically alternate in inner margins
My implementation is to use list style Numbering IVX. Therefore the item number is always at left. I tricked Writer to force the number in the margin. It is dirty but it works (use of blank “separators” with a specific alignment).
- No use of drawing objects
Since drawing objects always cause difficult tuning problems, I tried not to use them for line decorations. Unfortunately it does not give the same look as the example. If you want strict equality, attach the drawing objects to the header. But be aware that they can’t be controlled by styles and they’ll have to be formatted/positioned “manually” (preferentially through the properties dialog, not the mouse otherwise you’ll create havoc).
I was also compelled to use Left Page and Right Page styles because border definition does not alternate in Mirrored configuration (affects apparently only margins).
- Marginal notes
These notes are typed inside frames. Basic style is Marginalia. Be very careful not to apply any direct formatting, even with the mouse, lest all automatic repositioning is disabled. Style was very tricky to tune.
Unfortunately, frame position cannot be specified as inner or outer margin.
- Fix: definition of a “symmetrical” style Marginalia Left for the left margin.
-
Inconvenience: you must manually choose which style to apply. In case of edits, with text flowing to next page, you must manually re-apply the newly-correct style.
(EDIT 3) @EarnestAl drew my attention on Mirror on even pages check box I completely ignored. I modified Marginalia frame style and update the attached file. Now a single style does the job on both pages.
- Page number, chapter number
As I tried to minimise the use of frames (always a good idea, performance-wise), the header is limited to the area between margins. It is not flushed near the edge of the paper like in the example.
If you consider this is more reader-friendly, anchor a text frame in the header and footer (like @EarnestAl did) and insert the ad-hoc field inside.
Updated AskLO-LatinClassBook.odt (33.7 KB)


