
When your purpose is only a different header for left and right, all other parameters unchanged (you can distribute uneven left and right margins with the Mirrored option), there is no need to create different page styles. This is necessary only when “base geometric dimensions” are “incompatible” between left and right. You unlink headers (and footers the same) by unticking the Same contents on left and right pages in the Header tab (resp. Footer). This simplifies a bit your work.
Also your “Important addition” above suggests your headings are literal “quotations” of other contents, making mandatory the creation of individual styles per chapter.
If your chapter headings are correctly styled with Heading n, heading text is captured in fields. Then inserting this field in a header will automatically copy the current heading for the selected level. This results in a single-fits-all-chapters page style instead of one (or two or three) styles per chapter.
As I already mentioned, your full-page illustrations with their own page style break the logical sequence first-left-right-left-… and requires a separate page style for the first page of a chapter. All in all, you only need two page styles for all your chapters: one generic first page and one “dynamic” (thanks to fields) running pages.
Hi Ajlittoz,
Thank you very much for your comment about fields.
There are two problems for me.
(1) Although I think I created a Chapter Field I couldn’t use it.
(2) More importantly, I couldn’t get the Right Header to change with the change of Chapter.
Following a mock-up has proved very helpful previously. I’ve now created a little mock-up of a book entitle DUCK, GEESE AND HENS.
If you had the time, I would be MOST grateful if you could amend it so that the Right Header changes from DUCKS to GEESE. I could then update my IMPORTANT ADDITION TO SUMMARY Comment.
Book Ducks, Geese and Hens.odt (11.1 KB)
Your main problem is a psychological lock. You still think mechanical type writer way: you have raw text and you decorate it afterwards. Writer is several steps beyond this approach. It emphasises text categorisation into “significance buckets”. When you start to write your book, you think of it as a main title (representing the global “container”) as a roof for several stories, themselves consisting of a sub-title, chapters and text.
Do the same with Writer. The “significance buckets” are implemented as styles with a more or less large extent. For text, these are paragraph styles and character styles (for words or sequences of words when the importance/significance is different from the paragraph). Style your paragraphs or words, even if the style does not initially translate your opinion about the look. The important task is to mark up the text with styles.
The title of your book is “tagged” with Title; your story intra-titles with Heading 1 (because we want an outline hierarchy); your chapter headings with Heading 2; your main text or discourse with Body Text.
As already mentioned, never (biblically repeat ×7 times) use Default Paragraph Style for anything specific in your document. This may be a bad habit imported from Word where “Standard” has the role of Body Text . Default Paragraph Style has a different role in Writer to quickly reconfigure the look of the book. It is always used implicitly behind the scene; don’t disturb it until you have understood how to benefit from it.
Also, don’t vertically space with empty paragraphs. Since you think these empty paragraphs are not important per se, usually they have a variety of styles applied to them. When the styles are tuned for look, the empty paragraphs suddenly start to behave inconsistently in appearance. This is only because they are all different. Also, since they are paragraphs, albeit without contents, they will also be handled for spacing above and below. Writer never suppresses anything you typed. Thus, these empty paragraphs need paper space and will cause empty pages to appear unexpectedly.
Vertical space above and below is also an intrinsic property of paragraph significance. This spacing is much better configured as a parameter of paragraph style (e.g. chapter heading always occurs at the beginning of a page preceding by some white space and followed by a double or triple line spacing).
This is what I did in your corrected sample Book Ducks, Geese and Hens-ajl.odt (13.5 KB).
Tuning the appearance of your book can be done once it is completely written if the text is fully styling with direct formatting reserved for “exceptions”, mainly in my opinion special page breaks or list numbering restart. Any “wrong” direct formatting will play nasty tricks on your back (100% probability and I have a long experience about it).
“Full semantic styling” allows you to change the look from a boring academic paper to a fancy children fairy without having to care for text, spacing or anything else (once again from experience). This is compatible with job separation between author and graphics artist, providing the latter handles styles only with no temptation to act upon the text.
Hi Ajlittoz,
Thank you SO MUCH for your explanation and correction of my mock-up. It will take me a little while to follow what you have done.
In the meanwhile I’ve put a note at the end of my IMPORTANT ADDITION comment telling readers to see your comment. I didn’t delete it as you refer to it.
Hi Ajlittoz,
The Heading 1 and Heading 2 aspect of your correction of my mock-up is very helpful.
BUT your Chapter Field in the Right page Header is a mystery to me! I can see it is a Chapter Field by clicking on View and putting a tick against ‘Field Names’.
With the curser in the Right Page Header, I’ve gone to Insert > Field > More Fields, selected Chapter and clicked inserted. This has inserted a Chapter Field BUT I find I cannot enter any text in it. Pressing a character on the grey area deletes it. Even entering the wording and highlighting it first doesn’t help.
I’m totally at a loss! Please can you help YET AGAIN!
Have you tried looking in the help? You might also find the Writer Guide [PDF] a useful resource.
Fields are one form of cross-references. In a cross-reference or field, information is created in a “source”. This source can be a sequence in the text itself or defined “externally” as, e.g. in Tools>Properties. This information is inserted at the location of “usage” with a tool called a field. Basically a field occurrence is a placeholder which will be replaced by the designated data. It is not a real replacement because the field remains in place, which allows the “usage” to be refreshed automatically when the “source” is updated.
Therefore typing over a field deletes the “placeholder” with what you typed and the cross-reference function is no longer available.
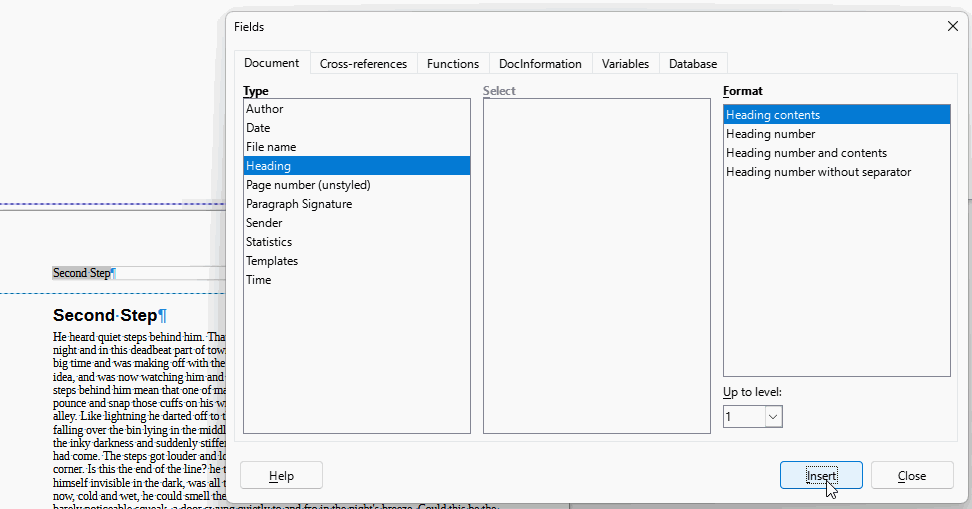
The chapter field, as you call it, is available through Insert>Field>More Fields, Document tab. Its Type is Heading. You can insert heading text only, its number only or both.
The “source” for heading data is any paragraph attached to an outline level. This is most easily done by styling your headings with one of Heading n but the feature is more powerful than just that and provides very sophisticated possibilities.
And as @robleyd recommends, read at least the Writer Guide to grasp the basics, then practice one scratch documents. Writer is a very powerful program. You can’t go by without minimal knowledge of its features. Mastering the fantastic possibilities requires some personal involvement in understanding the founding principles (mainly styles). Mastering it comes with practice.
Following your instructions I have now been able to insert a Heading Field in a Page Header.
BUT I cannot get different Headings for different Chapters. I can CHANGE the contents, but the same Right Heading appears in both Chapters. I can get ‘DUCKS’ for both Chapters or ‘GEESE’ for both Chapters, but not DUCKS for one and GEESE for the other.
I’m almost there, but not quite!!!
Please let me know what I should do to get different Chapter names. I am in suspense!
As I stated it several times, the key is to make Writer aware about your chapters and other subdivisions. Style your story title and chapter heading paragraphs with Heading 1 and Heading 2 respectively.
If you still get the same header in your chapters, something went wrong, either with Heading 2 or you added a direct formatting which removed the assignment to outline level 2. Direct formatting is the start of evil; avoid it and rely on styles (pure styles without DF overload!).
Hi Ajlittoz and EarnestAI.
Thank you both VERY MUCH for your help - and patience. At last I’ve managed to enter the Fields!
Here is my Summary. If any amendments are necessary please let me know.
If it is OK I will include it as an Answer.
S U M M A R Y - C O N T I N U A T I O N - (2024-01-25)
INSERT FIELDS INTO LEFT AND RIGHT BOOK HEADERS
LEFT HEADER
This will be the Title of the book
Put curser in left Header
File > Properties > Description
Insert your book Title.
RIGHT HEADER
First you have to create Headings to be used for the Fields.
Heading 1 will be used for Level 1
Heading 2 will be used for Level 2
Heading 3 will be used for Level 3
This example is for a book with a Book Title, Sections, and Chapters within the Sections.
In this case the Section Name will appear in the Right Header.
(1) HEADING
On the first Section Page enter the Section Name.
Select the Section Name
Click Styles on top menu
Click Heading 1
The Section Name will have taken on the default appearance of Heading 1.
(2) FIELD
To insert the Section Name Field in the Right Header
Put curser in Right Header
Insert > Field > More Fields
Document Tab > Type > Chapter
Document Tab > Format > Chapter Name
Document Tab > LEVEL 1
Follow the same procedure for other ‘Chapter’ headings, which will be at different Levels.
(3) APPEARANCE
To Modify the appearance of the book Title
Styles > Manage Styles > Paragraph Style (click first icon on left)
Click the + sign of +Headings to open up Headings options
The Title is one of these Heading options
To Modify the appearance of the Section Name
The same process as for modifying the book Title.
Direct Formatting, which means putting the curser in the Header itself, should be avoided and is NOT advisable. It spoils consistent structuring.
Space Under
To insert Space under a Header
Styles > Manage Styles > Page Style (4th icon from left)
Right click on Page Style containing the relevant Header
Select Modify > Header Tab > Spacing
LINKS
Correction of my (April’s) mock-up by Ajlittoz
This is what I (Ajlittoz) did in your corrected sample Book Ducks, Geese and Hens-ajl.odt (13.5 KB).
LINKS from Robleyd
Have you tried looking in the help 1? You might also find the Writer Guide 1 [PDF] a useful resource.
That will work bu is not “good practice”. Whatever you apply with menu Format leads you to direct formatting which sooner or later causes issues when you try to tune your formatting. It is much much better to apply a character style over the one defined in the character style. If you want to modify the whole header appearance, modify first the character style. Remember: the fewer applications (either with styles and, most important, with direct formatting, to be used as a last resort when it is really impossible to handle the goal with styles), the better (reliability, predictability, stability, ease of application, performance, …).
There are two ways to manage it.
- for single line header: modify the spacing parameters in Header paragraph style
Indents & Spacingtab. - for more sophisticated headers: open the page style configuration dialog and go to
Headertab
Parameter Spacing is the distance below the bottom limit of the last paragraph in the header and the top limit of the first paragraph in the text. I use here word “limit” to emphasise that these boundaries include the spacing below and above of said parameters. Consequently, the effective distance between “lines” is larger than Spacing alone because you add header spacing below and text spacing above.
Don’t go into too many details. Users are supposed to have read the Writer Guide or at least built-in help. Haven’t you  ? AskLO is not a substitute for guides and tutorials. It helps solve pinpoint problems but the whole training is rather a personal effort. In addition, the site is not structured methodically by clearly identified topics, making difficult to query for an existing solution.
Hi Ajlittoz,
(1) Comment about modifying Header appearance.
I myself was surprised that I had no success with changing the appearance via Style.
I did try to change the appearance in Styles > Manage Styles > Paragraph Styles and selected Header but that made no change. I tried changing from lower case to capitals and from black to a colour. The change of colour appeared in the Style panel but made no difference in the Header. Perhaps I was doing something wrong. I have updated the SUMMARY CONTINUATION.
(2) Spacing under Header
Thanks for explaining that spacing under a Header can be applied in the Header Tab of Page Styles. I have updated the SUMMARY CONTINUATION.
(3) LibreOffice Writer Help
I have tried a number of times to use LibreOffice Writer Help, but without success. I could NEVER FIND THE HELP I NEEDED!. I Also tried YouTube. If it wasn’t for you and EarnestAI I could have spent many weeks learning about LibreOffice Writer to find out what I have learnt in 13 days with your kind assistance. I would like other people to have the opportunity of benefitting from what I have learnt. I consider it VERY VALUABLE!.
This means some direct formatting masks the effect of style. I keep on repeating DF is the source of all evil but this is difficult to hear because most people believe DF is “intuitive” and the normal way of handling formatting (curse Word propaganda for that!). DF was only offered for quick’n’dirty formatting of single page write-then-throw-away scratch documents. Writer is a very sophisticated and powerful tool. DF conflicts with its functions until you have understood hwo to use wisely DF.
So, first thing in order to use effectively and efficiently is to accept to forget everything you think you know about text processing. You must accept that founding principles are different and understand them. Then, and only then, you realise that these founding principles result in a very simple consistent structuring mechanism. There are still small discrepancies here and there, but globally you end up with an easy-to-use program implying a user-friendly workflow (I call it “semantic styling”).
Hi Ajlittoz,
I’ve amended my APPEARANCE section further, and have added links to the mock-up I created and you corrected.
I’ve also added links provided by Robleyd.
I’m planning to paste it in as a Suggested Solution.
S U M M A R Y - C O N T I N U A T I O N - (2024-01-26)
INSERTING FIELDS INTO LEFT AND RIGHT BOOK HEADERS
LEFT HEADER
This will be the Title of the book
Put curser in left Header
File > Properties > Description
Insert your book Title.
RIGHT HEADER
First you have to create Headings to be used for the Fields.
Heading 1 will be used for Level 1
Heading 2 will be used for Level 2
Heading 3 will be used for Level 3
This example is for a book with a Book Title, Sections, and Chapters within the Sections.
In this case the Section Name will appear in the Right Header.
(1) HEADING
On the first Section Page enter the Section Name.
Select the Section Name
Click Styles on top menu
Click Heading 1
The Section Name will now have taken on the default appearance of Heading 1.
(2) FIELD
To insert the Section Name Field in the Right Header
Put curser in Right Header
Insert > Field > More Fields
Document Tab > Type > Chapter
Document Tab > Format > Chapter Name
Document Tab > LEVEL 1
Follow the same procedure for other ‘Chapter’ headings, which will be at different Levels.
(3) APPEARANCE
To Modify the appearance of the book Title
Styles > Manage Styles > Paragraph Style (click first icon on left)
Click the + sign of +Headings to open up Headings options
The Title is one of these Heading options
To Modify the appearance of the Section Name
The same process as for modifying the book Title.
Direct Formatting, which means putting the curser in the Header itself, should be avoided and is NOT advisable. It spoils consistent structuring.
Space Under
To insert Space under a Header
Styles > Manage Styles > Page Style (4th icon from left)
Right click on Page Style containing the relevant Header
Select Modify > Header Tab > Spacing
LINKS
Correction of my (April’s) mock-up by Ajlittoz
This is what I did in your corrected sample Book Ducks, Geese and Hens-ajl.odt (13.5 KB).
LINKS from Robleyd
Have you tried looking in the help 1? You might also find the Writer Guide 1 [PDF] a useful resource.
As usual, advices are much better when OP mentions OS name, LO version (full version number with 4 components) and save format. I’ll assume you save .odt.
Headers are one of the properties attached to page styles. One page style can have only one header. Consequently, either you create one page style per chapter, but it soon becomes boring if you have tens of chapters. Or you turn your headers into “dynamic” strings with the help of fields.
The latter solution is generally the preferred one but it requires you follow some discipline. The chapter heading can be captured to be inserted into the header. This is done when you apply Heading n paragraph styles to your headings: Heading 1 for chapter titles, Heading 2 for sub-chapters, etc. There is a dedicated field for each level accessible with Insert>Field>More Fields, Document tab, Heading Type to retrieved the heading with or without the chapter number.
Considering your question, I recommend you read the Writer Guide for basic information about styles and fields. Come back here for more specific help.
EDIT 2024-01-14 (after reading the comments below this answer)
Let me summarise the specification:
- the book contains (3) parts, the heading of which provide right-page headers
- every part is structured in chapters (which start on a new page, I assume from the following requirement)
- chapter start page have no header
- other page headers are book name on left, part name on right
- illustrated pages have no header nor footer
My suggestion is then to record the book title in File>Properties, Description tab, Title:. The title can be inserted anywhere appropriate, e.g. in the First Page cover page with Insert>Field>Title and then paragraph-styled Title.
Changing the title in the properties automatically updates all the usages in the document.
Story titles are entered in a page of their own (page style to be defined) in a Heading 1 paragraph. Customise Heading 1 for ample spacing above paragraph, font parameters, centre alignment, automatic page break “before” with switch to your page style.
Using Heading 1 captures the story title in a field.
Your chapters start with a Heading 2 paragraph (chapter title/heading). Customise Heading 2 as usual for the required look and in Text Flow force a page break “before” to Default Page Style.
I use Default Page Style as the target page style but if you prefer any else, it is up to you.
Default Page Style Header tab is configured as:
- tick Header on to enable headers
- untick Same content on first page
This “detaches” the first page from the other headers and will allow you to have an empty header. - untick Same content on left and right pages
This makes left and right headers independent from each other.
Create a chapter, eventually with dummy text so that you have at least 3 pages. This assumes you already have a story name otherwise you’ll see disturbing things (though everything will settle down once you have a story name; it is important to respect the hierarchy Heading 1, Heading 2 to ensure there is data at each level).
- make sure your header is empty on first chapter page
- in left header,
Insert>Field>Title - in right header, type two Tab (to right align the header) and
Insert>Field>More Fields,Documenttab, Heading Type, Heading contents Format (level should be 1, check)
Regarding pages with pictures, they require a dedicated page style. However, your specification is incomplete. If the images are frontispieces, i.e. a picture preceding a chapter start, usually a left page facing chapter start on right, insertion of this page can be automated. Of course, you can leave it empty if you have no image.
Otherwise, full-page images are quite hard to insert automatically. What I mean here is the “natural” page breaks in your book are not predictable (from an author’s point of view). The location where they happen depends on the edits and text updates. Full-page insertions require manual anchor positioning and you must change manually this position after an update (or at least check that changes didn’t move “too much” the anchor, creating nearly empty pages).
Hi Ajlittoz,
Thank you very much for your help. I didn’t manage to work out the ‘preferred’ solution, but on the way found out how to create the one page style per chapter method. I will copy my notes below.
HEADERS FOR BOOKS: One page style per chapter method
(in LibreOffice 4.1.8)
For the right hand header
(1) Styles
(2) Manage Styles
(3) Page Style (click 4th icon from left on top menu)
(4) Right click on blank space in the box
(5) New (style)
(6) The Page Style box opens up under the Organiser tab.
Give the style a name (e.g. The Road to Concord)
(7) It is important to fill in Next Style line below, which will be the left hand header
when you’ve created it
(8) Still in Page Style, click the Page tab and under Layout Settings and choose Mirror
(9) Still in Page Style, click on the Header tab and click in Header On box.
You can make the left hand header in the same way as above, but for a book it will be the same throughout (e.g. The Silk Roads). Always remember to fill in the Next Style line in the Organiser section, which will be the chapter name (e.g. The Road to Concord or The Road to heaven)
You could choose Left Page which is already a style option, right click on it and Modify it. Modifying involves filling in the Next Style box in the Organiser section, changing Page style to Mirror, and having the Header box ticked under the Header tab.
Once you have created the right and left pages you can enter the appropriate text for the left and right headings in the actual document headers. Once they have been entered they repeat until a different chapter heading is required.
Of course the margins for books will be greater on the inside than on the outside. Adjustments can be made in Page Style under the Page tab.
ADDITIONAL INFO
No Header Pages
No Header or Footer Pages
At the beginning of chapter you will not want any header at all. For pictures you will not want headers or footers.
Create New page styles by right clicking in the blank space as in (4) above.
You can call it Right Page No Header, Blank Top & Bottom etc.
Make changes on the Organisation tab, Page tab, Header and Footer tab as necessary.
You will have to insert Manual pages breaks in some situations. Insert them as often as you can.
There is a much simpler way if all you want is different left/right header. This makes only one page style per chapter instead of two.
And if your header(s) can be retrieved from chapter information/book information, then you end up with only one page style for all chapters.
I am busy right now, so have no time to explain. But if you’re still interested when I am back, I can explain the procedure.